

I haven't been on the forum much lately ... I bought a '55 MGTF-1500 that is taking up space, time, and money that is(was) used by my woodworking shop. The car has a wood frame beneith the body panels, so I guess it counts as woodworking.
Thanks for resurrecting my No-Measure alignment thread. I see that it has lost some of the attachments. So I reposted it below.
Note - there are a lot of good ways to adjust a BT3K or any other table saw. This is the one that I found is best for me. Any method that achieves the intended result is just as good.
I set my rip fence to be parallel to the blade. I rip on both sides of the fence (bevels, size of workstock, etc.), so a setting that will allow extra space on the outfeed of one side of the fence could bind the stock on the other side of the fence. The No-Measure tool is easy for me to use for initial setting plus is a fast way to check that the fence is still in alignment.
TIP: When you determine which direction the rip fence needs to move to get into alignment, and before you loosen the adjusting bolts ...
Lock the rip fence and clamp the front "T" of the rip fence to the front rail. Then slip a piece of typing paper under the rail and tape it to the table. Mark two lines on the paper using the rip fence as a straight edge. Loosen the locking handle (The "T" will continue to be held in position by the clamps). Now you will be able to easily tell how much you move the fence before tightening the adjusting bolts. Otherwise, the process is like herding cats, there are too many parts that can move.
The miter fence and sliding miter table are the most important settings on the saw. If they are not spot-on, then you will never be able to make square corners on your workpiece. I feel that the No-Measure adjusting tool for adusting the SMT and the 5-cut method for adjusting the miter fence produce the most accurate results.
Here is a repost of my No-Measure Alignment Method:
+++++++++
Some of you have asked for my �No-Measure� method of aligning the BT3K. Links to the posts on the Ryobi forum and on BT3 Central are broken. This is a modified copy of my original post.
"Everyone has his favorite way of tuning up the BT3.
I've been using this method of aligning the rip fence and SMT on my BT3000 for years. I recognized from the first that the saw could not be tuned up accurately using a bent framing square and a grease pencil. I believe this is about the most accurate way to align the BT3x00. And it's a fast way to double-check alignment before starting a project."
- Lonnie
===
ALIGNMENT GAUGE
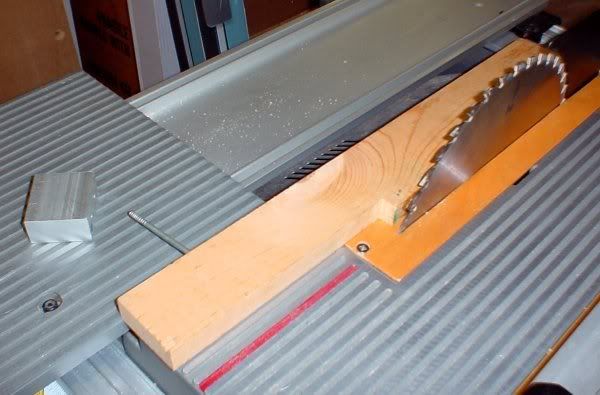
Make a simple alignment gauge out of 1-by stock, a nail, and two common magnets (not rare earth mags - too strong). Measurements and materials do not need to be exact. Make it wider if you have miter slots installed.

A .pdf diagram is attached to this post.
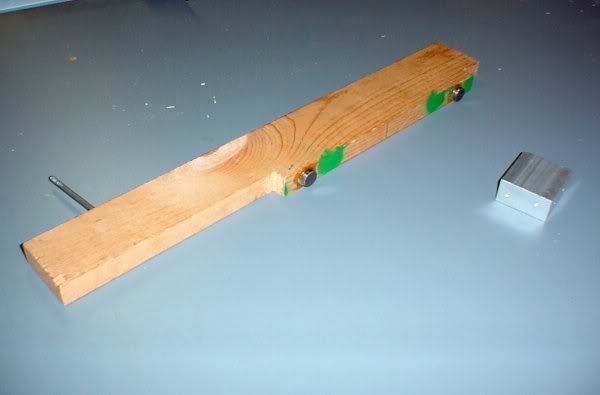
This is the alignment gauge I made in 1996 when I bought the saw. It's banged up and splattered with paint, but it works, so I have no reason to make a new "pretty" one.
Set the blade to 90 degrees before adjusting the SMT and rip fence.
FIND THE HIGH SPOT ON THE BLADE
You can reduce error caused by wobble/run-out in the blade by placing the nail point of the alignment gauge against the side of the blade and rotating the blade slowly by hand to find the high and low spots. Mark them.
Rotate the blade so the high point is at the top when you use the alignment gauge. Then rotate the blade so the high point is at the bottom and check alignment again. Use the average if necessary.
Rotate the blade so the high point is at the front or rear when you adjust the blade to 90deg or 45deg to the table.
ADJUST THE BLADE TO 90 DEGREES AND 45 DEGREES
Raise the blade up almost all the way. Rotate it so the high spot is toward the front or the back of the table.
Lay a drafting triangle on the saw table with the 90-degree corner and one edge against the rip fence. Stand another triangle up vertically with one edge against the first triangle and another edge against the blade. This will insure the vertical triangle is perpendicular to the blade.
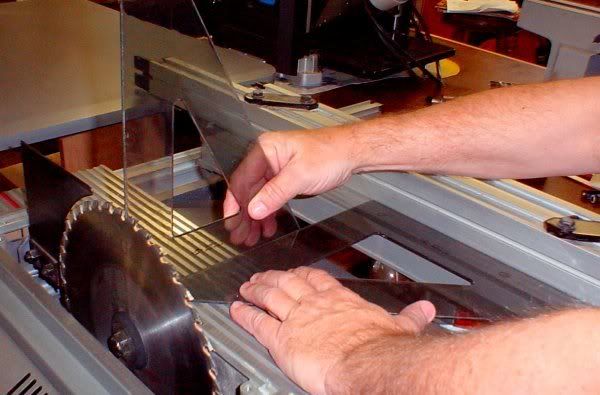
Check for gaps at the blade and adjust the blade stops and indicator as needed. You may need to remark the 45 degree line when the 0 degree mark is true, or vice versa.
Use the same blade position (high spot toward front or rear of table) if you use a machinists square to set the 90deg and 45deg stops.
RIP FENCE ALIGNMENT
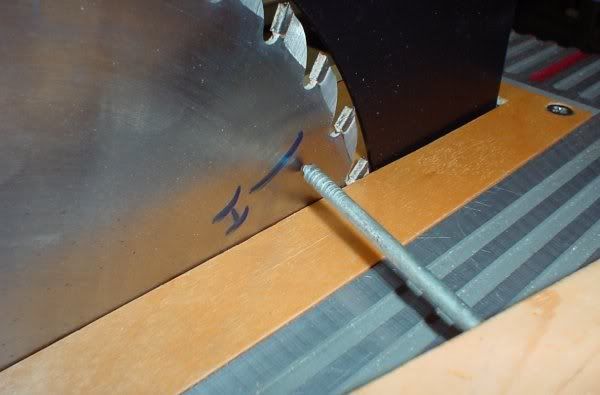
Raise the blade up almost all the way. Rotate the blade so the high point is at the top. Lay the alignment gauge on the table with the magnets against the right side of the blade. Move the fence very near the nail and lock it.

Flip the board so the nail is near the other end of the fence. The gap should be equal. Adjust the fence as needed.
The extended arm of the gauge magnifies the alignment over two times. An error of 1/64" at the tip of the nail is actually less than 1/128" at the blade.
You can use a feeler gauge to get the fence aligned perfectly. Before you get close enough to use the feeler gauge, press the nail into the fence so one of the magnets releases from the blade. It will sound like a code key. You can tell by the feel and the sound when you are close to alignment.
SMT BASE ALIGNMENT
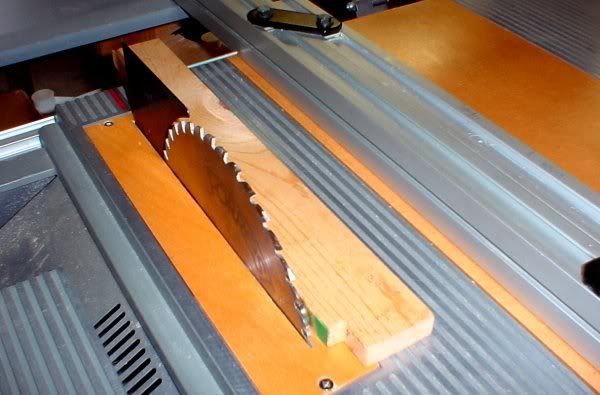
Raise the blade up almost all the way. Rotate the blade so the high point is at the top. Lay the alignment gauge on the saw table with the magnets against the left side of the blade.
Place an object that has a vertical corner and weighs 3 or 4 oz. on the SMT. I use an aluminum cube about 2" X 2" X 1". For this discussion, I'll call the object a "cube." Set the cube about 4" from the outfeed edge of the SMT and positioned diagonally so a vertical corner points toward the blade. Move the SMT so that the vertical corner brushes against the nail on the alignment gauge. The corner of the cube will now be exactly in line with the tip of the nail.
Flip the alignment gauge and slide the SMT and cube the other direction past the nail. The gap at this end should be equal to the gap at the other end. Adjust the SMT Base as needed.
(Although it looks like it is, the alignment gauge is not resting on the SMT.)
SLIDING MITER TABLE AND MITER FENCE ALIGNMENT
I have revised my original method of setting the miter fence to 0-deg (90deg to the blade). The �Five-Cut� method that Phil Bumbalough describes on his �Bench Mark� web site is perfect. Here is the link �
http://benchmark.20m.com/tools/BT310...XcutFence.html
Make large adjustments by repositioning the SMT on the SMT Base. Fine tune to 0-deg with the cam on the quick stop, as Phil describes.
Note: If the link to Phil's site is broken, then Google "Five Cut Method." It is a common way to square the miter fence.
===
The whole process takes forever to describe, but only a couple of minutes to execute.
Let�s hope that we can keep our BT3K�s running true for a long time.
- Lonnie
+++++++++
 LCHIEN
 twistsol
 ]). Remove blade and spacers.
Thank you for your repost!