Good low-cost router table fence?

Collapse
This topic is closed.
X
X
 
  • Time
  • Show
Clear All
new posts
  • BigguyZ
    Veteran Member
    • Jul 2006
    • 1818
    • Minneapolis, MN
    • Craftsman, older type w/ cast iron top

    #1

    Good low-cost router table fence?

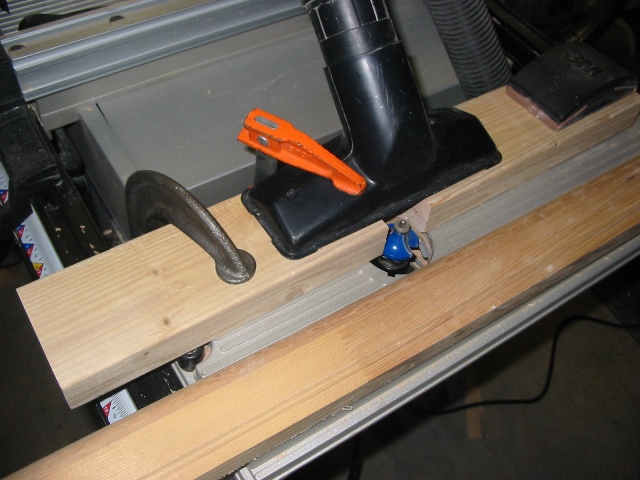
    I eventually want to build a complete router table with a nice top and a nice fence. However, I have the need to something reliable to get me by at a low cost. I tried the board with a notch and two clamps thing, and it's just not working to get things aligned and set reliably.

    Any reccomendations? Rockler had their old fences on clearance, but it would seem that I missed out on that one.

    Thanks
  • Black wallnut
    cycling to health
    • Jan 2003
    • 4715
    • Ellensburg, Wa, USA.
    • BT3k 1999

    #2
    What exactly seems to be the problem with a board and two clamps? With bearing guided bits all you need to do is use a straight edge to line up the bearing with the fence and you should be good to go. Make sure you turn the cutter by hand so that the cutting edge is farthest from the fence when you measure.
    Donate to my Tour de Cure


    marK in WA and Ryobi Fanatic Association State President ©

    Head servant of the forum

    ©

    Comment

    • BigguyZ
      Veteran Member
      • Jul 2006
      • 1818
      • Minneapolis, MN
      • Craftsman, older type w/ cast iron top

      #3
      I would like to be able to do a few plunge cuts, which I would imagine would be hard to do with a short fence of 1x4...

      Comment

      • dbhost
        Slow and steady
        • Apr 2008
        • 9508
        • League City, Texas
        • Ryobi BT3100

        #4
        What are you using for a router table?

        The BT3x00 router / accessory table leaves quite a lot to be desired, but it CAN be a functional system, and it certainly saves shop floor space which, if you are like most of us, is worth more than tons of gold...

        I saw the Rockler clearance deal, and am ticked that I missed it too... Then again...

        Assuming you have a fairly standard table, not the BT table, you will need the following...

        #1 Aluminum Router Fence main piece. The L bracket part. You CAN fab this from wood, but aluminum ones are readily available and DON'T require you have a router table set up to get working... Peachtree has them pre drilled for around $24.00...
        #2 MDF, or MUCH better, melamine fence material. I personally would start with 1" mealmine if you can find it, or do a laminate of 2 1/2" pieces. 16" x 6" (I like tall fences). Might be best to start with 33" x 6" and cut to final length after the dado cuts have been made...
        #3 T-track, T bolts, and through star knobs... The Rockler 17 piece set for $19.99 seems to be the best bargain at this time... You will need 2 pieces of T track, but 1 Rockler kit has enough bolts, knobs etc...
        #4 Table saw and dado stack...
        #5 Hacksaw (and the skill to cut a straight line in Aluminum with a hacksaw).
        #6 Rat Tail File.
        #7 Screwdriver and flat head wood screws. #8 x 1/2" I think...
        #8 Good multi material glue like Gorilla glue.

        Set your dado stack to run the middle of a 3/4" dado at the distance from the L to the middle of the hole for the bolts that holds the fence onto the frame. This is the back. This is usually around 1.25" I think... The Dado should be 3/4" wide x 3/8" deep, but measure your T track to make sure...

        Next set your dado to cut the same width and depth slot but at 2.5" or so high.

        If you need to, cut to final length now.

        From your T tracks, now cut 4 16" long pieces, and deburr them with a fine rat tail file.

        Set your glue in the dadoes per glue MFGs direction, set T tracks in place, and run screws in. Wipe off any squeeze out glue as quickly as possible.

        Once the glue has set, your fence is now complete. Assemble T bolts into rear T slot, and install fence halves onto aluminum L bracket, install fence onto router table, live a happy, productive woodworking life...
        Please like and subscribe to my YouTube channel. Please check out and subscribe to my Workshop Blog.

        Comment

        • BigguyZ
          Veteran Member
          • Jul 2006
          • 1818
          • Minneapolis, MN
          • Craftsman, older type w/ cast iron top

          #5
          I'm really looking for a completed ready-to-use solution right now. I'm working 80 hour weeks and just need it to help me finish up a late Christmas gift. Though when I'm done, I'm definitely building something along the lines of what you describe...

          Originally posted by dbhost
          What are you using for a router table?

          The BT3x00 router / accessory table leaves quite a lot to be desired, but it CAN be a functional system, and it certainly saves shop floor space which, if you are like most of us, is worth more than tons of gold...

          I saw the Rockler clearance deal, and am ticked that I missed it too... Then again...

          Assuming you have a fairly standard table, not the BT table, you will need the following...

          #1 Aluminum Router Fence main piece. The L bracket part. You CAN fab this from wood, but aluminum ones are readily available and DON'T require you have a router table set up to get working... Peachtree has them pre drilled for around $24.00...
          #2 MDF, or MUCH better, melamine fence material. I personally would start with 1" mealmine if you can find it, or do a laminate of 2 1/2" pieces. 16" x 6" (I like tall fences). Might be best to start with 33" x 6" and cut to final length after the dado cuts have been made...
          #3 T-track, T bolts, and through star knobs... The Rockler 17 piece set for $19.99 seems to be the best bargain at this time... You will need 2 pieces of T track, but 1 Rockler kit has enough bolts, knobs etc...
          #4 Table saw and dado stack...
          #5 Hacksaw (and the skill to cut a straight line in Aluminum with a hacksaw).
          #6 Rat Tail File.
          #7 Screwdriver and flat head wood screws. #8 x 1/2" I think...
          #8 Good multi material glue like Gorilla glue.

          Set your dado stack to run the middle of a 3/4" dado at the distance from the L to the middle of the hole for the bolts that holds the fence onto the frame. This is the back. This is usually around 1.25" I think... The Dado should be 3/4" wide x 3/8" deep, but measure your T track to make sure...

          Next set your dado to cut the same width and depth slot but at 2.5" or so high.

          If you need to, cut to final length now.

          From your T tracks, now cut 4 16" long pieces, and deburr them with a fine rat tail file.

          Set your glue in the dadoes per glue MFGs direction, set T tracks in place, and run screws in. Wipe off any squeeze out glue as quickly as possible.

          Once the glue has set, your fence is now complete. Assemble T bolts into rear T slot, and install fence halves onto aluminum L bracket, install fence onto router table, live a happy, productive woodworking life...

          Comment

          • radhak
            Veteran Member
            • Apr 2006
            • 3061
            • Miramar, FL
            • Right Tilt 3HP Unisaw

            #6
            I always fancied this one


            called the Rockler Deluxe Fence. But regular price $125 is rather steep.

            This one looks neat -
            ,

            at woodpeck for $90.

            But it's either good and cheap (ie, shop-made), or good and easy (ie, store bought hence not cheap). You can't have both...


            edit - sorry, forgot you already mentioned rockler.
            It is the mark of an educated mind to be able to entertain a thought without accepting it.
            - Aristotle

            Comment

            • dbhost
              Slow and steady
              • Apr 2008
              • 9508
              • League City, Texas
              • Ryobi BT3100

              #7
              Well, for future reference. To shop build your own, you will want the following or something similar.


              source: http://www.ptreeusa.com/routertableFence.htm

              Peachtree Item #1098 32" Pre-Drilled and Slotted Router Table Fence with fence opening. I was wrong on the price, it's $29.99.


              source: http://www.rockler.com/product.cfm?p...lter=T%20track

              2 @ Rockler 17-Piece Universal T-Track Kit. Honestly, The sale price for the entire kit is what other vendors get for just the track, OR the T bolts and star knobs. It is a bargain comparatively speaking. If I knew of a T slot cutter that would accept standard 5/16" bolts instead of T bolts I would say buy that and go to Peachtree for 5/16-18 star knobs... The T track kits are currently $19.99


              source: http://www.rockler.com/product.cfm?p...router%20table

              The Rockler 4-Piece Router Accessory Kit - New. I have the original one. This retails for $29.99

              And of course 1" Melamine. My local Lowes has it in 2' x 4' project sheets for about $10.00. If you are willing to laminate two pieces. Half inch Melamine shelves go all day long in 10' x 18" sections for $6.00...

              I just noticed, you will have to drill the Peachtree fence frame for the dust port. No big deal though...

              The big $130.00 Rockler fence is a real nice, tall fence for sure, but might just be out of your price range... Of course DIY with the various manufactured parts might just hurt too... Can anyone suggest a T slot cutter router bit that would accept the bolt head from a standard 5/16, or even a 3/8" bolt?
              Please like and subscribe to my YouTube channel. Please check out and subscribe to my Workshop Blog.

              Comment

              • shoottx
                Veteran Member
                • May 2008
                • 1240
                • Plano, Texas
                • BT3000

                #8
                For very simple go to the BORG and pick up a piece of Aluminum Angle.
                Often in error - Never in doubt

                Mike

                Comment

                • sscherin
                  Senior Member
                  • Dec 2003
                  • 772
                  • Kennewick, WA, USA.

                  #9
                  Honestly this is how I did it.. Notched 2x4 with dust collector and hammer tap micro adjustment..

                  William's Law--
                  There is no mechanical problem so difficult that it
                  cannot be solved by brute strength and ignorance.

                  Comment

                  • Black wallnut
                    cycling to health
                    • Jan 2003
                    • 4715
                    • Ellensburg, Wa, USA.
                    • BT3k 1999

                    #10
                    Originally posted by BigguyZ
                    I would like to be able to do a few plunge cuts, which I would imagine would be hard to do with a short fence of 1x4...
                    Don't take this the wrong way but IMHO your problem is one of technique rather than fence selection. AFAICS there will be no difference in set up between a fence made from a jointed bord with a relief notch for the bit and a store bought fence costing upwards of a couple of hundred dollars. There are some fences like Jointech and Incra that the user actually dials in but by and large most fences just reference off the cutting edge of the bit and are adjusted manually.

                    To make the plunge cuts for the hinge you are asking about in the other thread you will need either a stop block or just a start and stop line on the face of your fence that is visable the whole time you are plunging. Carefully measure your bit setting for distance by either the gap between the fence and the trailing edge of the bit or the leading edge and the fence but not both. It appears to me that the hinge you chose to use should be centered on the side and back of the box. So reference by the second method. One way to do this if your bit had a marked center is by staning the box up behind the bit exposing the side and eyeball the center of the bit in the center of where you want your mortise. If I was at home I'd do a short pic turtorial to 'splain this. Anyway then set your fence and leave it until you have done both hinges.
                    Next step is to take a piece of scrap exactly equal in thick ness to the back of the box and run it over the bit. Mark the side away from the fence with a big X. After this pass turn the scrap 90° clockwise so that it is over the bit and the X is facing away from you. Draw a line on the fence that meets the X side vertically on your fence but higher than your box. If your fence is lower than the box is tall just mark on the top of the fence. This line will be your start line that you line up the rear corner of the box with when you start the plunge. Set all this aside and take your hinge laying one end on the line and affix a stop block to the fence for the end of your cut. Keep in mind the more care you take in set up the better your results will be.

                    Now if your fence is long enough you could also affix a start block to the fence to assist in starting the plunge. Do thos with the bit lowered by lining up the back of the box with your start line and using the box as a guage to set the start block.

                    Hope this helps ya.
                    Donate to my Tour de Cure


                    marK in WA and Ryobi Fanatic Association State President ©

                    Head servant of the forum

                    ©

                    Comment

                    • LCHIEN
                      Super Moderator
                      • Dec 2002
                      • 21995
                      • Katy, TX, USA.
                      • BT3000 vintage 1999

                      #11
                      Most of the time I use a hardwood 1" x 3", jointed and cut to about an inch over the width of my router table. I cut a router bit recess hole about 1- 1.25" diameter and arranged it to breakout the side of the fence by about 1/2". I widened the Gap some where the bit entered, making it a bit over 3/4" wide and rounding off the sharp points so items sliding by won't get caught. And then I drilled a 1/2" hole near the end so I can hang it on a nail on the leg of my woodpecker table.

                      A couple of quickgrips lock it in place. For stop blocks I don't need any fancy t-tracks in the fence, I just use some scrap wood 1x2s I slide along the fence and clamp to the edge of the table. The end of the 1x2's stop the wood item.

                      I have an incra fence but 98% of the time I just use this one, its fast and easy.
                      Need a higher fence? Just get a bigger piece of wood or stand the 1x3 on edge.
                      Plunge? I do it with this fence, no problem.
                      DC? Maybe your storeboughten fence does a bit better job with stuff hanging all over it.
                      Cheap? can't beat it.
                      Alignment, microadjust? easy, just loosen one end clamp, tap lightly with a hand, mallet or other tool. Retighten clamp.

                      Always liked the simplicty of the router workshop guys.

                      I'm in agreement with Blackwalnut:
                      Originally posted by BW
                      Don't take this the wrong way but IMHO your problem is one of technique rather than fence selection. AFAICS there will be no difference in set up between a fence made from a jointed bord with a relief notch for the bit and a store bought fence costing upwards of a couple of hundred dollars. There are some fences like Jointech and Incra that the user actually dials in but by and large most fences just reference off the cutting edge of the bit and are adjusted manually.
                      Last edited by LCHIEN; 01-08-2009, 12:13 PM.
                      Loring in Katy, TX USA
                      If your only tool is a hammer, you tend to treat all problems as if they were nails.
                      BT3 FAQ - https://www.sawdustzone.org/forum/di...sked-questions

                      Comment

                      • dbhost
                        Slow and steady
                        • Apr 2008
                        • 9508
                        • League City, Texas
                        • Ryobi BT3100

                        #12
                        Originally posted by sscherin
                        Honestly this is how I did it.. Notched 2x4 with dust collector and hammer tap micro adjustment..

                        Simple? Yep...

                        Cheap? Probably has the stuff to do this in the shop...

                        I think we have a winner!
                        Please like and subscribe to my YouTube channel. Please check out and subscribe to my Workshop Blog.

                        Comment

                        • Hoover
                          Veteran Member
                          • Mar 2003
                          • 1273
                          • USA.

                          #13
                          Agreed, you don't need anything fancy for a router table fence. SScherin's set up should be just fine. Cheap and quick, you can get a lot done this way. I have an older fence from Woodpecker's, and it isn't any better than the above set up.
                          No good deed goes unpunished

                          Comment

                          • Lonnie in Orlando
                            Senior Member
                            • May 2003
                            • 649
                            • Orlando, FL, USA.
                            • BT3000

                            #14
                            sscherin:

                            That shop-vac dust pick up is too neat. Can't beat the price!

                            BTW. I clamp my fence on the other side of the bit. I have an MDF insert between the saw table and the accessory table that gives more support to a large workpiece.

                            I hot glued some scraps under the table so the clamps don't dimple it.

                            And yes, I use the hammer micro-adjustment, too.

                            - Lonnie
                            OLD STUFF ... houses, furniture, cars, wine ... I love it all

                            Comment

                            • dkerfoot
                              Veteran Member
                              • Mar 2004
                              • 1094
                              • Holland, Michigan
                              • Craftsman 21829

                              #15
                              Early on I wasted money on a really nice router table that I rarely use except to gather junk. If I have a big project I'll make use of it, but simpler is usually better.

                              Most often I use a spare accessory table I bought for my 21829. I use the brackets from the Ryobi two piece fence, but mount them to a piece of ply or mdf. I attach to the rip fence and I have a sacrificial fence.

                              If I didn't have those brackets already, I'd probably go with the slotted 2by method shown.

                              .
                              Doug Kerfoot
                              "Sacrificial fence? Aren't they all?"

                              Smaller, Smarter Hardware Keyloggers
                              "BT310" coupon code = 10% for forum members
                              KeyLlama.com

                              Comment

                              Working...