First Project I've Shown Here

Collapse
This topic is closed.
X
X
 
  • Time
  • Show
Clear All
new posts
  • lombard
    Forum Newbie
    • Feb 2004
    • 35
    • Merritt Island, FL

    First Project I've Shown Here

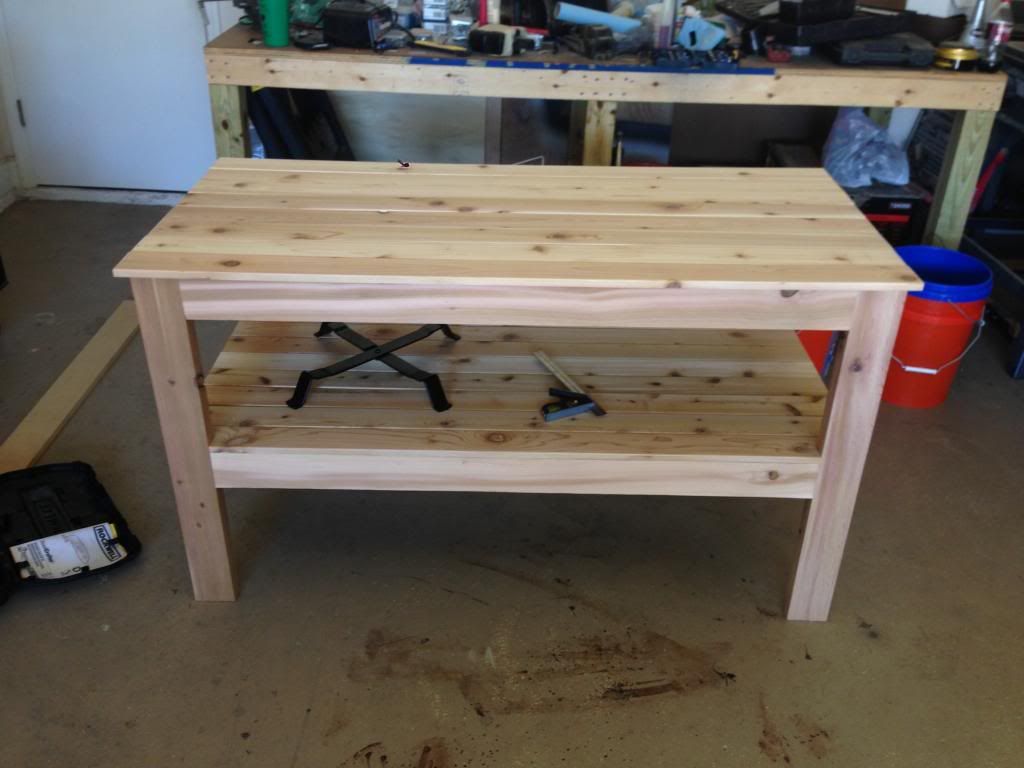
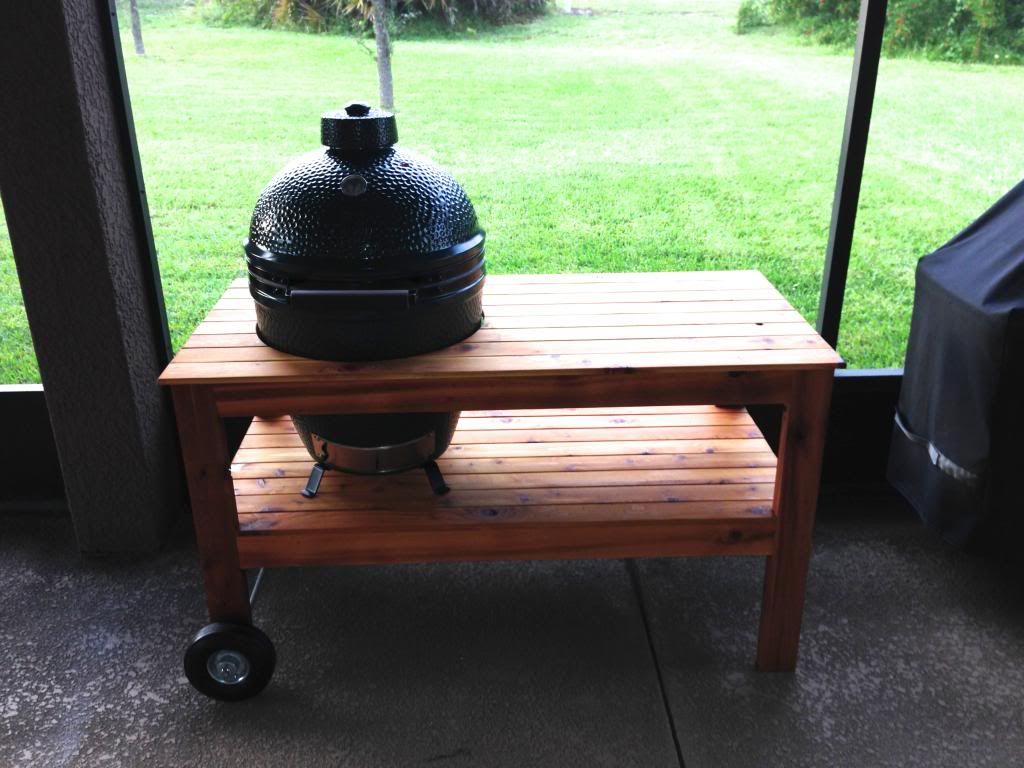
    So, this one's nothing major. Couple (several) weekends worth of work. Tons of pocket holes and lots of glue. Made it out of cedar, coated it with Penofin. It's functional, but still a work in progress...need to replace part of the top with granite or slate to have a decent heat proof working surface. Just wanted to get to grilling on the new egg ASAP!


  • Richard in Smithville
    Veteran Member
    • Oct 2006
    • 3014
    • On the TARDIS
    • BT 3100

    #2
    Very nice unit. I love the look of cedar-especially when given a top coat to pop the grain. Will you replace both work surfaces or just the top one?
    From the "deep south" part of Canada

    Richard in Smithville

    http://richardspensandthings.blogspot.com/

    Comment

    • Black wallnut
      cycling to health
      • Jan 2003
      • 4715
      • Ellensburg, Wa, USA.
      • BT3k 1999

      #3
      Good looking cart, what's for dinner?
      Donate to my Tour de Cure


      marK in WA and Ryobi Fanatic Association State President ©

      Head servant of the forum

      ©

      Comment

      • atgcpaul
        Veteran Member
        • Aug 2003
        • 4055
        • Maryland
        • Grizzly 1023SLX

        #4
        You had me at "Egg". Nice cart. I want some steaks now.

        What size is that? I have a medium and am always looking for a large. I need a cart like yours. I'm only using the nest and it's a PITA to move around.

        Comment

        • greenacres2
          Senior Member
          • Dec 2011
          • 633
          • La Porte, IN
          • Ryobi BT3000

          #5
          Very nice cart!! How about some more pics of the miter saw station?? Looks like it a multi-tool kind of work station with some modular (?) storage??

          earl

          Comment

          • lombard
            Forum Newbie
            • Feb 2004
            • 35
            • Merritt Island, FL

            #6
            Originally posted by Richard in Smithville
            Very nice unit. I love the look of cedar-especially when given a top coat to pop the grain. Will you replace both work surfaces or just the top one?
            Planning to just rework the top surface. Probably gonna hang around the granite places to find a decent remnant.

            Originally posted by atgcpaul
            You had me at "Egg". Nice cart. I want some steaks now.

            What size is that? I have a medium and am always looking for a large. I need a cart like yours. I'm only using the nest and it's a PITA to move around.
            Got the large. Even though it's just me here, I figured the medium would be too limiting.

            Originally posted by greenacres2
            Very nice cart!! How about some more pics of the miter saw station?? Looks like it a multi-tool kind of work station with some modular (?) storage??

            earl
            Got the idea from here. Here's the website with the plans I based it on.

            Comment

            • Pappy
              The Full Monte
              • Dec 2002
              • 10453
              • San Marcos, TX, USA.
              • BT3000 (x2)

              #7
              Ditto on the good looking results on the Egg Cart! Cedar is a beautiful wood to work with and finish.

              The Ultimate Tool Stand has been around for a long time and there have been many adaptations of it by members here. Everything from a multi tool station like you did to a base/wide table for the BT 3.
              Don, aka Pappy,

              Wise men talk because they have something to say,
              Fools because they have to say something.
              Plato

              Comment

              • dbhost
                Slow and steady
                • Apr 2008
                • 9231
                • League City, Texas
                • Ryobi BT3100

                #8
                Very nice so far. I have seen a lot of guys build these and have always wondered how well the pocket holes / screws worked in the long run for something that rolls around. keep us posted on that!

                I have only seen one other that didn't have a wooden top, and it was actually a cedar top wrapped with stainless steel.
                Please like and subscribe to my YouTube channel. Please check out and subscribe to my Workshop Blog.

                Comment

                • lombard
                  Forum Newbie
                  • Feb 2004
                  • 35
                  • Merritt Island, FL

                  #9
                  Originally posted by dbhost
                  Very nice so far. I have seen a lot of guys build these and have always wondered how well the pocket holes / screws worked in the long run for something that rolls around. keep us posted on that!

                  I have only seen one other that didn't have a wooden top, and it was actually a cedar top wrapped with stainless steel.
                  Well, to be fair, the thing is glued together with Titebond III. After cure, the glue joint is stronger than the screws or surrounding wood, so in theory I could just remove all the screws. Did pocket holes to make sure there were no visible screw heads without having to clamp everything and wait for the glue to cure.

                  Comment

                  • dbhost
                    Slow and steady
                    • Apr 2008
                    • 9231
                    • League City, Texas
                    • Ryobi BT3100

                    #10
                    Please take this as it is meant, which is honest curiosity as what you are saying you did I have always been taught will not work. If what I was taught is wrong I want to know.

                    I would suspect that the end grain issue would make the glue close to useless... How do you get around the end grain glue issue without screws, dowels, M&T or some other type of joint?

                    We are told that modern glues are stronger than the wood itself but that is meaningless unless you understand the nature of wood and how glue works as the bo...
                    Please like and subscribe to my YouTube channel. Please check out and subscribe to my Workshop Blog.

                    Comment

                    • LCHIEN
                      Internet Fact Checker
                      • Dec 2002
                      • 21007
                      • Katy, TX, USA.
                      • BT3000 vintage 1999

                      #11
                      It looks (from the first picture) that the OP used PH screws to connect the aprons to the legs. That would make the ends of the apron end-grain against the long grain of the legs. Basically butt joints with PH screws.

                      So as dbhost says, the traditional conventional wisdom is that end grain does not hold well for glue joints - good glue joints would involve long grain to long grain. At least part of the problem is that end grains soaks up the glue so not much is left for joint strength.

                      That's why butt joints are not used much in good joinery; preferred joints would use lapping, or ends set in rabbets so that the sides of the ends would be glued. Also M&T, even dowels let long grain-to long grain gluing come into play on joints.
                      Loring in Katy, TX USA
                      If your only tool is a hammer, you tend to treat all problems as if they were nails.
                      BT3 FAQ - https://www.sawdustzone.org/forum/di...sked-questions

                      Comment

                      • Ed62
                        The Full Monte
                        • Oct 2006
                        • 6022
                        • NW Indiana
                        • BT3K

                        #12
                        Nice well done project. You should enjoy using that.

                        Ed
                        Do you know about kickback? Ray has a good writeup here... https://www.sawdustzone.org/articles...mare-explained

                        For a kickback demonstration video http://www.metacafe.com/watch/910584...demonstration/

                        Comment

                        • Woodshark
                          Established Member
                          • May 2006
                          • 158
                          • Atlanta

                          #13
                          Congratulation on the DIY BGE table. I made mine several years ago and I'm so glad I did. May I make a recommendation? I would adding a single 18x18" or 20x20" flooring tile to the right side of the table top. That way you can place hot items on the table (and trust me-you will) without worrying about burning or discoloring the wood. Plus tile is easy to clean. You can just place it on top or get fancy and route out a shallow area and drop in the tile.
                          sigpic

                          Comment

                          • lombard
                            Forum Newbie
                            • Feb 2004
                            • 35
                            • Merritt Island, FL

                            #14
                            Originally posted by LCHIEN
                            It looks (from the first picture) that the OP used PH screws to connect the aprons to the legs. That would make the ends of the apron end-grain against the long grain of the legs. Basically butt joints with PH screws.

                            So as dbhost says, the traditional conventional wisdom is that end grain does not hold well for glue joints - good glue joints would involve long grain to long grain. At least part of the problem is that end grains soaks up the glue so not much is left for joint strength.

                            That's why butt joints are not used much in good joinery; preferred joints would use lapping, or ends set in rabbets so that the sides of the ends would be glued. Also M&T, even dowels let long grain-to long grain gluing come into play on joints.
                            True, which is why I doubled up on the high stress/load joints with a sistered chunk of wood. Plenty of edge grain to edge grain surface as well as additional butt-joint surfaces. I've got no worries.

                            Originally posted by Woodshark
                            Congratulation on the DIY BGE table. I made mine several years ago and I'm so glad I did. May I make a recommendation? I would adding a single 18x18" or 20x20" flooring tile to the right side of the table top. That way you can place hot items on the table (and trust me-you will) without worrying about burning or discoloring the wood. Plus tile is easy to clean. You can just place it on top or get fancy and route out a shallow area and drop in the tile.
                            Yeah, I'm actually planning to check out some of the local granite shops around here for a decent remnant. I just threw this together as-is to get to grilling a bit sooner.

                            Comment

                            • LCHIEN
                              Internet Fact Checker
                              • Dec 2002
                              • 21007
                              • Katy, TX, USA.
                              • BT3000 vintage 1999

                              #15
                              Originally posted by lombard
                              True, which is why I doubled up on the high stress/load joints with a sistered chunk of wood. Plenty of edge grain to edge grain surface as well as additional butt-joint surfaces. I've got no worries.


                              ....
                              I did notice that on the lower section. I don't think its going to fall apart and I didn't mean the previous post as criticism.

                              Here's how I built a BGE cart for my sister...
                              This forum is the place to post photos of your completed projects. Please try to limit pictures to 540px wide or less so that is is viewable to all. Off-topic threads in this forum will periodically be purged so as to keep it "clean".
                              Loring in Katy, TX USA
                              If your only tool is a hammer, you tend to treat all problems as if they were nails.
                              BT3 FAQ - https://www.sawdustzone.org/forum/di...sked-questions

                              Comment

                              Working...