Don't you just hate it when...

Collapse
This topic is closed.
X
X
 
  • Time
  • Show
Clear All
new posts
  • dbhost
    Slow and steady
    • Apr 2008
    • 9476
    • League City, Texas
    • Ryobi BT3100

    #1

    Don't you just hate it when...

    You go to test out a newly built dust hood, and you forget to open the correct blast gate?

    Oh well, once the blast gate is open, it catches better than 95% of the visible stuff coming off the blade. No clue about the stuff I can't see...

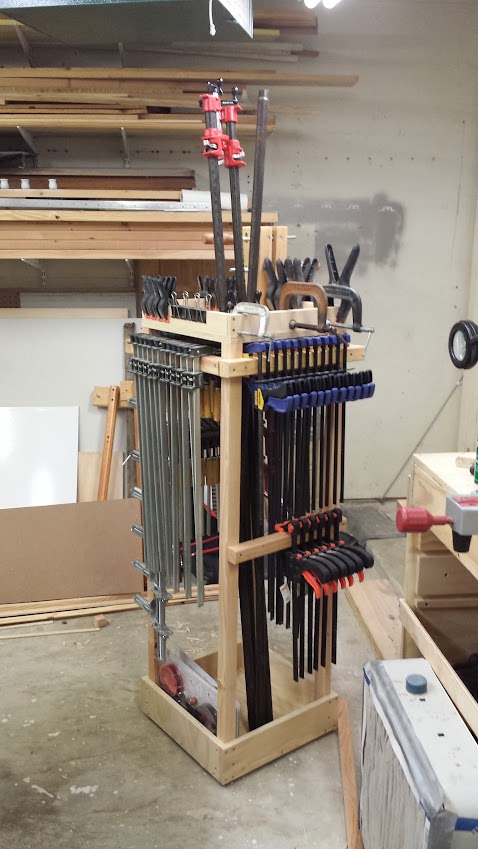
    I did get busy in the shop using both the BT and the miter saw. Nothing fancy, I just knocked together a pretty simple clamp rack. Had some issues with a split due to pilot holes not going as deep as I though they were, but nothing critical...

    It's not 100% complete yet though, I sort of forgot to get the bolts for the casters, so I need to grab a set of those. I do however have it populated for now. Yeah I will have to strip it back down to put the casters on... And I forgot to make the provisions for my pipe clamps. So a little more work left to do on it... Next four days will be busy. Maybe after that...
    Please like and subscribe to my YouTube channel. Please check out and subscribe to my Workshop Blog.
  • Rslaugh
    Senior Member
    • Sep 2003
    • 609
    • Punta Gorda, FL, USA.
    • None right now

    #2
    No pics? Didn't happen.

    And you take and post some pictures.
    Rick
    IG: @rslaugh_photography
    A sailor travels to many lands, Any place he pleases
    And he always remembers to wash his hands, So's he don't gets no diseases
    ~PeeWee Herman~

    Comment

    • dbhost
      Slow and steady
      • Apr 2008
      • 9476
      • League City, Texas
      • Ryobi BT3100

      #3
      Just a teaser pic of the freshly cut hole for the pipe clamps...


      Have I ever mentioned Harbor Freight hole saws stink? It burned more wood than it cut...

      It's past my bedtime. I will write up and post the photos. I still need the bolts for the casters, I may fix the cracked piece by gluing / clamping then redrilling, but it isn't structural. Another note to self, remember the drill bit in a counter sinking pilot bit is SHORT...
      Last edited by dbhost; 03-03-2014, 11:52 PM.
      Please like and subscribe to my YouTube channel. Please check out and subscribe to my Workshop Blog.

      Comment

      • Stytooner
        Roll Tide RIP Lee
        • Dec 2002
        • 4301
        • Robertsdale, AL, USA.
        • BT3100

        #4
        I really like the bimetal hole saw kit that I got from HF. Very robust for a HF tools. It has tackled cuts in some pretty thick steel and remained sharp.

        I have several larger US made hole saws that are obviously very good. The HF compares well with those.
        Lee

        Comment

        • LCHIEN
          Super Moderator
          • Dec 2002
          • 21834
          • Katy, TX, USA.
          • BT3000 vintage 1999

          #5
          [QUOTE=dbhost;527979...
          Have I ever mentioned Harbor Freight hole saws stink? It burned more wood than it cut...

          ....[/QUOTE]

          most all hole saws have the same problem of burning. The problem arises because there is no escape route for the cuttings - no spiral flute like on a drill bit to raise the cuttings up and out. Instead the cuttings go around and around in the gullets eventually filling the gullets and raising them off the bottom so it doesn't cut well then you press harder and ultimately the friction heats up the saw and the hole causing burning while still cutting like crap because the teeth are not in contact with the bottom. Forstners take out a lot more wood but there's an escape route designed in.

          There are two solutions:
          1 raise and clear the saw often, this is slow and inconvenient. You may have to use compressed air to blow out the kerf and a toothbrush to clear the compacted cuttings in the gullets between the teeth - it doesn't clear like a twist bit where the cuttings are in the flutes and usually fall out from gravity.
          2 (and this works very well) drill approx half inch hole with a conventional twist bit or a forstner that will intersect tangent with the hole saw cut. If you are cutting so that the disc is waste side then drill the 1/2" hole to the inside with the edge intersecting the hole saw cut but no protruding outside. The ideal is that the holes are tangent. The 1/2" cut will provide and exit for the cuttings and your hole saw will work very well. It works well with the relief hole inside or outside, just depends on whether you want the disk or the hole to be affected.
          It doesn't have to be 1/2", it can be any larger hole. It sounds like more trouble but its really worth it. I mean, it really works! Try it!
          Hint, the hole saw cuts a largish kerf, you may want to start the hole saw just to break the surface, then switch to the relief bit to place it properly, then go back to the hole saw.
          Last edited by LCHIEN; 03-04-2014, 08:33 AM.
          Loring in Katy, TX USA
          If your only tool is a hammer, you tend to treat all problems as if they were nails.
          BT3 FAQ - https://www.sawdustzone.org/forum/di...sked-questions

          Comment

          • Stytooner
            Roll Tide RIP Lee
            • Dec 2002
            • 4301
            • Robertsdale, AL, USA.
            • BT3100

            #6
            Loring has some good tips there.
            I also like to drill from both sides when boring wood with a holes saw. This does a few things. Lets you clear the teeth half way through the hole. Allows easier removal of the plug from the tool. Lets the bit cool while you re-position and clamp the piece. Greatly reduces chip out you could get if you bored straight through.
            Lee

            Comment

            • LCHIEN
              Super Moderator
              • Dec 2002
              • 21834
              • Katy, TX, USA.
              • BT3000 vintage 1999

              #7
              Originally posted by Stytooner
              Loring has some good tips there.
              I also like to drill from both sides when boring wood with a holes saw. This does a few things. Lets you clear the teeth half way through the hole. Allows easier removal of the plug from the tool. Lets the bit cool while you re-position and clamp the piece. Greatly reduces chip out you could get if you bored straight through.
              I do that too. makes plug removal easier but then so does a half inch relief hole.
              Having a pilot hole makes it easy to line up.
              prevents chip out at the bottom but leaves this awful ridge on your plug that's not easy to sand off w/o resorting to a circle sanding jig on your disc sander.
              Loring in Katy, TX USA
              If your only tool is a hammer, you tend to treat all problems as if they were nails.
              BT3 FAQ - https://www.sawdustzone.org/forum/di...sked-questions

              Comment

              • Stytooner
                Roll Tide RIP Lee
                • Dec 2002
                • 4301
                • Robertsdale, AL, USA.
                • BT3100

                #8
                It does depend on what you are making for sure. Toy wheels knobs and you are better off just scoring the first side. Then boring from the other side.

                If keeping the plug side for wheels and knobs, another useful trick is to use paste wax or even candle wax on the cutter. Makes it slip out nice and easy while reducing burn.
                Lee

                Comment

                • dbhost
                  Slow and steady
                  • Apr 2008
                  • 9476
                  • League City, Texas
                  • Ryobi BT3100

                  #9
                  Okay, well the build is mostly complete, and the write up is on my Blogger blog...

                  http://daves-workshop.blogspot.com/2...t-i-built.html

                  I have a couple of spots that could be redone / fixed due to operator error, but I doubt I will. It is only cosmetic and I just don't care that much. It needs to work, not be pretty...

                  Quick Rundown, the build was done with 2x4s and plywood. 2x4s were cut down to size on the BT and crosscut with the miter saw, after the first cut, using the dust hood... HUGE difference. Not perfect, but certainly acceptable.


                  Once it was put together, even lacking casters, I loaded it up , unless the casters induce some instability, this thing is rock solid... No worries of tipping here!


                  I have after what, 6 years now, removed the clamp rack that was bolted to the wall. Next step will be to add the casters, patch the wall, and then move the freezer in...
                  Please like and subscribe to my YouTube channel. Please check out and subscribe to my Workshop Blog.

                  Comment

                  • leehljp
                    The Full Monte
                    • Dec 2002
                    • 8723
                    • Tunica, MS
                    • BT3000/3100

                    #10
                    Originally posted by dbhost
                    Okay, well the build is mostly complete, and the write up is on my Blogger blog...

                    I have after what, 6 years now, removed the clamp rack that was bolted to the wall. Next step will be to add the casters, patch the wall, and then move the freezer in...
                    I like that. Not too much of a foot print and holds quite a few clamps. I must give it a try. Thanks for posting.
                    Hank Lee

                    Experience is what you get when you don't get what you wanted!

                    Comment

                    • dbhost
                      Slow and steady
                      • Apr 2008
                      • 9476
                      • League City, Texas
                      • Ryobi BT3100

                      #11
                      Look at my Blogger post. I have the link to the Sketchup file there. Will be more than willing to answer any questions you may have afterwards, as long as you can live with the I don't know answer if it is the honest one!
                      Please like and subscribe to my YouTube channel. Please check out and subscribe to my Workshop Blog.

                      Comment

                      • unclecritic
                        Forum Newbie
                        • Feb 2008
                        • 99
                        • Michigan
                        • Craftsman 21829, (2) bt-3100's

                        #12
                        Nice job on the clamp rack. Wish i had room for something like this. Most of my clamps end up on the wall rack or up in the ceiling joists. Really enjoy your writeups, especially because your quick to point out measuring mistakes and the like. Good to know im not the only one.

                        Comment

                        • dbhost
                          Slow and steady
                          • Apr 2008
                          • 9476
                          • League City, Texas
                          • Ryobi BT3100

                          #13
                          I guess it comes from a realization that we don't have to be perfect. We have to learn from our mistakes, and the mistakes of others...
                          Please like and subscribe to my YouTube channel. Please check out and subscribe to my Workshop Blog.

                          Comment

                          • JimD
                            Veteran Member
                            • Feb 2003
                            • 4187
                            • Lexington, SC.

                            #14
                            Do you have your casters? If not, I think I like some I got from here:

                            http://www.castercity.com/cm3a-plate.htm

                            I was modifying my BT3100 before putting it in storage, hopefully briefly, until the extra garage is built at the new-to-us house. I had the extension rails and 5 foot rip capacity but with a track saw I really do not need that capacity and the saw took up a lot of space. So I took the reciprocating saw to it and cut off the saw support section, shortened it, and added the total locking casters. I also incorporated a couple drawers from the rest of the base. I didn't really use it when I was done but it seems fine. Much smaller. Ready to go into the storage unit, hopefully Saturday.

                            Pipe rack is a good idea for the new shop - once the garage is built, after the other house sells.

                            Comment

                            • dbhost
                              Slow and steady
                              • Apr 2008
                              • 9476
                              • League City, Texas
                              • Ryobi BT3100

                              #15
                              Yeah, and the build is complete http://daves-workshop.blogspot.com/2...p-cart-is.html

                              The casters were takeoffs from an old rolling cabinet of some sort that was in the garage when I bought the house. The cabinet itself was in BAD shape, but the casters were okay, so I stripped them and tossed the cabinet. I have been holding on to them for probably 12 years now...
                              Please like and subscribe to my YouTube channel. Please check out and subscribe to my Workshop Blog.

                              Comment

                              Working...