

 Tweet
Tweet
Very nice!
-
Please like and subscribe to my YouTube channel. Please check out and subscribe to my Workshop Blog. -
Glad to hear about AZCarbide. I was thinking of getting some from Capt. Eddie myself. I have a smaller Woodchuck Pen Pro for pens, but would like to make my own full size carbide tool.
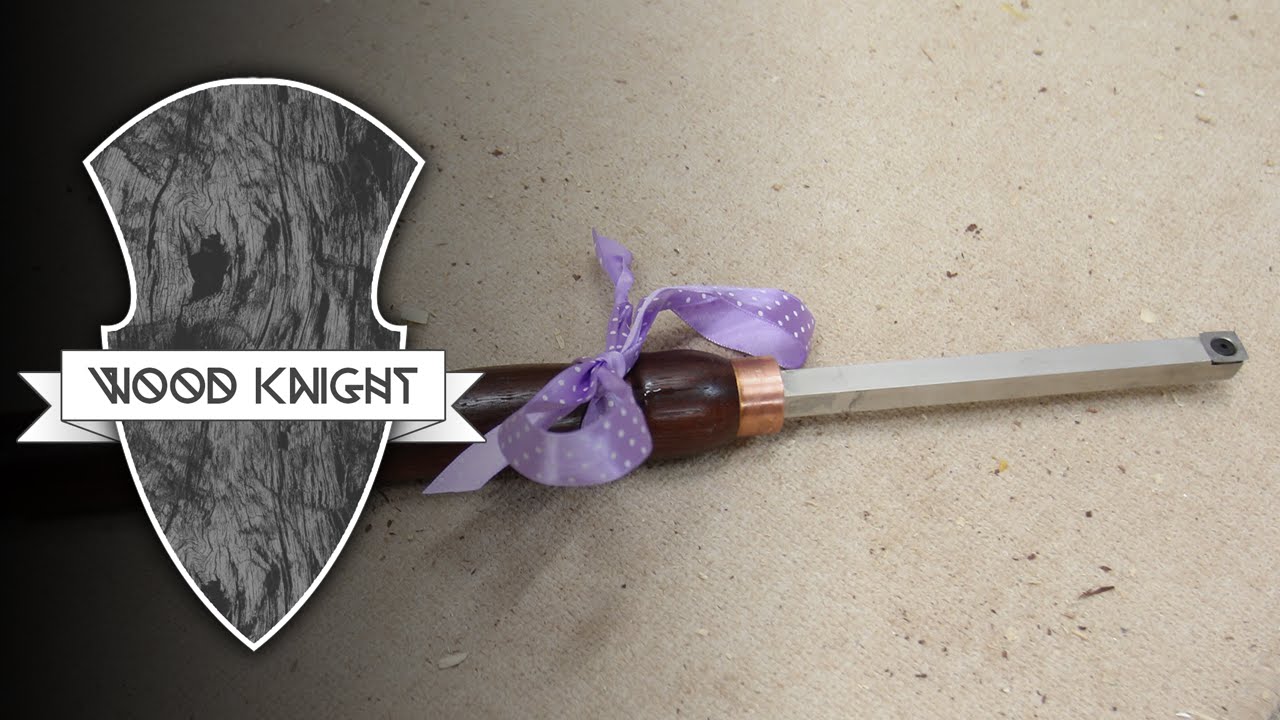
I love turning handles, and it is a great way to practice turning. As much as I like carbide tools for pen turning, I spent a lot of time practicing using a skew last month. Here is my first handle finished completely using a skew. I roughed it with a gouge, but was determined to get the hang of using a skew.
These are maple, with a walnut endcap, and a brass compression nut for ferrule. The bowl gouge shaft goes well down into the maple, so it should be plenty sturdy. I split the 2X2 maple blank a few times, and laminated back together with several colors of veneer, just for interest. The first cut on bandsaw was a straight cut down the middle, and re-glued. The next was a sweeping S-curve from end to end.Attached FilesLeeComment
-
-
Lee, beautiful handle, looks like you did get the hang of the skew
Thanks all for the kind words - and I recently was asked about YouTube clips on making your own carbide tools, so thought I would share those links here as well. Some interesting differences in approaches, mine was probably closer to Capn Eddie's.
Bill in Buena ParkComment
-
Thanks Bill. I have watched 3 out of those 4 videos recently. It did not occur to me just rout a dado in each half of a turning blank, to form the square recess for the square-shanked steel for a carbide lathe tool. It also never occured to me that a live center will work to hold a blank with a square at one end, as long as the hole is very close to square.
I was impressed with the final outcome on the tool where the author used a hacksaw and file to to make the recess for the carbide insert. These really do look simpler to make than I thought would be the case.
Nice job on yours, by the way. I'm anxious to try making one. The price of the homemade versions is awfully attractive!LeeComment
-
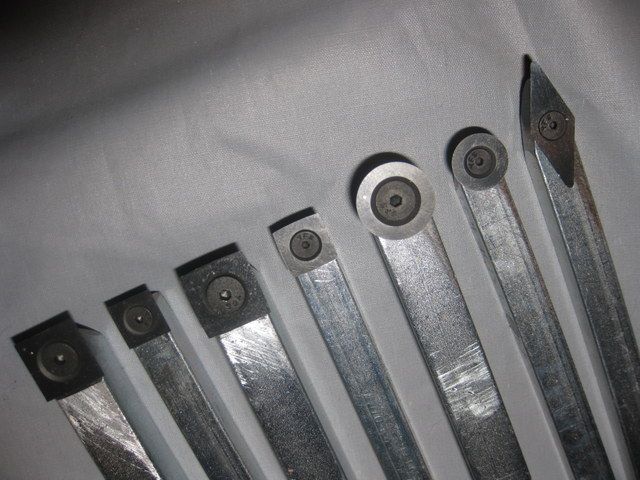
Thanks for the post Bill. I was going to ask for photos without the inserts so we could see the recess you provided. I saw your comments about friction being adequate and the CA glue Capt. Eddie uses. Just seems like a mechanical stop might be required for a non-symmetrical cutter. I'm a new turner and thinking if the insert did turn would it be a disaster?
MikeComment
-
Mike,
The degree of "disaster" depends on the operation you're doing with a particular tool. Since my round and square are seated, I'll assume the question is about the detailers. However - round (scraper or sheer cutters) likely not need be seated, since they're round, and any cutter movement keeps the same geometry against the workpiece. A loose square cutter, generally used in both finesse and agressive cuts, might be a bigger deal - however, I think the edge would tend to stay parallel to the surface of the workpiece.
Back to the detailers. As an example, I create the dovetailed recess within the foot of my bowl for mounting on the chuck using a light touch with the broader detailer in the corner I initially form with my square cutter. If the detail cutter did move, it would likely be away from the vector of my pressure, and would be immediately noticeable. Again, it depends on the vector of my tool in relation to how the cutter would stay aligned within that corner. I don't think it would be a disaster, but could cause me to modify my recess somewhat.
I think a catch could be a "design disaster" on a delicate piece, and this might occur if I was making a detail cut straight into the face of the workpiece and the cutter moved; it may not leave enough material for a "design alteration".Bill in Buena ParkComment
-
Thanks for the response. Again I'm new to the round world. In the flat world I have spiral cutter heads on my jointer and planer. On both of these cutter heads the milled recesses positively contsct the chamfer on the carbide inserts.
MikeComment
-
Bill's post encouraged me:
Just need 7 handles. I'm a new turner so it will be good practice!
Thanks for sharing this Bill,
MikeComment
-
Mike,
Those look great! I'm sure you'll have as much fun turning some good handles for those. One thing I did that you might find helpful - after producing the first handle, I created a "story stick" of sorts, marking where the ferrule area was (end to shoulder), and where the handle was either thinner or thicker (noting the diameter after measuring by caliper), and then the butt end.
This came in handy for duplicating the other handles. After rounding my handle stock, I just used the story stick to mark pencil lines where these dimensions were, used my parting tool to create a channel of the appropriate dimensions, then turned off the rest of the material to those dimensions.
I also found a particular "order of operations" helpful in making my handles:
1. Start with square or round stock. Use a 4-jaw chuck on headstock to hold what will be the butt end, and center the tool end with a live center in the tailstock, then tighten the chuck. Replace the live center with a drill chuck, and drill tool hole with bit of appropriate dimension to target depth (min. of 3 inches)
2. Replace drill chuck in tailstock with conical 60 degree live center, and bring up into hole. If using square stock, turn it round. Using story stick, mark and turn channels for thin/thick dimensions. Turn portion near tool hole for ferrule dimensions, but sneak up on the fit, backing the tailstock off to test, bring back to turn, and repeat until ferrule fits. I chose not to mount ferrule at this point (some do), but chose to do the next steps first.
3. Turn away remaining stock to established dimensions. Do not part off butt end completely, but turn away enough to allow for some sanding of the butt.
4. Sand entire handle as the surface condition requires up through your desired grit. Ferrule area should not need sanding - it will be covered.
5. Finish the handle as desired, including the shoulder next to the ferrule area, but leave ferrule area clean. Part off on butt end and clean that up too.
(*** This is a good time to check that your tool shaft fits the hole. My preference was to further shape the square shafts at this point to ensure a good fit. For a round tool shaft, enlarge hole if the fit is too tight ***)
6. Apply epoxy to the ferrule, interior bottom edge only (the edge that will be first to slide over the ferrule area), not on the wood. Sliding the ferrule onto the ferrule area (with a slight twist) will distribute the epoxy between the ferrule and the wood, and prevent a mess of epoxy being pushed out at the ferrule shoulder. Note, however, that some epoxy may squeeze out at the top - I was ok with this, and used it cover the end-grain around the tool hole.
7. Put epoxy into the tool hole, not on the tool shaft to be inserted. Make sure you have enough that it will be pushed to secure the bottom of the tool in the hole, and maybe have a little squeeze out around the shaft (if there is too much squeeze out, you can clean this away - I used strips of cut-up credit cards to clean this up.) Then set the tool somewhere secure with the butt down and tool end facing up and allow epoxy to fully cure.
Then have some fun "making shavings" as Capn Eddie likes to say!
Last edited by Bill in Buena Park; 01-27-2015, 01:22 AM.Bill in Buena ParkComment
-
Good write up Bill in Buena Park!
I especially like your use of credit cards to clean up glue. Finally a sensable use for them that won't get you in trouble.
capncarlComment
-
A spur drive would also work, but depends on when you drill the hole for the tool shaft. I use the chuck to suspend the blank for the drilling operation which I do up front, on the lathe, and also to keep the blank suspended when I back off the tailstock to test fit my ferrule.
However, a chuck is not necessary, it just makes it easier for me. Another way - you could (carefully) drill your tool hole on the DP first, then mount between spur drive (butt end) and live center (hole end). During the ferrule test fit, when moving the tailstock bck and forth, you just need to be careful to get the blank recentered afterward. Once the ferrule is fit, you can leave between the centers till all shaping, sanding, finishing is done.Bill in Buena ParkComment
-
Dang! I haven't even started turning and I already need more tools!
So if you drill your hole upfront--which it seems like you need to do with no chuck--then the ferrule hole would need to be at the tail stock end, right?
And sorry to hijack the thread.Comment
-
Not a hijack - just continuation of the topic!
I prefer to keep the ferrule end, with its pre-drilled tool hole, at the tailstock, so I can use my 60 degree live center in the hole to keep the handle blank centered. For me, this has been the simplest approach, because if I wait to drill the hole after I've turned the handle to shape, gripping/chucking for drilling a straight hole which runs parallel to the length of the handle would get overly complicated.
So I approach a tool handle pretty much the same way I turn pens. I used to use my DP to drill my pen blanks, but got inconsistent results on the exit hole, due to bit drift and other factors. So I got the 4-jaw and drill chucks to drill perfectly centered holes for pens - and the idea extends to handles well, or any other spindle shape you need to put in a centered, straight hole.Bill in Buena ParkComment
-
Bill - thanks for the step by step on the handles. What are your thoughts (for square bars) on making the handle of two pieces with void for the bar cut in the halves before glued.
MikeComment


Comment