Simple Box Entertainment Center

Collapse
This topic is closed.
X
X
 
  • Time
  • Show
Clear All
new posts
  • IBBugsy
    Established Member
    • Jan 2006
    • 160
    • Allentown, PA.
    • BT3100

    Simple Box Entertainment Center

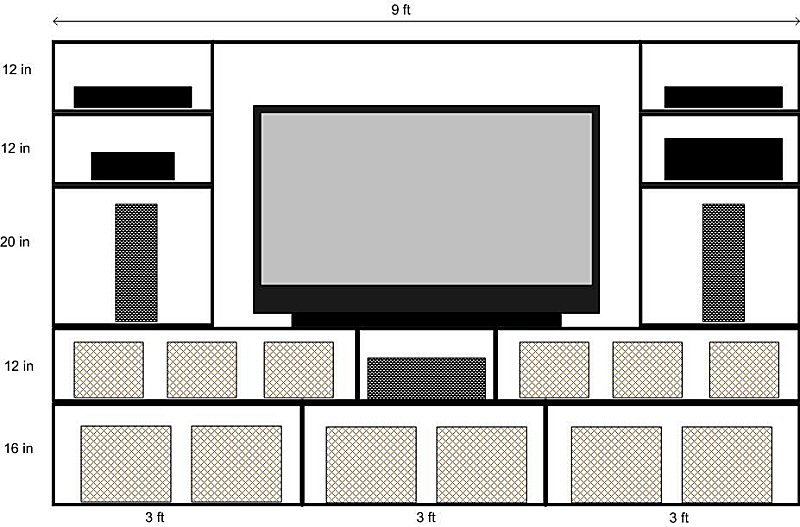
    I am planning my first furniture project - an entertainment center. There's a picture below. I plan to use simple boxes everywhere so that's 12 boxes. I considering 3/4 in baltic birch plywood. My wife wants it to be painted black so I don't have to worry about hiding nails or screws. The TV is light (60 lbs) so the main weight will be from the plywood itself. It's 20 inches deep.

    How should I join the sides of the boxes to make sure it's strong enough, esp. the bottom two rows of boxes? I don't want it to collapse. Should I consider adding 1x1's to the inside corners for bracing?

    In case it matters, I have a BT3100, a small bandsaw and a router with table.

    Dave - Weekend Garage Junkie
    "I'm no physicist but I know what matters" - Popeye
  • dbhost
    Slow and steady
    • Apr 2008
    • 9226
    • League City, Texas
    • Ryobi BT3100

    #2
    Are you planning on building this as a bunch of stacked boxes, or boxes inside of one MUCH bigger box? The bigger box approach works well, but is harder to move when you are done...

    If you are doing a bunch of boxes stacked up etc.. Since it will be painted, how about using some captive nuts, the kind with the prongs that you pre drill a hole, then nail the fastener into the hole, and then some 1.25" counter sunk screws so it's all flush?

    For that you will need a drill, drill bits, counter sink bit, and a hammer.

    Are you going open or closed back? Closed back, with the panel in a rabbet (do you have a rabbeting bit for that router table?) will make for some incredibly stable boxes.

    There are a LOT of ways to approach this project. The one thing I would suggest is to avoid butt joints if you can. Not strong at all, even though they are better with ply because the grain direction changes...

    Best of luck, and keep us posted!
    Please like and subscribe to my YouTube channel. Please check out and subscribe to my Workshop Blog.

    Comment

    • cabinetman
      Gone but not Forgotten RIP
      • Jun 2006
      • 15218
      • So. Florida
      • Delta

      #3
      Originally posted by dbhost
      The bigger box approach works well, but is harder to move when you are done...

      That is a serious consideration in fabricating, and just moving and storing the pieces when done. It could be done with several boxes. The section above the TV is really not necessary, but you might like it as a "tie in" for the outer units, and it will help in stabilization.

      Rabbeting the backs in would add a lot of structure to the boxes and help in keeping them square. I would use dadoes and rabbets for the joinery. You might also consider adding a base under the boxes to keep the whole look less "boxy". It could be a loose base (plinth) that is recessed on the sides and the front, giving the whole unit a "floating" look. The base could be in sections or one piece. That would also help in leveling. I've faced bases (toe kicks) with clear mirror, and standing back looking at the unit, it looks like it's really off the floor.
      .

      Comment

      • IBBugsy
        Established Member
        • Jan 2006
        • 160
        • Allentown, PA.
        • BT3100

        #4
        I was figuring stacked boxes. One reason was so I don't have one large unit to try and move if I need to get behind it. I could unstack the boxes from the top down.

        I wasn't planning on having backs for the boxes but if it would improve the stability a lot, I could. I'll have to ask the wife about if this look OK in her decorating scheme. Might help/hinder hiding the wires - can't decide which is better?

        Dadoes and rabbits for the joinery was my first thought. Never done it before but would be good to learn and not too hard. I don't have a dadoe stack for the table saw but I could use the router.

        Also thought about buying metal L brackets that I could put on the inside to brace the corners.

        A base sounds interesting. How does it help leveling? This is another thing I'll have to ask the wife about. One thought I had was to use an upsidedown rug on the bottom so it would be easier to move. My floor is fake wood laminate so things can slide pretty easily.

        Thanks for the thoughts so far.
        Dave - Weekend Garage Junkie
        "I'm no physicist but I know what matters" - Popeye

        Comment

        • drumpriest
          Veteran Member
          • Feb 2004
          • 3338
          • Pittsburgh, Pa, USA.
          • Powermatic PM 2000

          #5
          Backs will add a ton of strength, and keep things square. I was going to recommend the L braces if you didn't want backs, but you've already mentioned them.

          A base of some sort will help it sit flat on you probably no so flat floor. Over a span of 4-6 feet you'd be surprised how uneven a floor really is. So furniture with 4 points of contact, for instance, tend to sit better. If your floor isn't flat, and your box bottoms are, then where the boxes sit side by side, there will be an uneven gap between them.
          Keith Z. Leonard
          Go Steelers!

          Comment

          • poolhound
            Veteran Member
            • Mar 2006
            • 3195
            • Phoenix, AZ
            • BT3100

            #6
            Will each of the boxes be individual or is the whole thing maybe 4 or 5 boxes with sections. If you try and make it all out of individual boxes and dont have backs to them they will have a tendency to rack. If its made in sections this will be a lot stronger and safer. As OPs have mentioned adding a rabbeted back will add lots of strength.

            The L bracket idea would add extra support but I think they would be rather unsightly and would make it problematic to place things in the boxes.

            Face frames would help and also make everything look more substancial. I would suggest that you use some knock-down fasteners to join all the sections together. When everything is connected together it will add significant strength.

            Not sure the rug idea is that smart. I think it will tend to make the whole unit unstable. Even with the rugh its going to weigh a lot and I doubt you will move it that easily even with the rug.

            If you made it in 4 sections (2 for the base and 2 sides) you could consider adding whole side vanity panels a) so you can see the joins & b) it will help keep everything together.
            Jon

            Phoenix AZ - It's a dry heat
            ________________________________

            We all make mistakes and I should know I've made enough of them
            techzibits.com

            Comment

            • Pappy
              The Full Monte
              • Dec 2002
              • 10453
              • San Marcos, TX, USA.
              • BT3000 (x2)

              #7
              I would build it in sections to make the weight managable. The bottom levels each as a section and the towers as sections. An idea I haven't tried would be to route a recess in the bottom of the lower level (or base if you incorporate one) to accept some of the small, round "super gliders". These should make it fairly easy to move around.
              Don, aka Pappy,

              Wise men talk because they have something to say,
              Fools because they have to say something.
              Plato

              Comment

              • dbhost
                Slow and steady
                • Apr 2008
                • 9226
                • League City, Texas
                • Ryobi BT3100

                #8
                I would definately build with a back for the stability reason mentioned, as well as having better ability to conceal wires. You could of course use L brackets like you said, but with enough weight,

                L brackets, or corner braces as they are more properly called, can be an attractive part of your project, IF you select the right ones, and install them correctly. For example, say you are going for a black / brass feel, you could go with some National N227-454 2 x5/8 corner braces. Mortise them in, and use at least three accross each corner to keep everything stable. I actually thing that would make for a very attractive look. Especially if you use 3/8" or 1/2" brass screws.
                Please like and subscribe to my YouTube channel. Please check out and subscribe to my Workshop Blog.

                Comment

                • Gator95
                  Established Member
                  • Jan 2008
                  • 322
                  • Atlanta GA
                  • Ridgid 3660

                  #9
                  If it was 8' wide, I'd suggest doing in 4 parts... but with 9' width you'll have to do it differently. Unless you can get 10'x4' BB or other plywood somewhere. Also, if you can't get a 4x10 sheet I don't see how you do the top piece other than using real wood.

                  Face frames will help stabilize each box a little and I think are necessary here to cover the exposed plywood edge, unless you want to take a trip to edgebanding land. Even painted I think it would show a bit- at least I've never had success disguising an edge with paint.

                  Definately include a back! Some 1/2" ply back there will add tons to the strength.

                  For box construction, look into pocket hole screws.

                  Comment

                  • chopnhack
                    Veteran Member
                    • Oct 2006
                    • 3779
                    • Florida
                    • Ryobi BT3100

                    #10
                    Without a doubt make a "toe kick" frame for this item to sit on and use leveling feet. As drumpriest mentioned the floor is probably not even. Some other great idea's already mentioned that i second are:

                    make in sections, use dados with captive backs and use kd's to tie the individual parts together. No rug - if you need to move it, it will be on 4 small legs so you can as others have mentioned put it on super gliders.

                    Since this is your first furniture project you may want to start small and make one box at a time and see what you learn from the experience. After going through and cutting all the joinery and assembling one small section you may learn something on your own that would work better!

                    I think in straight lines, but dream in curves

                    Comment

                    • LCHIEN
                      Internet Fact Checker
                      • Dec 2002
                      • 20969
                      • Katy, TX, USA.
                      • BT3000 vintage 1999

                      #11
                      if you are going to make it totally out of individual boxes that will double your material. If you make it out of individual boxes and bolt the sides together rigidly then you could save sme thickness by going 1/2" instead of 3/4". If you put a back panel and rabbet it it will be much stronger. If you only do a few rabetted backs here and there and then bolt the sides together you will get much of the benefit of the backs without having to do them all... some boxes you may well want the wall to show thru.
                      Finally, you can compromise some and do a few boxes with multiple sections.
                      the platform or toe kick is a great idea to improve the looks.
                      Loring in Katy, TX USA
                      If your only tool is a hammer, you tend to treat all problems as if they were nails.
                      BT3 FAQ - https://www.sawdustzone.org/forum/di...sked-questions

                      Comment

                      • IBBugsy
                        Established Member
                        • Jan 2006
                        • 160
                        • Allentown, PA.
                        • BT3100

                        #12
                        Thanks to all!!

                        Here's a bunch of thoughts and a question or two:

                        1) Wife has agreed that a backing is preferred. I was wondering on the thickness but 1/2" ply was mentioned so I'll plan on that.

                        2) I was planning on making one "trial" box with scrap to see how it goes. I'm enough of a paranoid engineer to plan for this.

                        3) I was also planning on connecting the individual boxes together after they are made with some recessed screws. Figured I'd do this as I stacked them in place in the living room. Screw the bottom row together, then the second row together and then screw the second row to the bottom row with a few screws.

                        4) Wife also suggested the super gliders underneath. I'll take a look at those online.

                        5) I'll check the level of my floor to see how it looks. This will be along a foundation-based wall so hopefully it won't be too off level.

                        6) I always like to award myself when I do projects with a new tool so a Kreg pocket hole kit would be nice. Then I don't have to use rabbets on the 4 sides of the boxes.

                        7) Would just screwing the backer plywood in place be good enough for strength or should I try to recess the plywood with a rabbet groove (is this a captive back?)?

                        8) Another adjustment I figured I'd need to make is that small middle box in the center of the second row. I won't size that box exactly until I make the bottom row and the two larger boxes on the second row. I want the two rows to match up closely and I can adjust the width of the second row by adjusting that small middle box as needed.

                        9) Would have been nice if the width was 8 ft but that didn't work for my wife.

                        Again, thanks for the all the suggestions. This will be a winter-long project for me.
                        Dave - Weekend Garage Junkie
                        "I'm no physicist but I know what matters" - Popeye

                        Comment

                        • drumpriest
                          Veteran Member
                          • Feb 2004
                          • 3338
                          • Pittsburgh, Pa, USA.
                          • Powermatic PM 2000

                          #13
                          You don't need 1/2" ply for the back, that's a bit of overkill unless you are going to hang the thing from the wall, 1/4" plywood will add plenty of strength, it's job is just to prevent racking. I would rabbet the back panel, looks nicer, and will help with ensuring the box is square when you glue it up. If they plywood is square, then the box will be square.
                          Keith Z. Leonard
                          Go Steelers!

                          Comment

                          • JimD
                            Veteran Member
                            • Feb 2003
                            • 4187
                            • Lexington, SC.

                            #14
                            If you don't have a bunch of clamps, screwing together the dados and rabbetts will hold them until the glue sets. If you recess the screws you can plug the holes to hide them. 1/4 luan is fine for the back. Pockets screws are fine but not pretty to look at. If you go to Woodsmith's website, they have a free plan for an entertainment center that is made with pocket screws. I changed it a little but used their basic idea for one for my son. It is much smaller than your plans but it might still give you some ideas.

                            Jim

                            Comment

                            • poolhound
                              Veteran Member
                              • Mar 2006
                              • 3195
                              • Phoenix, AZ
                              • BT3100

                              #15
                              Dave, here are some answers and a few other comments, they are in BOLD in line with your original questions.

                              Originally posted by IBBugsy

                              1) Wife has agreed that a backing is preferred. I was wondering on the thickness but 1/2" ply was mentioned so I'll plan on that.

                              1/4" will add plenty of strength, 1/2" is overkill.

                              2) I was planning on making one "trial" box with scrap to see how it goes. I'm enough of a paranoid engineer to plan for this.

                              A trial is a great idea. I dont think material has yet been discussed but if you want these boxes to be square and stay that way, which will be crucial if all the boxes are to fit together, then stay away from big box store ply!!! You will find numerous posts about the nightmares of using BORG (home depot) plywood. Call around your local quality wood suppliers and get an idea of what they have and how much they will charge. Veneered MDF is also an option, very easy to work but will make everything even heavier. Around me (PHX) a 3/4" sheet of most comon hardwood ply is around $70-$100.

                              Using scraps is great to perfect your technique and if they are even slightly warped it will illustrate how substandard material can easiy wreck the whole project.


                              3) I was also planning on connecting the individual boxes together after they are made with some recessed screws. Figured I'd do this as I stacked them in place in the living room. Screw the bottom row together, then the second row together and then screw the second row to the bottom row with a few screws.

                              For a few extra bucks, do use some form of knockdown fastners rather than screwing into the plywood. It will make the whole project neater and make it much easier to disassemble and rebuild later.

                              4) Wife also suggested the super gliders underneath. I'll take a look at those online.

                              5) I'll check the level of my floor to see how it looks. This will be along a foundation-based wall so hopefully it won't be too off level.

                              I have lived in many different houses and I have yet to find a level floor anywhere in the world. If you build a simple plinth/platform as others have suggested this can either be shimmed or scribed and you are assured the main unit will be level and on a flat base.

                              6) I always like to award myself when I do projects with a new tool so a Kreg pocket hole kit would be nice. Then I don't have to use rabbets on the 4 sides of the boxes.

                              Thats a nice kit (I have the Master System) and easy to use. There are many ways to construct the boxes. You should consider the "look" as well as the construction. Any butt or rabbetted joint is going to have some issue with the edges showing. Another option would be splined or biscuited miters. PH joints are great but will leave a lot of screw holes showing.


                              7) Would just screwing the backer plywood in place be good enough for strength or should I try to recess the plywood with a rabbet groove (is this a captive back?)?

                              Simply adding a plywood back will be better than nothing but sitting it in a rabbet is better. With the various other dadoes and rabbets needed in this project you will be an expert so no hassles adding some simple 1/4" rabbets to the back of the boxes


                              8) Another adjustment I figured I'd need to make is that small middle box in the center of the second row. I won't size that box exactly until I make the bottom row and the two larger boxes on the second row. I want the two rows to match up closely and I can adjust the width of the second row by adjusting that small middle box as needed.

                              Still not sure if you are considering making all the boxes individually? I would make the two base levels as two distinct subassemblies. Much easier to do, uses less material, less joinery and no alignment issues.


                              9) Would have been nice if the width was 8 ft but that didn't work for my wife.

                              Again, thanks for the all the suggestions. This will be a winter-long project for me.
                              Jon

                              Phoenix AZ - It's a dry heat
                              ________________________________

                              We all make mistakes and I should know I've made enough of them
                              techzibits.com

                              Comment

                              Working...