Need cab design help (again)

Collapse
This topic is closed.
X
X
 
  • Time
  • Show
Clear All
new posts
  • Schleeper
    Established Member
    • Feb 2008
    • 299

    Need cab design help (again)

    I'm building the last of nine wall cabinet carcasses, and I'm having trouble with the design. It's one of two corner cabinets, and I used the attached design (with slight modification) to construct the first one. But there are several things different about the second one.

    First of all, the one I'm working on now isn't going to be mounted on two intersecting walls; it's going over a peninsula where it meets the wall. The back surface that would normally butt up to the left wall will instead have another face frame and door so the cabinet contents are accessible from the other side of the peninsula. (Both doors will have glass panels so as to not block the natural light from the patio door.) I'm also substituting 1/2 inch ply for the 1/4 inch for the other back, and there obviously won't be a need for the angled back support.

    As I've done with all my cabinets, I'll be using dadoes, glue, and screws to attach the top and bottom to the sides. (and the 1/2 inch ply back.) For end panels, where I've been unable to put screws through the sides, I've used pocket screws. I'll be using biscuits to attach the face frames to the cabinet bottoms, and pocket screws for the other three sides. Were it just a matter of adjusting the measurements to account for the 3/4" face frame and the 1/2" ply back, I don't think I'd have too much problem. However, there's another fly in the ointment.

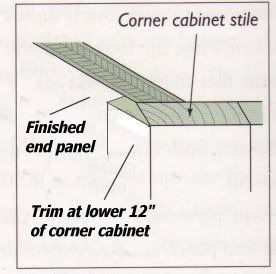
    As with the other corner I made, there will be cabinets attached to both sides. The one to the right will be 42" just like the corner; the one to the left, however, will only be 30" because it will be directly above the peninsula (the back of which has an overhang to accomodate stools for dining.) That means at least the bottom 12" of the left side of the corner cabinet will presumably need to be finished as if it were an end panel (ie. flush corners, and no exposed fasteners.) But the end stll has to be the correct size (12" deep) to match the depth of the 30" cabinet, and the angle of the front face frame (45 degrees) has to be maintained.

    My head hurts from trying to work this out on my own. Any ideas?

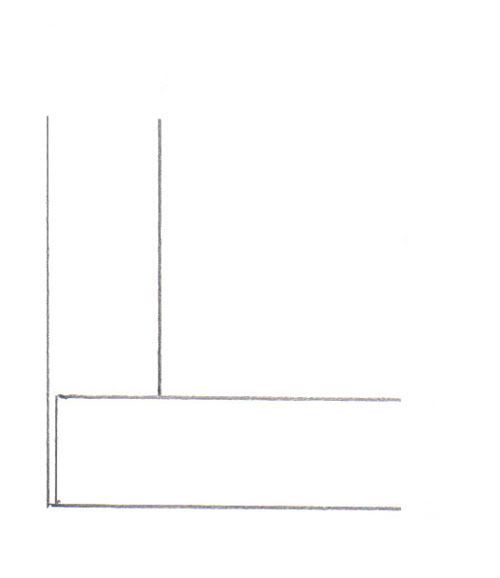
    [I tried to upload pictures exported from the design software I use, but they're bitmap files which our forum doesn't tolerate very well. I printed one out in black and white, and scanned it. Better than nothing, I guess. The cabinets I'm referring to are on the left.]
    Last edited by Schleeper; 12-16-2008, 12:00 AM.
    "I know it when I see it." (Justice Potter Stewart)
  • Popeye
    Veteran Member
    • Mar 2003
    • 1848
    • Woodbine, Ga
    • Grizzly 1023SL

    #2
    Am I correct in saying that the 30" cabinet will be 12" X 30" O/A and will have it's back also finished as it will be showing in the next room? If that's the case just reduce the top/bottom/ and sides on the 30" by 3/4" for the face from on the back and it should all come together. Pat
    Woodworking is therapy.....some of us need more therapy than others. <ZERO>

    Comment

    • Schleeper
      Established Member
      • Feb 2008
      • 299

      #3
      Yes, the other cabinet is 30" high by 36" long by 12" deep, and it's going to have a frame and doors on both sides. The ends of the frames will be joined to the frames of the corner cabinet, which is the reason why the finished depth of that end of the corner cabinet has to be 12". Normally, the stiles on the face frames being joined would extend 1/4" beyond the sides of the carcasses, and be beveled 22.5 degrees. If I do that here, the 12" portion of the end panel of the corner cabinet that'll be visible below the 30" cabinet, is going to look a bit funny.
      "I know it when I see it." (Justice Potter Stewart)

      Comment

      • cabinetman
        Gone but not Forgotten RIP
        • Jun 2006
        • 15218
        • So. Florida
        • Delta

        #4
        According to what you described the corner cabinet should be at the 30" height, and the one to the right the longer length. Visually, that, IMO, would look best if there has to be an offset. Since I don't use biscuits or pocket screws for FF's, all the machining can be done with rabbets.

        You would do best to draw that corner out in full scale with a plan view for all the vertical pieces and section drawings for the horizontal/vertical details. It can be drawn on a sheet of anything including cheap brown rolled wrapping paper.

        By drawing out, you can create the 12" depth, and draw in the FF's. Making a drawing will allow you to see exactly how the cabinets will fit together, and you can plan your joinery much easier than trying to figure it out in your mind. Attaching the FF's can be a butt/glue/clamp procedure, or, the bottom back edge of the FF can be rabbeted, and the bottom set into the rabbet. You could just use glue and pin nail, or use clamps.

        If you can't work it out with doing the drawing, PM me and I'll give you my email so you can make a pencil sketch, if the size is too big for a post.
        .

        Comment

        • Schleeper
          Established Member
          • Feb 2008
          • 299

          #5
          Originally posted by cabinetman
          According to what you described the corner cabinet should be at the 30" height, and the one to the right the longer length. Visually, that, IMO, would look best if there has to be an offset. Since I don't use biscuits or pocket screws for FF's, all the machining can be done with rabbets.

          You would do best to draw that corner out in full scale with a plan view for all the vertical pieces and section drawings for the horizontal/vertical details. It can be drawn on a sheet of anything including cheap brown rolled wrapping paper.

          By drawing out, you can create the 12" depth, and draw in the FF's. Making a drawing will allow you to see exactly how the cabinets will fit together, and you can plan your joinery much easier than trying to figure it out in your mind. Attaching the FF's can be a butt/glue/clamp procedure, or, the bottom back edge of the FF can be rabbeted, and the bottom set into the rabbet. You could just use glue and pin nail, or use clamps.

          If you can't work it out with doing the drawing, PM me and I'll give you my email so you can make a pencil sketch, if the size is too big for a post.
          .
          I agree that it would probably look better with the offset to the right of the corner cabinet, except for one little problem. It would put the bottom shelf over five and a half feet above the floor, effectively rendering it inaccessible to my 4'11" spouse (except by ladder or step stool.) Besides that, all it would accomplish is to shift my problem from one side of the corner cabinet to the other. (Also, when I built the carcass for the 15" cabinet, I assumed that the left side wasn't going to show.)

          I suspect that I haven't explained myself very clearly. I have no problem handling the joinery in assembling the corner cabinet, or in modifying the cabinet plan to incorporate a second door and face frame. The one modification I'm wrestling with is to the outside surface of the left side. The plan was designed for a corner cabinet that butts up to cabinets of the same height on both sides. I'm going to have a 42 inch on one side, and a 30 on the other. I need to join the mismatched cabinets, and have the bottom 12" of the left side look like a finished end panel.
          "I know it when I see it." (Justice Potter Stewart)

          Comment

          • JR
            The Full Monte
            • Feb 2004
            • 5633
            • Eugene, OR
            • BT3000

            #6
            Why not just put a matching veneer over the lower 12" of the left side of the corner cabinet? You can get thin veneers, pre-glued or dry, in a variety of species.

            Even 1/8" or 1/4" ply could do the trick, but the thin veneer would make it so that cutting the face-frame would be virtually hassle-free (except for the parts you've already conceptualized).

            JR
            JR

            Comment

            • cabinetman
              Gone but not Forgotten RIP
              • Jun 2006
              • 15218
              • So. Florida
              • Delta

              #7
              If you are trying to figure out how to join the bottom of the end panel so you don't see an edge might be what you're asking. As I understand you, the right side of the glass door cabinet is 12" shorter than the wall cabinet to the right.

              The left end of the 42" cabinet can have a mitered corner, and that would give a finished look. Here are some ideas:
              .
              Splined miter


              A "lock miter bit"


              There are those situations that you may have to consider the lesser of two evils.
              .

              Comment

              • LarryG
                The Full Monte
                • May 2004
                • 6693
                • Off The Back
                • Powermatic PM2000, BT3100-1

                #8
                I may not be understanding the problem correctly; but if I am, the following will work and is easy to do:


                Note that this "extra" piece of trim occurs only at the lower 12" of the corner cabinet, below the adjoining shorter cabinet. It continues the miter line down to the bottom of the corner cabinet, without making the face frame's sight line any wider on the front. It runs up and terminates under the bottom rail of the FF on the adjoining 30" cabinet. The front-to-back width can be whatever you like. Also, if desired, a matching piece could be run back the 12" depth of the cabinets and up to the bottom of the 30" cabinet, at the back.

                The face frames are mitered at 22.5deg. If they are 3/4" thick, this piece of trim will be 5/16" thick.

                To get a finished look on the lower 12" of the corner cabinet, simply make that side panel out of the same material you're using for other exposed ends.
                Last edited by LarryG; 10-10-2008, 12:41 PM. Reason: clarity; and then again for a typo
                Larry

                Comment

                • LarryG
                  The Full Monte
                  • May 2004
                  • 6693
                  • Off The Back
                  • Powermatic PM2000, BT3100-1

                  #9
                  Re-reading your OP, I now catch the words "flush corners." If the 5/16" thickness of the applied trim in the above solution is objectionable, here are two more ways you could do this:


                  The "Easier" option on the left has the (slight, IMO) disadvantage of showing a wider face frame end at the 12" of exposed corner cabinet under the adjoining 30" high cabinet. Since it's a hairline joint, I doubt anyone but you would ever notice it.

                  But if you don't like that, there's the "Harder" option on the right which eliminates this little problem but is, well, harder, because the plywood side panel of the corner cab has to be notched to fit around the face frame. Of course, you only have to do it once ...

                  With either scheme, the side panel on the corner cab carcase would be a finished piece.
                  Last edited by LarryG; 10-10-2008, 12:40 PM.
                  Larry

                  Comment

                  • Schleeper
                    Established Member
                    • Feb 2008
                    • 299

                    #10
                    You got it, Larry. What the heck do I do about that beveled portion of the face frame that extends beyond the side panel? (And for that matter, the face frame on the back should be 24" wide, which means it will extend 1/4" beyond the side, also.)

                    I think you're on to something, but I'm questioning the 7/16" thickness of that piece of trim. How did you calculate that? According to the plan measurements, it would only have to be 1/4". In that case, a piece of 1/4" ply 12" high by approx. 12" wide, beveled to match the end of the face frame(s), would do the trick.

                    In any event, now I feel comfortable proceeding with carcass construction as if I were butting up to two 42" cabinets. Thanks, guys.
                    "I know it when I see it." (Justice Potter Stewart)

                    Comment

                    • LarryG
                      The Full Monte
                      • May 2004
                      • 6693
                      • Off The Back
                      • Powermatic PM2000, BT3100-1

                      #11
                      Originally posted by Schleeper
                      I'm questioning the 7/16" thickness of that piece of trim. How did you calculate that?
                      My bad ... I must've misread what my CAD program was telling me. The correct thickness is 5/16". (I just drew it again, to make sure.)

                      I think either of my second-reply suggestions are the ticket, though. If it were mine, I'd use the "Easier" option and make the face frame on the back of the corner cab finish flush with the plywood side panel, rather than hanging over 1/4".
                      Larry

                      Comment

                      • Schleeper
                        Established Member
                        • Feb 2008
                        • 299

                        #12
                        Originally posted by LarryG
                        My bad ... I must've misread what my CAD program was telling me. The correct thickness is 5/16". (I just drew it again, to make sure.)

                        I think either of my second-reply suggestions are the ticket, though. If it were mine, I'd use the "Easier" option and make the face frame on the back of the corner cab finish flush with the plywood side panel, rather than hanging over 1/4".
                        That was actually one of the solutions I came up with, Larry. I was less concerned about the extra thickness of the end of the face frame, than I was with the reduction in sight line of the frames (3/4" in front and 1/4" in back.) I assume that means shortening the rails in order to keep the stile widths equal?

                        I think C-Man hit the nail on the head. Sometimes you have to choose the lesser of two evils.
                        "I know it when I see it." (Justice Potter Stewart)

                        Comment

                        • cabinetman
                          Gone but not Forgotten RIP
                          • Jun 2006
                          • 15218
                          • So. Florida
                          • Delta

                          #13
                          Originally posted by Schleeper
                          In any event, now I feel comfortable proceeding with carcass construction as if I were butting up to two 42" cabinets. Thanks, guys.

                          Somehow I thought your concern was how to have a finished looking panel on the remainder 12" end panel, not how to configure the face frame. Since I don't use a computer program, or even SketchUp to plan fabrication details, I work those out with a 1:1 (full size) drawing as I described earlier, or from having done the same type of layout before. I save all of my shop drawings for that reason. I use shop drawings to also make up a materials and cut list.

                          Doing an accurate shop drawing will take into account the actual dimensions of the materials you are working with. Once you have it drawn out you can cut the pieces and place them right on the drawing for a "fit".
                          .

                          Comment

                          • Schleeper
                            Established Member
                            • Feb 2008
                            • 299

                            #14
                            Originally posted by cabinetman
                            Somehow I thought your concern was how to have a finished looking panel on the remainder 12" end panel, not how to configure the face frame. Since I don't use a computer program, or even SketchUp to plan fabrication details, I work those out with a 1:1 (full size) drawing as I described earlier, or from having done the same type of layout before. I save all of my shop drawings for that reason. I use shop drawings to also make up a materials and cut list.

                            Doing an accurate shop drawing will take into account the actual dimensions of the materials you are working with. Once you have it drawn out you can cut the pieces and place them right on the drawing for a "fit".
                            .
                            That's exactly what I was concerned about - how to build the corner cabinet so I could butt the 30" cabinet to it while having the remaining 12" look like a finished end panel. I figured that it had to impact the face frame one way or the other, because of the portion that extended beyond the side. The best choices came down to cutting the stile flush to the side, or building the side out to cover it up. Cutting it flush appears to be the easiest, but it's going to require two very clean bevel cuts on my part (not exactly my forté,) or one clean bevel, and a lot of planing. Should be interesting.

                            Full-scale drawings is a smart way to do it, but I have neither the paper stock or patience for that. I don't have CAD, either. Believe it or not, I found myself falling back on something I learned a long, long time ago: the Pythagorean Theorem (The square of the hypotenuse of a right triangle is equal to the sum of the squares of the other two sides.)
                            "I know it when I see it." (Justice Potter Stewart)

                            Comment

                            • Schleeper
                              Established Member
                              • Feb 2008
                              • 299

                              #15
                              Originally posted by LarryG
                              Re-reading your OP, I now catch the words "flush corners." If the 5/16" thickness of the applied trim in the above solution is objectionable, here are two more ways you could do this:


                              The "Easier" option on the left has the (slight, IMO) disadvantage of showing a wider face frame end at the 12" of exposed corner cabinet under the adjoining 30" high cabinet. Since it's a hairline joint, I doubt anyone but you would ever notice it.

                              But if you don't like that, there's the "Harder" option on the right which eliminates this little problem but is, well, harder, because the plywood side panel of the corner cab has to be notched to fit around the face frame. Of course, you only have to do it once ...

                              With either scheme, the side panel on the corner cab carcase would be a finished piece.
                              Larry, I KNEW there was a reason why I couldn't just cut the frame flush with the side panel. If that's the only adjustment that's made, the depth of the side ends up being more than 12". You can't just reduce the size of the plywood end to make up for it, either, because then the angles at which the face meets the sides is changed. (One ends up at more than 135 degrees, and other one becomes less.)

                              The answer is, increase the width of the face frame on the back, and the corresponding depth of the carcass, from 23-3/4" to 24". Shorten the plywood end panel accordingly, extend the frame, and then use the "Easier" option to flush the corner.
                              "I know it when I see it." (Justice Potter Stewart)

                              Comment

                              Working...