Making templates - HELP!

Collapse
This topic is closed.
X
X
 
  • Time
  • Show
Clear All
new posts
  • MilDoc

    #1

    Making templates - HELP!

    I plan on building several (read: 6) chairs. To get them all the same I was thinking of making templates for each piece, but I've never done that. I have full-scale drawings that can be transferred to 1/4 " MDF, then I planned to cut the templates on the bandsaw, about 1/8" or so outside the lines. And that's where I'm stuck.

    Despite everything I've read here, in books, etc., I can't figure out how to then "file down" the oversized templates to the lines, accurately. Router sure wouldn't do it, and I'm pretty bad at making accurate cuts with either a BS or a saber saw (that's why I'm not a surgeon!)

    I have: a Ridgid spindle sander, a PC 1/4" sheet sander, a Ridgid 5" oscillating sander.

    What do you do? What would you suggest?

    Thanks in advance!
  • wsuriano
    Forum Newbie
    • Jan 2005
    • 19
    • .

    #2
    Making Templates

    Why do you think a router won't do it? Use the template as a guide over the final piece cut a little large. Run a flush trim bit in your router with the bearing running on the template. Every piece will come out exactly the same as the template and as each other piece. The key is a good template. Spend your time getting it right and everything else will fall into place.

    Comment

    • Thom2
      Resident BT3Central Research Ass.
      • Jan 2003
      • 1786
      • Stevens, PA, USA.
      • Craftsman 22124

      #3
      Fire up that spindle sander and sand to the lines, the beauty of using templates is that you'll only have to do this once, so take your time and be VERY accurate. Any inconsistencies (sp?) will be transferred to each and every item that you route with that template. On the bright side, you don't have to sand each and every single piece
      If it ain't broke.. don't fix it!!!... but you can always 'hop it up'
      **one and only purchaser of a BT3C official thong**

      Comment

      • hermit
        Established Member
        • Dec 2002
        • 379
        • Somerset, PA, USA.

        #4
        Sounds like you're getting into the power tool rut like I used to, and are forgetting the usefulness of old standby hand power utensils. Use wood rasps, files and hand sanding to get the template perfect. Then as the other guys mentioned the the router with the template bit will cut the actual pieces perfect.

        Todd

        Comment

        • LCHIEN
          Super Moderator
          • Dec 2002
          • 22039
          • Katy, TX, USA.
          • BT3000 vintage 1999

          #5
          I find the spindle sander just great for that. The key is to Keep the template moving steadily as you sand it, that will take off the high spots and make the curve smooth, and avoid gouging the template. just make a number of passes taking off a little at a time and stop when the edge splits the line. Apply a litle more pressure where there's more material to remove, less where there's less and no pressure when its ont he line. Go faster when the curve is broad and slower where the curve is steep. plan the movement of the template along the spindle sander and pull back as you reach the end of the section that needs to be done. A little practice and you'll be pretty confident.
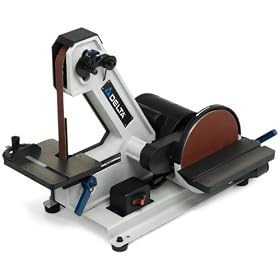
          A good way to smooth it up further is a 1" belt sander with the platen removed, that will smooth out over an inch wide area, and you need to keep the template moving for this operation, too.
          Last edited by LCHIEN; 07-08-2006, 09:57 PM.
          Loring in Katy, TX USA
          If your only tool is a hammer, you tend to treat all problems as if they were nails.
          BT3 FAQ - https://www.sawdustzone.org/forum/di...sked-questions

          Comment

          • MilDoc

            #6
            Originally posted by LCHIEN
            ...A good way to smooth it up further is a 1" belt sander with the platen removed, that will smooth out over an inch wide area, and you need to keep the template moving for this operation, too.
            Loring: a 1" belt sander? I didn't know there was such a thing. And why remove the platen?

            I'm lost on this!

            Comment

            • LCHIEN
              Super Moderator
              • Dec 2002
              • 22039
              • Katy, TX, USA.
              • BT3000 vintage 1999

              #7
              Originally posted by MilDoc
              Loring: a 1" belt sander? I didn't know there was such a thing. And why remove the platen?

              I'm lost on this!
              A 1" belt sander usually has a vertically running belt - see pic below.

              If you remove the platen the belt is flexible hanging out there in space and will conform to a gentle convex or concave curve. If you put the platen in the belt will be forced flat and make a flat spot on your piece.


              In this pic you can barely see the vertical platen behind the belt at the table level. The platen is removable and in this pic goes up about 3 inches.

              Like the spindle sander you have to keep the workpiece moving horizontally to avoid gouging the piece.

              http://www.amazon.com/gp/product/B00...lance&n=228013

              grizz also makes one for about $45, no disk.
              Last edited by LCHIEN; 07-08-2006, 10:28 PM.
              Loring in Katy, TX USA
              If your only tool is a hammer, you tend to treat all problems as if they were nails.
              BT3 FAQ - https://www.sawdustzone.org/forum/di...sked-questions

              Comment

              • RodKirby
                Veteran Member
                • Dec 2002
                • 3136
                • Melbourne, Victoria, Australia.
                • Mao Shan TSC-10RAS

                #8
                OSS definitely.

                As the guys say - you only have to do it once (for each template).

                Sure beats doing it for every chair!
                Downunder ... 1" = 25.4mm

                Comment

                • kwgeorge
                  Veteran Member
                  • Jan 2004
                  • 1419
                  • Alvin, TX, USA.

                  #9
                  Well for what it is worth I will tell you how I do it. Normally I don’t make a MDF pattern as my shop is too small to have all that laying around. So I will make one master that ends up in the project and then use it as the template. I found a couple of wonder tools for initial shaping and smoothing.

                  The first is a Japanese rasp. It has a course side and a fine side. Very controllable and I love it on outside curves and such. I normally use it without the handle. You can find this at Rockler.

                  The second is a set of Microplane shaping tools. These work very well for inside curves and such.

                  The third is a Veritas adjustable spoke shave. This thing can be tuned to take off just micro ribbons of wood. It is what I used on the legs of the last table I just built.

                  Finaly the OSS sander gets me close and then I move to the hand tools.

                  Ken

                  Comment

                  • JR
                    The Full Monte
                    • Feb 2004
                    • 5636
                    • Eugene, OR
                    • BT3000

                    #10
                    You've got some good advice so far, so I won't repeat that. One additional tool I find useful is a Stanley Surform. It takes material pretty fast, so try to keep it just away from the line, then finish with a file.

                    In my limited experience template making requires patience, but is not difficult. As others have said, take your time on this part of the process and you'll be rewarded with easy work later on.

                    Try to get within 1/16th" when you're using the bandsaw. Go slowly, trying make your mistakes into the waste area. Use the OSS only to get close, particularly on the curved sections. On the curves, and for the final shaping, you'll want to use hand tools. The Surform will get you very close, with good shape, then rasps and files will make it perfect.

                    I'm not sure I'd use1/4" MDF for the template. The bearing on your router bit will be at least that high. I used 1/2" and found that to be as thin as I'd want to use.

                    Finally, don't be afraid to scrap a teimplate. MDF is cheap. If the template is bad, so will the final product be bad. Once you've got the template perfect the rest of the work is extremely easy, so make sure you're happy with the template.

                    JR
                    JR

                    Comment

                    • just4funsies
                      Senior Member
                      • Dec 2005
                      • 843
                      • Florida.
                      • BT3000

                      #11
                      The great thing about a template is that EVERY screw-up you make producing one will be reproduced PERFECTLY in every workpiece...
                      ...eight, nine, TEN! Yep! Still got all my fingers!

                      Comment

                      • MilDoc

                        #12
                        Thanks guys, lots of good advice!

                        Comment

                        • Lance
                          Established Member
                          • Jun 2005
                          • 102
                          • Haverhill, MA, USA.

                          #13
                          Mildoc,

                          Keep in mind that for most shaped pieces the template doesn't have to macth the line perfectly. It is more important that the templates edges be smooth and even, and be a pleasing shape. Once you uses the template to cut the stock, no one else will ever know that the template was a 16th off here and there, since all the pieces will be the same.

                          (CAVEAT: I am assuming we are talking about non-joint parts, such as chair arms and such. The joinery parts will have to be precise, and probably not something to be done via template.)
                          Ex-Armchair Woodworker and newb galoot.

                          Comment

                          • cabinetman
                            Gone but not Forgotten RIP
                            • Jun 2006
                            • 15216
                            • So. Florida
                            • Delta

                            #14
                            Paul

                            It is hard to add to all this good advice. Just a tip here. Whatever you use for your template, continually check it for damage or "bearing ridges" from use. If changes to the template go unnoticed, your final products will have that change.


                            "I'M NEVER WRONG - BUT I'M NOT ALWAYS RIGHT"

                            Comment

                            • onedash
                              Veteran Member
                              • Mar 2005
                              • 1013
                              • Maryland
                              • Craftsman 22124

                              #15
                              first of all I hope I never have a surgeon who has to use a band saw or saber saw on me.
                              Now here is the formula you need.
                              Cost of the six chairs if you bought them divided by two. Use that money to buy tools and materials and even if you spend a little more than half no one can complain since you are still way ahead. I would like a oscilating belt sander if I was going to make 6 chairs.
                              When I built my kitchen table I got some new tools and spent less than $600 total. The table in the store was $1000. Wife was happy.
                              YOU DONT HAVE TO TRAIN TO BE MISERABLE. YOU HAVE TO TRAIN TO ENDURE MISERY.

                              Comment

                              Working...