Stopped and started dado?

Collapse
This topic is closed.
X
X
 
  • Time
  • Show
Clear All
new posts
  • dbhost
    Slow and steady
    • Apr 2008
    • 9236
    • League City, Texas
    • Ryobi BT3100

    Stopped and started dado?

    Just wondering how this would be done...

    I have a project where I want to cut slots for panels in stiles that are butt jointed (say I want to pocket hole screw these together for example...)

    How would I start / stop the dado / slot without starting or going through the ends? Say like I want the slot to start, and end 3" from the ends of the stock?
    Please like and subscribe to my YouTube channel. Please check out and subscribe to my Workshop Blog.
  • LCHIEN
    Internet Fact Checker
    • Dec 2002
    • 21028
    • Katy, TX, USA.
    • BT3000 vintage 1999

    #2
    Originally posted by dbhost
    Just wondering how this would be done...

    I have a project where I want to cut slots for panels in stiles that are butt jointed (say I want to pocket hole screw these together for example...)

    How would I start / stop the dado / slot without starting or going through the ends? Say like I want the slot to start, and end 3" from the ends of the stock?
    Use a router, straight bit, guide fence, and start/stop blocks.

    this is called a "Stopped dado" if youwant to look it up on the internet.
    Last edited by LCHIEN; 06-23-2008, 04:41 PM.
    Loring in Katy, TX USA
    If your only tool is a hammer, you tend to treat all problems as if they were nails.
    BT3 FAQ - https://www.sawdustzone.org/forum/di...sked-questions

    Comment

    • LarryG
      The Full Monte
      • May 2004
      • 6693
      • Off The Back
      • Powermatic PM2000, BT3100-1

      #3
      ... or you can use a slot-cutting bit and lay the workpiece flat on the router table (with a straight bit, you'd place it on edge, with the wide face against the fence). With either method, you will need to tip the workpiece into the bit while the router is running.

      Nahm generally doesn't use stop blocks, choosing instead to make pencil lines on the fence indicating where to start and stop. This works, but the bit can grab the workpiece and make the slot start/end in a little different place than intended. Me, I use stop blocks.

      Yet another method is to use a straight bit in a plunge router, fitted with either an edge guide or some kind of fixture to hold the workpiece and guide the router along its length. Basically the same procedure as cutting mortises, except for the slot's length.

      With any of these methods, if you need a square end to the slot, you clean up the rounded end using a chisel.
      Larry

      Comment

      • dbhost
        Slow and steady
        • Apr 2008
        • 9236
        • League City, Texas
        • Ryobi BT3100

        #4
        Slot cutting bit sounds like a winner to me!
        Please like and subscribe to my YouTube channel. Please check out and subscribe to my Workshop Blog.

        Comment

        • cabinetman
          Gone but not Forgotten RIP
          • Jun 2006
          • 15216
          • So. Florida
          • Delta

          #5
          Originally posted by dbhost
          Slot cutting bit sounds like a winner to me!
          If you use a slot cutting bit similar to this:
          .

          http://www.amanatool.com/bitdetails/53400.jpg
          .
          you can get a variety of slot widths and depths. In using these, it will leave a curved start and stop with a radius of the bit used, similar to the ends of a biscuit slot. You will have to square them out cleanly with an appropriately fitting chisel, or carving tool.
          .

          Comment

          • dbhost
            Slow and steady
            • Apr 2008
            • 9236
            • League City, Texas
            • Ryobi BT3100

            #6
            I was thinking about something like...


            http://www.mlcswoodworking.com/shops...s/bt_slot.html

            I know Amana has great stuff... But I own MLCS router bits and have been very impressed with how clean their 3 wing cutters cut... And I like doing business with them...
            Please like and subscribe to my YouTube channel. Please check out and subscribe to my Workshop Blog.

            Comment

            • LCHIEN
              Internet Fact Checker
              • Dec 2002
              • 21028
              • Katy, TX, USA.
              • BT3000 vintage 1999

              #7
              that's kind of the slow way... depends on how wide your stopped dado needs to be.
              usually a straight bit is faster altho you still have to make a pass per 1/8" to 3/16th deep.

              Also if you need to square up the ends, the vertical ends of the straight bit dado will be easy to square up with a chisel, but the sloped ends of the slot cutter will be hard to square up.
              Last edited by LCHIEN; 06-23-2008, 11:08 PM.
              Loring in Katy, TX USA
              If your only tool is a hammer, you tend to treat all problems as if they were nails.
              BT3 FAQ - https://www.sawdustzone.org/forum/di...sked-questions

              Comment

              • JR
                The Full Monte
                • Feb 2004
                • 5633
                • Eugene, OR
                • BT3000

                #8
                I'm with Loring. I'd use 1/4" straight bit.

                To each his own, though.

                JR
                JR

                Comment

                • cabinetman
                  Gone but not Forgotten RIP
                  • Jun 2006
                  • 15216
                  • So. Florida
                  • Delta

                  #9
                  Suggestions as to the methods to do the slot can be based on the different ways to do it. Likewise preferences as to brand of bit or company are a personal one.

                  Using a slot cutting bit would be the easiest to use, but the cleanup would entail more material to clean out than a straight cutting bit. A straight cutting bit used with some kind of fixture to hold the part entails fabricating what may be a one time fixture. Standing the part vertically against the fence and using guide lines or stop blocks would be easier than using some fixture and a plunge or fixed base router.

                  A very effective and safer method to do slots would be to set up a router to be used horizontally like this simple shop built arrangement:
                  .

                  .
                  By just getting an extra router base, a straight bit can be used, and the stock can be laid flat to the table. With some adjustibility to the height of the router, many other procedures can easily be done, like rabbeting,or mortises. Further benefits can be realized with fabricating table slots and a sled assembly.

                  Other advantages to using a straight bit over a slot bit with a bearing is that there is no differential transferred to the slot from the bearing running on an imperfect edge.

                  In essence, using a slot bit in a vertically mounted router provides the same machining cut as a straight bit used in a horizontal set-up. The difference in the outcome would be less of a clean out with the straight bit.
                  .

                  Comment

                  • docrowan
                    Senior Member
                    • Mar 2007
                    • 893
                    • New Albany, MS
                    • BT3100

                    #10
                    Another option: If you change your butt joints to miter joints, you can run your grooves or dados all the way to the end.
                    - Chris.

                    Comment

                    • dbhost
                      Slow and steady
                      • Apr 2008
                      • 9236
                      • League City, Texas
                      • Ryobi BT3100

                      #11
                      I thought about the miter joints. However the question wasn't exactly for a specific project, but more of a how do I do this kind of thing... I do have a project in mind, but am not working on it at this time. Which is one of those bench top tool shelf things. I guess if I biscuit the miters they might be able to take some stress, but I would think a mitered joint wouldn't be all that strong... Even with biscuits.
                      Please like and subscribe to my YouTube channel. Please check out and subscribe to my Workshop Blog.

                      Comment

                      • LarryG
                        The Full Monte
                        • May 2004
                        • 6693
                        • Off The Back
                        • Powermatic PM2000, BT3100-1

                        #12
                        I had the impression you were asking a "generic" question. One reason for the variety of suggestions is that you didn't say what kind of tooling you have. The other was to kick-start your imagination, get you thinking about the possibilities.

                        If you have a router table, as Loring and JR and I assumed, a straight bit is the easiest and quickest way for the specific condition you described. For a butted connection joined with pocket screws, you could cut the slot over-long at each end by a distance equal to half the bit diameter; i.e., 1/8" for a 1/4" wide slot. The adjoining rail would cover this, and the joint's strength would not be compromised because the pocket screw wouldn't be that close to the edge of the rail anyway. You'd save time because there'd be no cleanup of the rounded end of the slot necessary -- and that's what tips the scale in favor of the straight bit. When doing any specific kind of joinery, always consider all the steps required to get the job done, not just the ease of only one of them.

                        If you have a slot cutter, you could use that. It's a good alternative to a straight bit, which is why I suggested it. But it's no better, and in some ways it's worse (i.e., you'd probably have to clean up the longer, gradually-curved end of the slot). Mainly, it's just different -- another way of getting to the same end result.

                        The main reason I suggested a plunge router (other than not knowing whether you have a router table) is because you didn't specify how long the workpieces are. A router table fence with stop blocks is a good method if the workpieces are short; but if they approach or exceed the length of the fence, the stop blocks are literally "off the table" and become difficult to rig. So this might be one of those times when taking the tool to the wood, as opposed to taking the wood to the tool, is easier.

                        In such a scenario, the main problem is giving the router a sufficiently stable surface on which to bear. A common solution is to gang together the other stiles and rails for the same assembly, with the actual workpiece out in the middle. Now instead of trying to balance a top-heavy router on an edge that is only, say, 3/4" wide, you have 3" (or even more, if you're making several identical assemblies) ... much better for stability. Adjust the edge guide to position the bit and make the cut.

                        No edge guide for your plunge router? Simply clamp a short piece of wood across the router's base, using some small C-clamps. Presto, instant fixture. Don't let anyone fool you into thinking that shop-built solutions have to be complicated, or costly in terms of money or time.

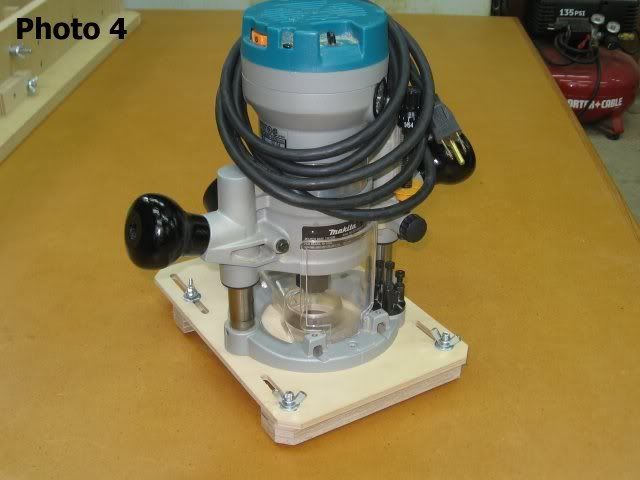
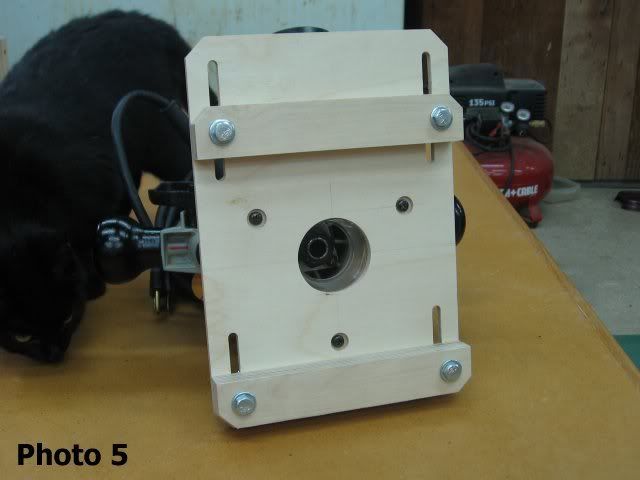
                        A good example of a simple, easy-to-make fixture is a custom base plate for a handheld router. Custom base plates are something I suspect too few woodworkers make use of. Here are some photos, recycled from another post, of a custom base plate I made that would work for the scenario described above, as an alternative to the somewhat crude (albeit effective) clamped-on stick:


                        As you can see, it consists of a rectangle of 1/4" plywood, with two 3/4" plywood fences attached through slotted holes with bolts and wing nuts. It is essentially a shop-built edge guide, with the advantage of having two fences, so that the router cannot wander off course. A custom base plate like this can be built from scrap, takes very little time to make (mine took less than an hour), and is something for which you'll find uses for as long as you have a woodshop. It's fully adjustable, it's repeatable, and it doesn't take three hands to set up. Best of all, since it's custom, you can size it and build it so that it works well for you.

                        So, really, it's all about what you have, what you're trying to do, your level of expertise, and your imagination. There are very few woodworking tasks that can be done only one way; and there are even fewer "best" ways.
                        Last edited by LarryG; 06-24-2008, 11:09 AM. Reason: improved readability
                        Larry

                        Comment

                        • dbhost
                          Slow and steady
                          • Apr 2008
                          • 9236
                          • League City, Texas
                          • Ryobi BT3100

                          #13
                          It's not much to look at, and the fence is something awful, BUT... I do have a router table, and an improved fence is in the works...
                          And yes I am kind of in the stage of function before form, trying very hard to get to the stage where I can be proud of form as well...


                          Along with the router table, with it's nearly permanently attached fixed base router, I also have a plunge router...


                          I know I am going to get grief over owning B&D but so be it...

                          Anyway, this router does have a parallel edge guide, but there is no way I can pull it in far enough to work with say slotting 3/4" wide stock... HOWEVER, I bet if I block it in with some clamps, and 2x4s to ride the router in... I can set the guide to the right depth to get my slot where I want it...
                          Last edited by dbhost; 06-24-2008, 12:51 PM.
                          Please like and subscribe to my YouTube channel. Please check out and subscribe to my Workshop Blog.

                          Comment

                          • JR
                            The Full Monte
                            • Feb 2004
                            • 5633
                            • Eugene, OR
                            • BT3000

                            #14
                            For the operation in question you could just clamp a piece of square wood to the table, and call it a fence.

                            JR
                            JR

                            Comment

                            • pelligrini
                              Veteran Member
                              • Apr 2007
                              • 4217
                              • Fort Worth, TX
                              • Craftsman 21829

                              #15
                              Another option using a through dado; instead of miters you could do a modified butt-joint. In the basic drawing below the dashed lines would be the depth of the slot. I've done this a few times where I didn't want to miter the corners. I just used this joint recently on some pegboard doors. I didn't do slots but there were rabbits running down both sides.

                              After cutting the slots on my router table with a straight bit I cut out the ends of the rails on my TS. I set up the fence with a block attached to set the placement of the rail on my SMT. I would use one of the stiles and the setup block the set the proper fence distance from the left side of the blade. Then I will move the setup block towards the front of the table so it won't be in-between the door rail being cut on the SMT and the fence. The blade height was adjusted to hit the bottom of the routered slot.

                              After making a cut on all the rail ends I can either stand them up on the TS using a tenon jig, or do them on the router table. I like making the crosscut on the TS even when using the routertable. It will really help with the tearout that can happen.

                              This last time I did some 3/8" counter bores on the drill press so I could join the stile to the rail with some screws. Closeup of joint corner I also bored through the rail with a bit size matching the outside thread diameter of the fastener. This will ensure a snug fit with the stile. I used some 1-1/4" fasteners from my Kreg kit in this case.
                              Attached Files
                              Erik

                              Comment

                              Working...