Multi-use train/lego/toy table

Collapse
This topic is closed.
X
X
 
  • Time
  • Show
Clear All
new posts
  • chopnhack
    Veteran Member
    • Oct 2006
    • 3779
    • Florida
    • Ryobi BT3100

    Multi-use train/lego/toy table

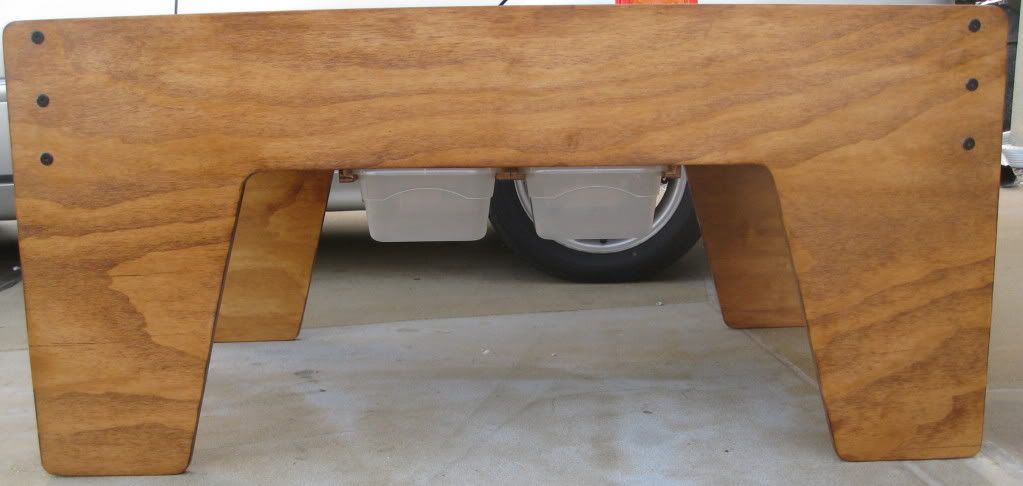
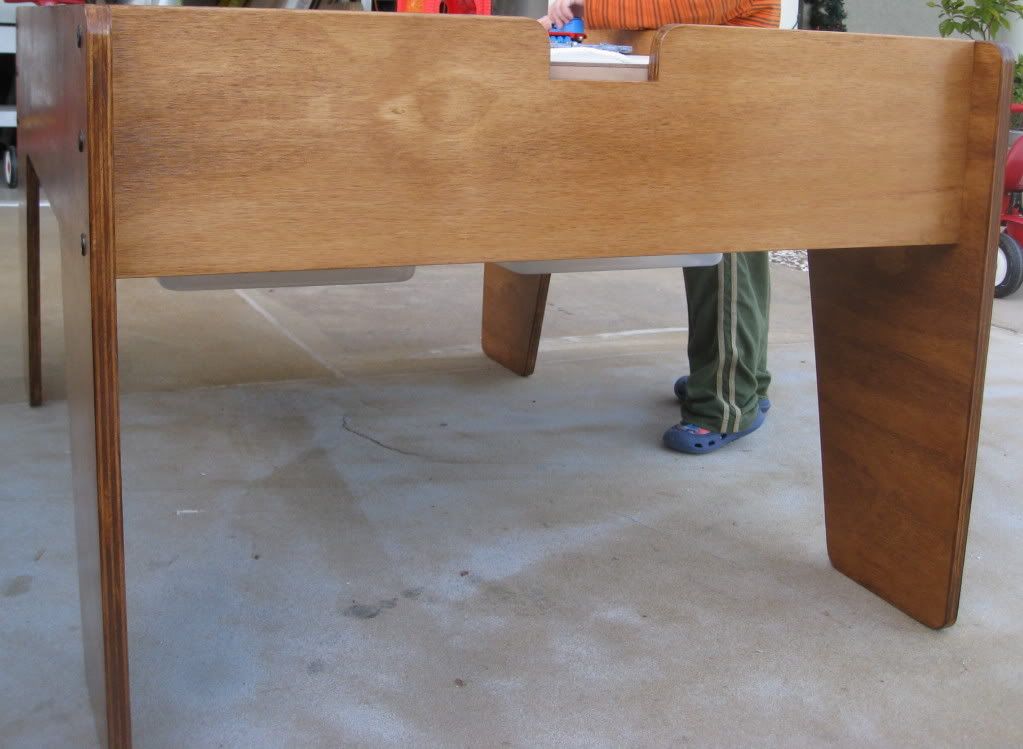
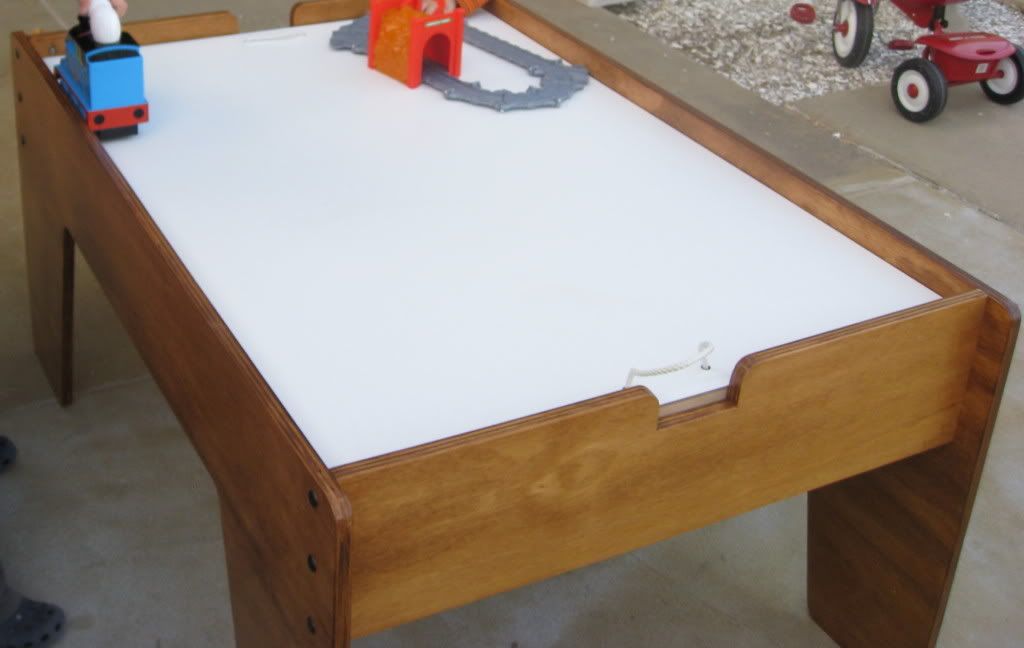
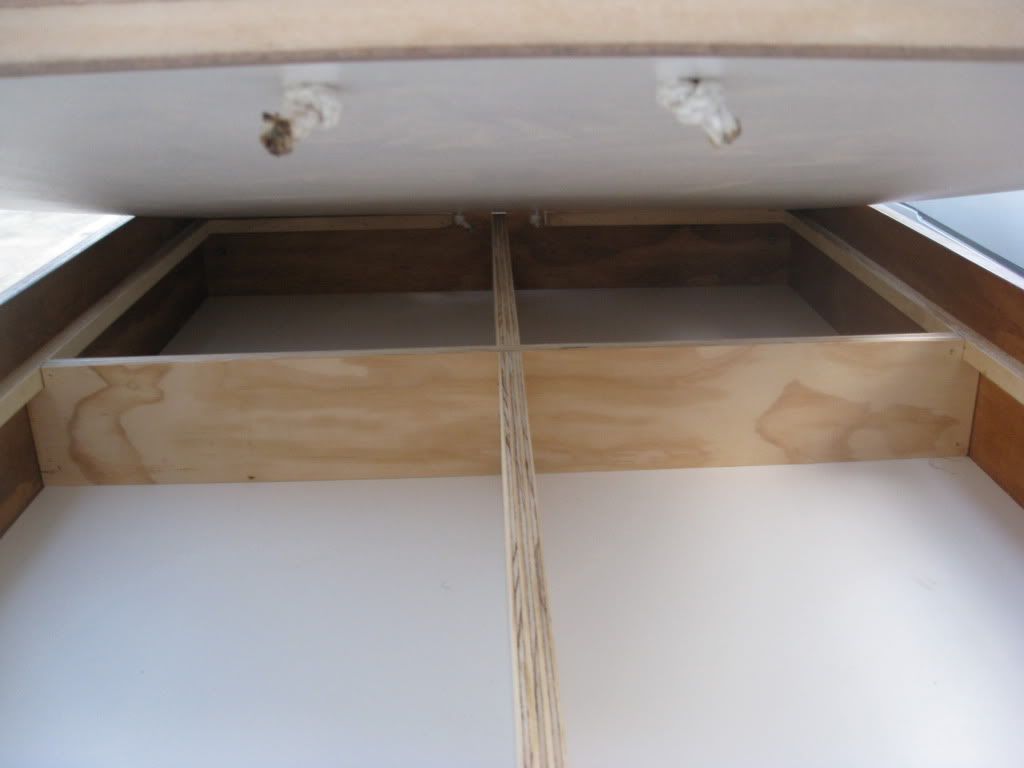
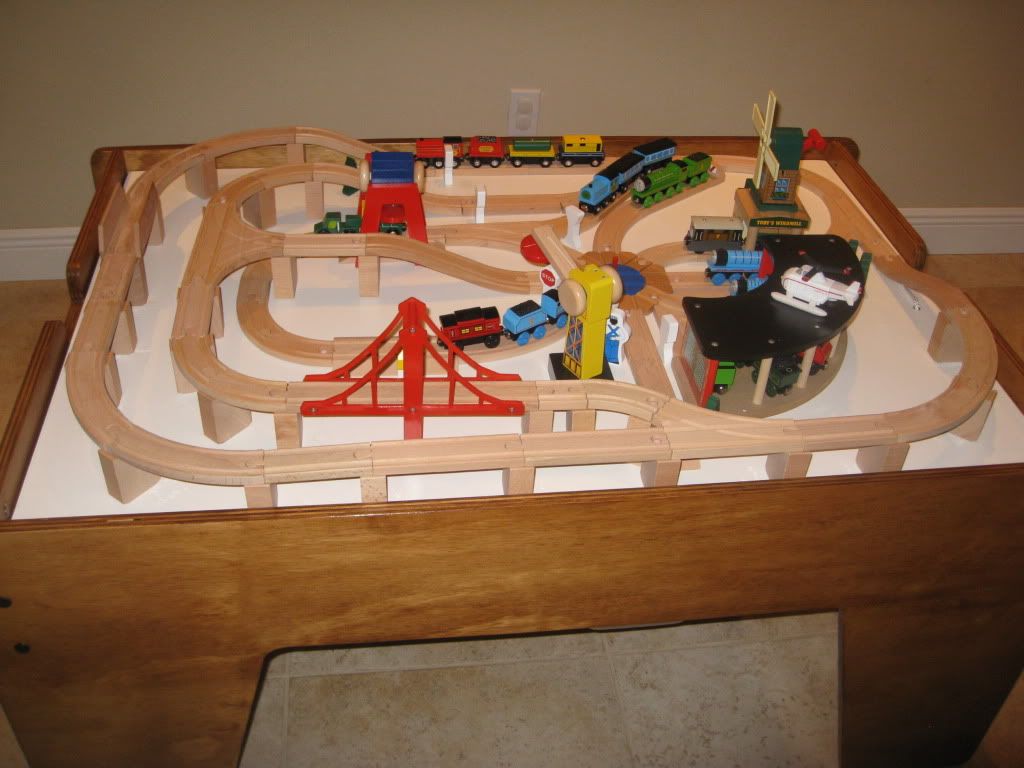
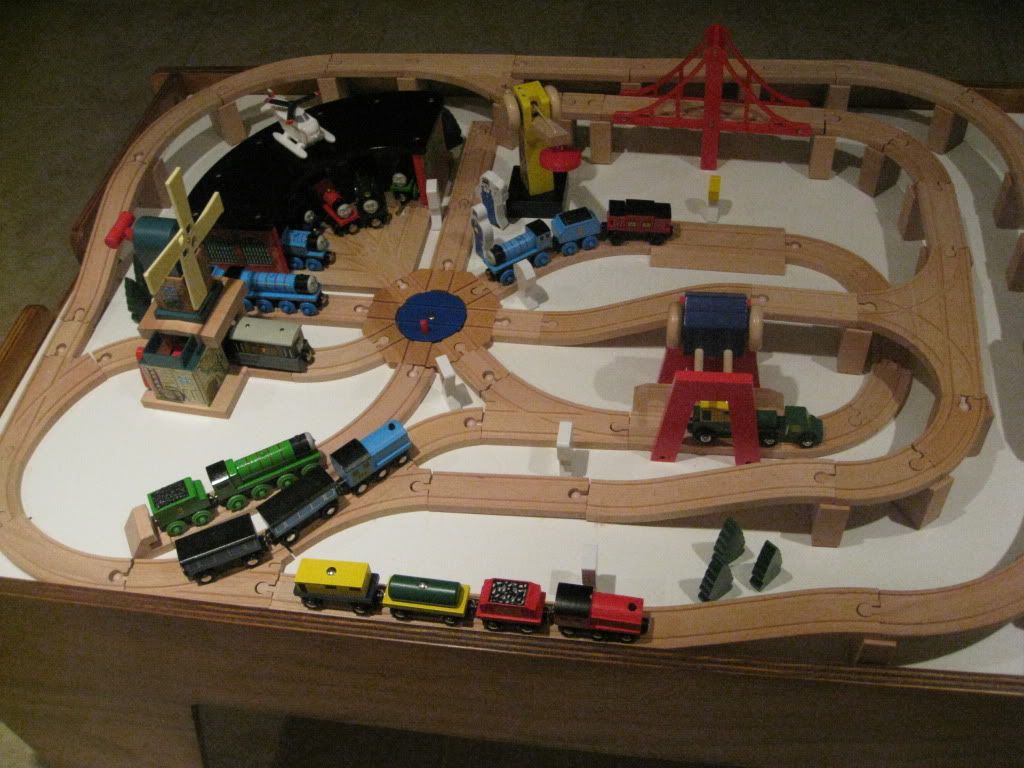
    Been so busy at work that this project kept getting delayed, but it's finally done. This is the first project I have done that was originated in Sketchup and then an image and cutlist was created from the program data. Worked out wonderfully. I used 1/4" bolts with large washer heads and cross dowel nuts to assemble and hopefully kidproof the table. The cross dowel method lends well to one man assembly. The plywood used was the Auraco pine plywood from Home Depot. The stain is GF's Shaker maple, sprayed a sealer coat of shellac and all pieces were sanded to 220 to help control blotching. The top is a sandwich of white melamine coated hardboard and mdf core. The top is removable to show a grid of 4 empty spots for storage as well as storage underneath. The finsh wasn't even dry and my two boys with toys in hand decended on me and started playing on the table so I chalk this one up as successful ;-)


    I think in straight lines, but dream in curves
  • LCHIEN
    Internet Fact Checker
    • Dec 2002
    • 20914
    • Katy, TX, USA.
    • BT3000 vintage 1999

    #2
    that's pretty neat. Is the bottom set in dadoes in the side pieces?
    I like the simplicity of the rope handles for the top lift.
    What is the working height? Will you share plans?
    It would have been neat if the cutouts in the side legs could have been used in the design somewhere... something about total use, no waste.

    Overall I give you a 9.5 out of 10, you lost the .5 only because you didn't use the cutouts :-). You get a crapload of points for original design, hidden fasteners.
    Last edited by LCHIEN; 12-22-2011, 01:30 AM.
    Loring in Katy, TX USA
    If your only tool is a hammer, you tend to treat all problems as if they were nails.
    BT3 FAQ - https://www.sawdustzone.org/forum/di...sked-questions

    Comment

    • chopnhack
      Veteran Member
      • Oct 2006
      • 3779
      • Florida
      • Ryobi BT3100

      #3
      LOL, thanks for the kudos Loring, that is some high score! No deduction for using softwood ply? hehe.

      The bottom is not set into a dado for a few reasons. The first reason is because of the choice of fastener. I figured that the bolt would be able to not only help square the piece as I assembled it, but it would draw tight the four corner areas. Why I chose the bolt: time crunch, don't have a reliable way to create a stop dado on such a large piece of ply - yes I have a router and straightedge, but too involved for what this is. The bottom simply sits on a border of 3/4" square plywood that is glued and nailed. After the center divider was installed I came back and nailed the bottom to the center divider.

      The dividers are cut halfway across each of their widths to intersect flush and where then toe nailed with some brads.

      Working height is ~2'.
      Plans shareable: http://sketchup.google.com/3dwarehou...944951133f1c85

      I did use the cutouts though, they were not wasted. I used them to test how much blotching to expect and what I had to do to address that before staining. After they accomplished their primary job, I cut them into shapes and the kids glued them up into "buildings". :-)

      This project was built exclusively on top of the long rail version of the knockdown worktable and man it was a saviour! The kids also like the worktable as its the right height for them to do their projects with me.
      Last edited by chopnhack; 12-22-2011, 01:58 AM.
      I think in straight lines, but dream in curves

      Comment

      • Pappy
        The Full Monte
        • Dec 2002
        • 10453
        • San Marcos, TX, USA.
        • BT3000 (x2)

        #4
        Slick table
        Don, aka Pappy,

        Wise men talk because they have something to say,
        Fools because they have to say something.
        Plato

        Comment

        • os1kne
          Senior Member
          • Jan 2003
          • 901
          • Atlanta, GA
          • BT3100

          #5
          I like it. I need to do something similar.
          Bill

          Comment

          • LCHIEN
            Internet Fact Checker
            • Dec 2002
            • 20914
            • Katy, TX, USA.
            • BT3000 vintage 1999

            #6
            Originally posted by chopnhack
            LOL, thanks for the kudos Loring, that is some high score! No deduction for using softwood ply? hehe.

            ...
            The kids don't know and don't care.

            I measure the top around 2'8" x 3'10" from your sketchup file.
            Last edited by LCHIEN; 12-22-2011, 12:16 PM.
            Loring in Katy, TX USA
            If your only tool is a hammer, you tend to treat all problems as if they were nails.
            BT3 FAQ - https://www.sawdustzone.org/forum/di...sked-questions

            Comment

            • dbhost
              Slow and steady
              • Apr 2008
              • 9209
              • League City, Texas
              • Ryobi BT3100

              #7
              Very cool table. I need to get busy on one of those for next year, one of my best friends sons will be 2 this June. I figure a play table like this might help centralize the sprawling toy mess in their family room...
              Please like and subscribe to my YouTube channel. Please check out and subscribe to my Workshop Blog.

              Comment

              • chopnhack
                Veteran Member
                • Oct 2006
                • 3779
                • Florida
                • Ryobi BT3100

                #8
                That sounds about right Loring. Dbhost, the table is a relatively quick build I will share some of my thoughts as I built it, things I did and things I would do differently:

                1. I didn't, but should have - dimension your plan and bring it with you into the shop!! - If I had done that I wouldn't have needed the rope handles! The cutouts on the sides were too shallow to allow for enough room to get the hands underneath.

                2. Make a template for the cutout if you choose to go the no rope option, the it allows you to clamp the template and use your router. I used one finished piece to create the other so one side piece has square edges for the hand hold area while the other is a nice radiused contour.

                3. Radius the edges, I chose to do so with sandpaper when I was prepping the pieces to avoid any chipout at the edges.

                3a. If you don't have any already, make some radiused edge templates and use them to do all your edges, except the obtuse angle on the underside, that you can hand shape fairly easily.

                4. There is a right way and wrong way of cutting the half height notches for the center divider - do it wrong like I did and you will have to remove one of the long pieces from the assembled table to allow yourself room to squeeze it in. Think about it and you'll understand why ;-) it was an order of assembly error on my part.

                5. Buy your tupperware or intended storage vessels for under the table before you rip the undertable supports. I made some L shaped supports on the t.s. only to have to "refine" them with sandpaper to get them to fit with the lids.

                6. Drilling the holes for the cross dowels and bolts - word to the wise, get a portable drill press attachment for your drill.... I had a near blow out that I was unaware of until I assembled the piece and there was a small bulge on the face of the short side from compressed wood fibers!! Also get yourself an appropriate sized forstner bit for the cross dowel itself that way if fits snug and bears on the edge better. I had planned on getting a set but failed to do so and had to use crappy twist bits that couldn't get to the full depth without the center spur poking through first. That had to be the worst part of the assembly, a little time consuming without the correct tools, but isnt that always the case?
                I think in straight lines, but dream in curves

                Comment

                • cabinetman
                  Gone but not Forgotten RIP
                  • Jun 2006
                  • 15218
                  • So. Florida
                  • Delta

                  #9
                  Well Chop...I give ya a 9.9. High scores for a great table. It came out great, and will provide lotsa fun.

                  .

                  Comment

                  • chopnhack
                    Veteran Member
                    • Oct 2006
                    • 3779
                    • Florida
                    • Ryobi BT3100

                    #10
                    Thanks Mike :-) It was a fun design and a pretty quick build. The kids are making good use of it. Can't wait to build their train set on top of it!! Even better, can't wait to see their faces come Christmas morning!!!
                    I think in straight lines, but dream in curves

                    Comment

                    • toolbelt diva
                      Established Member
                      • Oct 2004
                      • 202
                      • Houston, TX, USA.
                      • Ryobi BT3100-1

                      #11
                      Wonderful, great job! I love all the storage space. This is very timely, because I've been thinking of building a Lego table for our kids and this will give me some ideas on where to start. Due to lack of space I need to make a portable/folding one.
                      Rita

                      Comment

                      • chopnhack
                        Veteran Member
                        • Oct 2006
                        • 3779
                        • Florida
                        • Ryobi BT3100

                        #12
                        Twas the night before Christmas.....

                        The train table set up and waiting for sleeping children to awake next morning! Man this is one tired elf :P Since one of the boys is a terrible 2 y.o. everything is double stick taped down (except the trains and helicopter, LOL). That Rhino tape works well but with small intricate pieces is a bear to cut and peel. Much is left behind on the fingers. Otherwise it work really well!


                        I think in straight lines, but dream in curves

                        Comment

                        • LCHIEN
                          Internet Fact Checker
                          • Dec 2002
                          • 20914
                          • Katy, TX, USA.
                          • BT3000 vintage 1999

                          #13
                          Hey, who's having all the fun here?
                          Loring in Katy, TX USA
                          If your only tool is a hammer, you tend to treat all problems as if they were nails.
                          BT3 FAQ - https://www.sawdustzone.org/forum/di...sked-questions

                          Comment

                          Working...