-
Erik -
My approach to doing an array of holes like that:
use Brad point drill bits which are easy to locate the center,
or else use a laser indicator showing and "X" for drill center, or both...
MArk the vertical lines across the short dimension.
Mark a small mark on the long dimension - don't need horizontals lines, just a mark indicating each row; the fence will provide the line..
Use a drill press with a good fence.
Align the first row by positioning the bit point/laser on the first row mark and set the fence so you will drill this row.
Slide the workpiece along the fence to the first vertical line, drill the hoel using the DP depth stop. Slide to the next vertical ine and repeat until the row is done. If there's a row on the opposite side the same distance from the edge, flip the piece 180 degrees and drill that row.
Repeat, aligning the fence and the DP to the next row. and repeat drilling the line of holes.
THis process will go very quickly. With the laser or the brad point you can position the vertical line very accurately and the rows will be positioned extrememly will with the fence as a guide.Last edited by LCHIEN; 09-21-2010, 04:01 PM. Loring in Katy, TX USA
If your only tool is a hammer, you tend to treat all problems as if they were nails.
BT3 FAQ - https://www.sawdustzone.org/forum/di...sked-questionsComment
-
I draw a grid, 10 lines one way, 5 the other. The holes are 1" apart and the rule is 1" wide so once you layout your first line you use the rule's width to draw the rest. I set the depth stop on the drill press and drilled them with a brad point. Once you figure out what your layout is going to be it only takes 10 mins to mark and drill them. It's not real precise but it doesn't need to be.
I show pictures of the die holder box I'm building once it's done.Opportunity is missed by most people because it is dressed in overalls and looks like work. - Thomas EdisonComment
-
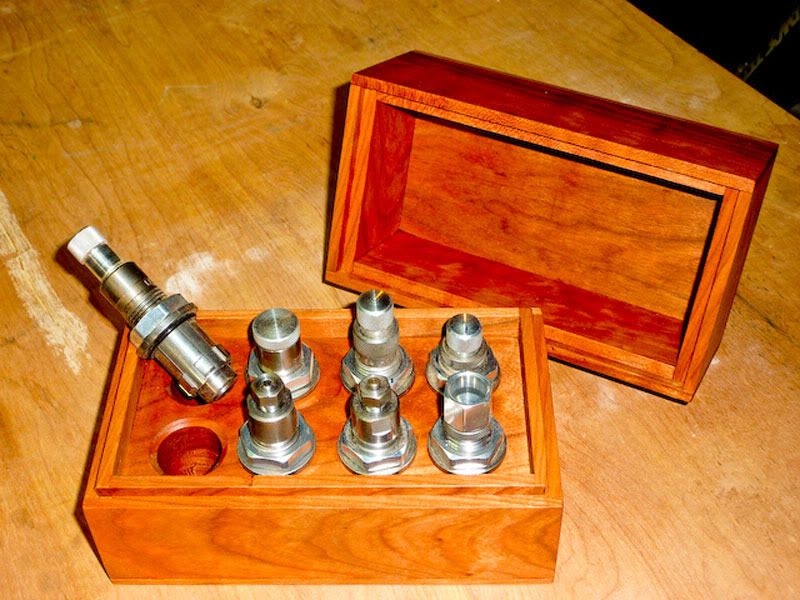
The trays I make the holes are slightly oversized to allow for easy insertion of drill bits or router bits.
On the DP, I might take one spacer the width to make the closest row, and just place it against the fence instead of moving the fence. For the next row, just rip the spacer narrower. Or, the different size spacers could be cut in advance and be ready to use.
The marks are just measured off laterally. Depending on the size and complexity of the pattern, it may be simpler to do it that way instead of configuring a stop pin of some sort.
.Comment
-
OK,
I've got some 1" flip stops and other fixed stops I'll use for spacing 1" holes. I also have a bunch of MDF spacers at 1/2" and 3/4" I'll use for other those spacings.
I'll usually start drilling on the centerlines so I can just flip the piece around to get equidistant spacings. Move the fence back once and do the lateral lines on each side.ErikComment
-
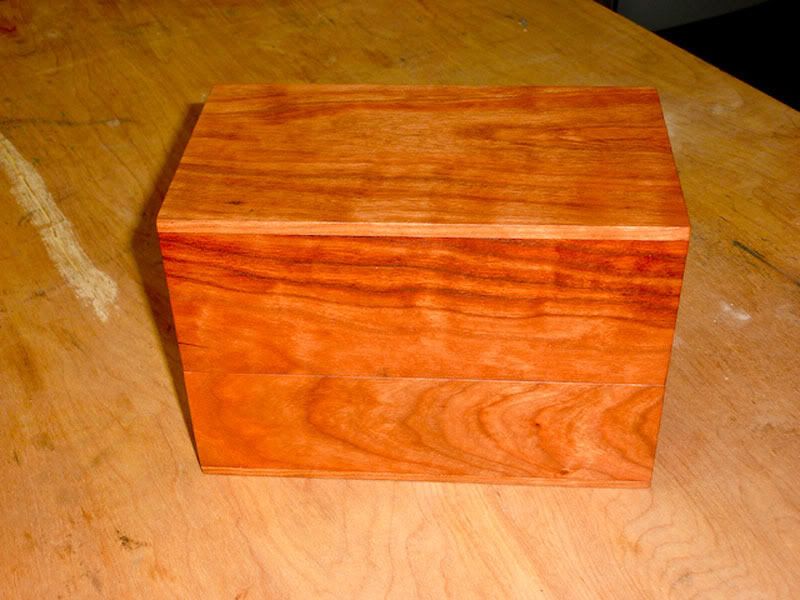
Here's a box I made to hold the reloading dies. I use a Hornady "lock and load" press so each die uses a special bushing. After you install that bushing there are no off-the-shelf boxes to store the dies.
The box is scraps of cherry finished with boiled linseed oil.
 Opportunity is missed by most people because it is dressed in overalls and looks like work. - Thomas Edison
Comment

 Tweet
Tweet
Comment