Looking for temporary use of a zero clearance throat plate for 3D modeling

Collapse
This topic is closed.
X
X
 
  • Time
  • Show
Clear All
new posts

  • LCHIEN
    replied
    I think its great!.

    I have one suggestion:

    Seems like the joint requires some means of fixing in place (glue?). Perhaps, Instead of the dovetail joint:

    Maybe fill in these sections solid. Then put two axial holes in the sections running lengthwise to the plate... intersecting the split. Holes of say 1/8" or 3/16" diameter about 5/8" deep into each half.

    The you can use some inexpensive, widely available metal roll (spring tension) pins of 1/8" or 3/16" x 1 inch long into the split for alignment.

    Click image for larger version  Name:	image.png Views:	0 Size:	501.0 KB ID:	859193
    Maybe a printed mortise and tenon is neater, needing no external parts. But the roll pins can make all 3 axis alignment near perfect and the spring force will keep them together under low forces to pull them apart. But this is an special form of mortise and tenon.
    Just a thought.
    Amazon lists a pack of 16 roll pins for $9. https://www.amazon.com/Hard-Find-Fas.../dp/B00OP62KVC

    25 pack 1/8" x 1 for $8.42 https://www.amazon.com/Prime-Line-9187812-Slotted-Spring-25-Pack/dp/B07DS5N6VJ

    I'm sure local ACE or Lowes or HD has them as well individually or Graingers or any industrial supply or fastener companies will have them in bulk (100+ qty) if needed. Graingers has 3/16" x 1 $22.29 to 24.59 for steel or stainless steel per 100. 1/8" x 1 steel for $7.55 for 100

    Lowes says they have them 1/8" x 1" 2-pack for $1.28

    I just want to know when I can place an order for mine... :-)
    Last edited by LCHIEN; 06-11-2024, 03:46 PM.

    Leave a comment:


  • jlmeredith
    replied
    LCHIEN d_meister - Let me know what you guys think!

    Leave a comment:


  • jlmeredith
    replied
    Video showing lower clearance from the ZCTP when the blade is fully lowered.


    Video showing the first cut through of the ZCTP on the saw after shims were replaced.


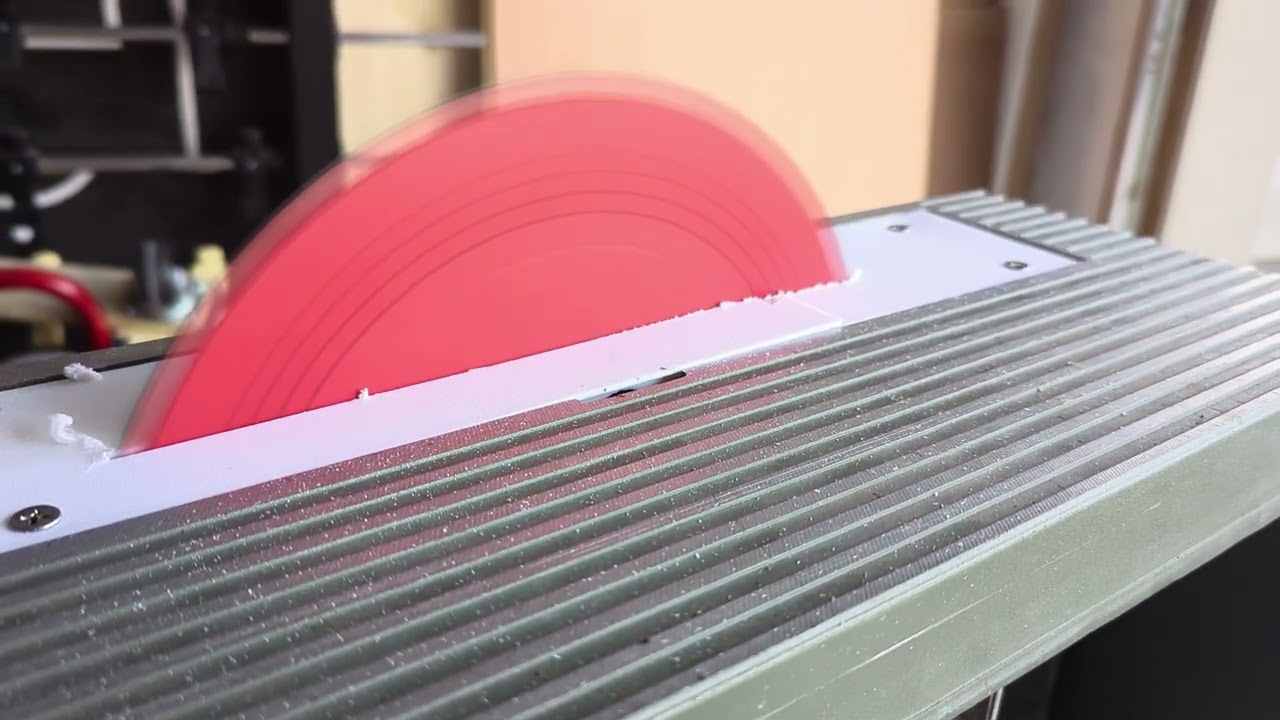
    This is the full height of the blade from the throat plate which I think is where I should be.

    Click image for larger version  Name:	PXL_20240610_225016290.MP.jpg Views:	0 Size:	149.1 KB ID:	859187
    Additional side shot from the left side of the blade.

    Click image for larger version  Name:	PXL_20240611_022325128.MP.jpg Views:	0 Size:	102.0 KB ID:	859185

    I will need to make some design adjustments to address where the throat plate is not hollowed out enough toward the front of the plate.
    Click image for larger version  Name:	PXL_20240610_222648743.jpg Views:	0 Size:	129.3 KB ID:	859184

    No noticeable rubbing or marks from the arbor washer in the fully up position, so I think the cut outs are working as expected.
    Click image for larger version  Name:	PXL_20240610_222654838.jpg Views:	0 Size:	101.3 KB ID:	859182

    Will need to make some adjustments for the screw heads to fully recess. Additionally, I need to make some adjustments to the interface of the base of the plate and the screw down points as screwing things down bends up the ends. This may also be due to the top portion not being completely solid.

    Click image for larger version  Name:	PXL_20240610_221746701.jpg Views:	0 Size:	114.3 KB ID:	859183
    Attached Files
    Last edited by jlmeredith; 06-11-2024, 11:23 AM.

    Leave a comment:


  • jlmeredith
    commented on 's reply
    I am thinking that it maybe a part to another tool that somehow got wedged up inside the saw. As you indicated, the two metal arbor spacers are in place. This is plastic, so not sure that it actually goes on the saw.

  • jlmeredith
    commented on 's reply
    This is the the two part design. I will be working on changing that to use a mortise/tenon design I think. Video post coming up next!

  • LCHIEN
    replied
    Looks like you have very little clearance. Maybe near Zero.
    Smells like success!

    Is that a one-piece or two-piece solution?

    You can clearly see its an ATB blade.
    Click image for larger version

Name:	image.png
Views:	96
Size:	19.7 KB
ID:	859177
    Attached Files
    Last edited by LCHIEN; 06-10-2024, 11:34 PM.

    Leave a comment:


  • jlmeredith
    replied
    Did not investigate the mystery plastic ring much.

    Shims installed and first official test cut completed!

    Click image for larger version

Name:	PXL_20240611_022314649.MP.jpg
Views:	169
Size:	114.7 KB
ID:	859174

    Leave a comment:


  • LCHIEN
    replied
    I mean offhand it resembles the wide arbor spacer... which is very precisely 1/2 inch wide with a 5/8" ID hole.

    But I know from your pictures you already have one in the right place. And I don't know why it would have 6 presumably dust circles on its side.

    Leave a comment:


  • jlmeredith
    replied
    I have the attention of a knowledgeable group of people so asking for a side quest - do any of you recognize this as something on the saw?

    The part has very regular wear marks so I think it is something that is supposed to be on the saw? It was wedged at the top of the screw that moves the saw head up and down.

    Click image for larger version

Name:	PXL_20240609_232624321.jpg
Views:	226
Size:	91.3 KB
ID:	859168

    Click image for larger version

Name:	PXL_20240609_232638985.jpg
Views:	182
Size:	80.4 KB
ID:	859170
    adClick image for larger version

Name:	PXL_20240609_232649063.jpg
Views:	191
Size:	87.8 KB
ID:	859171
    Attached Files

    Leave a comment:


  • jlmeredith
    replied
    I have my new shims installed and I will be reassembling things today to test. Will update when this is completed.

    Leave a comment:


  • d_meister
    replied
    Thanks for the tip, Dave. It's on auto cooling with the speed from 10 to 100%. I think you're right about turning the fan off, since there are no long bridges in the build. A lot of tricks in this game.
    Stringing was bad for me all of a sudden a few prints ago on PETG, but it was picking up moisture. Had some nice days and opened the windows. I blasted it in the microwave a few times and then dispensed it from a plastic bag until I ran it out and changed rolls. That one is feeding from inside of a plastic bag, for sure. A good video testing moisture in filaments is Here. My PLA was just breaking spontaneously in the section between the roll and print head overnight when it wasn't running, so I researched it quite a bit.
    I've been printing the newest ZCTP from Jamie, and it was doing well. Late in the print the corners furthest away have picked up and curled. New layer of Blue Tape had it doing better than before, but there's just no substitute for environment control with big prints. I'm printing the larger section of the ZCTP and it just fits on the platen diagonally. I stopped the print. I was running it because I modded the deck thickness above the blade, filament is cheap, I had a dust collection fitting on the other printer, and every day is a school day Once the prints start the the first few layers, I go and make sawdust and the printers can just run.
    It's time to make an enclosure with all the clear plexi I've been hoarding.

    Leave a comment:


  • dbhost
    commented on 's reply
    If your prints are curling up, drop your parts cooling fan speed, to potentially turning it off. PLA likes to curl as much as PETG likes to string. I am trying to run a batch of miter fence ends out of PETG and at least it is only the supports that are doing it, but man is it stringy...

  • d_meister
    replied
    The warping is actually taking place during the print as the extremities are cooling, probably due to uneven build plate heating. But it is an inexpensive printer I've fought this battle with this printer extensively, and I usually keep a layer of 3M Blue painter's tape on the beds, especially the PETG printer. The PLA printer application of blue tape had exceeded it's useful life and messed up the print initially, so I just removed it and printed direct on the spring steel textured plate
    The bed/build plate is suspended in space, and the thermister seems to be in the center, so uneven heating and cooling is probable without an enclosure. I've shielded on 3 sides on difficult prints in the past with carboard with good results. The PETG printer is in somewhat of an alcove, so has less issues, although a window nearby affects the front of the build plate more from the thermal currents. As Jamie notes, an enclosure is the solution.
    Click image for larger version

Name:	image.png
Views:	325
Size:	1,015.3 KB
ID:	859152
    The blade that made contact is a Diablo 10" 24 tooth ripping blade. What's remarkable about it is that there are few enough teeth so the blade may be clocked to a position where no teeth can make contact.
    Click image for larger version

Name:	image.png
Views:	232
Size:	689.7 KB
ID:	859153
    The ZCTP is actually providing more clearance in it's deformed condition, but the tooth is actually higher than the inside surface. This picture doesn't show it well, but the thickness of the top varies because of the warping during build. The lift is slight enough that the hot end irons the surface during the process. There is also post-print warping. It looks worse than it is in the photo. That triangular "cloud" is some kind of software artifact and has no difference in texture or surface level.
    Incidentally, I went through the arbor carrier system, cleaning and lubing, a week ago, so I'm confident it goes all the way to the basement. Hasn't operated so smoothly in years!
    Click image for larger version

Name:	image.png
Views:	249
Size:	1.08 MB
ID:	859154
    There's not much clearance, there. Maybe 3/32"? And that's below the ZCTP mounting surface. ​

    Leave a comment:


  • LCHIEN
    replied


    d_meister Regarding the dado blade, I am not sure I understand completely. Can you provide a photo for reference? Are you saying when the blade is fully lowered, the plate touches the dado blade teeth? Are the dado blades a standard 10" set? [/QUOTE]

    The recommended stack dado is 6" for the BT3x00s, there are actually some fit issues with the 8" stack dados.
    I have never seen a full 10" dado for any saws.

    Leave a comment:


  • jlmeredith
    replied
    d_meister - Thanks for the feedback and suggestions! I will be sure to take this info into account as I am working forward. Right now I am in the throws of replacing my shims, but once that is completed I can do a full test cut.

    The edge lift you are experiencing can be addressed by using a brim and then shaving that off after with a trimmer (or as you indicated, having an enclosure, which is always the best way to address warping).

    LCHIEN - Your question is correct. PLA prints at a much lower temp than many other FDM materials, and is prone to warping if the ambient temp where the part is being printed is not at least 30-35C/86-95F. Drafts do play an important role, but ambient temp is more important than drafts. As the part cools, if the ambient temp is too low, the part will cool too fast, especially in situations where there are long threads of filament laid out in lines, and curling will occur. I do think that the latest version with the grids on the bottom will be less prone to warping as there will be filament laid down at right angles to the long edges and this will help the part stay flat.

    As I noted above though, I simple brim will fix this in almost all situations, as well as making sure to wipe the build plate with IPA before every print. Depending on the build plate material, adding some glue can help as well. I print with a textured PEI plate and never have adhesion issues, but I also have 10 years of experience with FDM printing and have owned more than 40 printers in that time. Currently my print farm consists of eight Bambu P1S printers and two X1 Carbon printers that all have full enclosures and I rarely if ever have issues with lifting, but I understand the pain.

    d_meister Regarding the dado blade, I am not sure I understand completely. Can you provide a photo for reference? Are you saying when the blade is fully lowered, the plate touches the dado blade teeth? Are the dado blades a standard 10" set?

    Leave a comment:

Working...