Sharpening Station(pics)

Collapse
This topic is closed.
X
X
 
  • Time
  • Show
Clear All
new posts
  • Richard in Smithville
    Veteran Member
    • Oct 2006
    • 3014
    • On the TARDIS
    • BT 3100

    Sharpening Station(pics)

    A word of thanks to all the members who gave me advice and guided me in the right direction on how to keep my chisels sharp. This is based on King Heiple's jig from one of the links provided. I have jigs for gouges and one to do skew's and have intentions to build a jig for fingernail grinds. I built this from some left over box store oak ply.

    Enough talk...here's what I built.


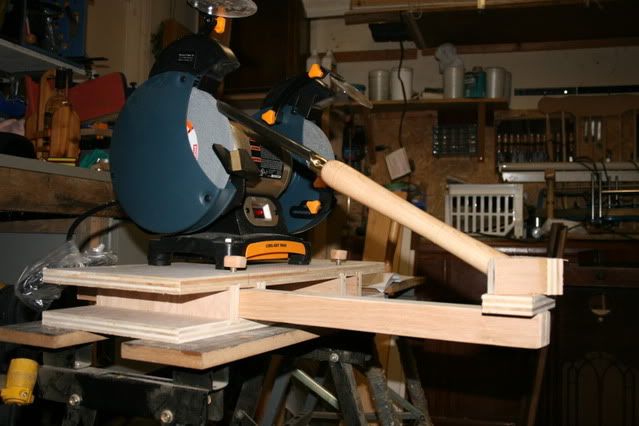
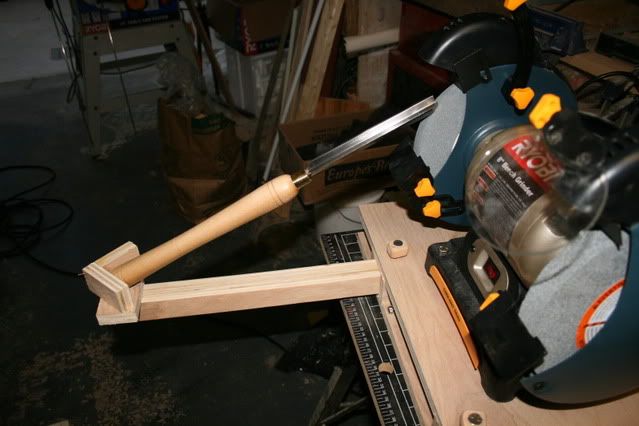
    The grinder and jig is now set up by the lathe.


    One last question( for now). Should I be changing the wheels that came with the grinder or will the stock wheels do?

    Thanks for looking.
    Last edited by Richard in Smithville; 07-13-2009, 03:11 PM.
    From the "deep south" part of Canada

    Richard in Smithville

    http://richardspensandthings.blogspot.com/
  • dbhost
    Slow and steady
    • Apr 2008
    • 9238
    • League City, Texas
    • Ryobi BT3100

    #2
    Two things.

    #1. I REALLY want those plans! That looks like just what I am looking to convert a mess of scrap ply into.

    #2. You CAN use the OE wheels, the white aluminum oxide run cooler, and stay square better...

    It's nice to see another user of the Ryobi 6" BGH616 grinder. Other than the lack of variable speed, I really like mine.
    Please like and subscribe to my YouTube channel. Please check out and subscribe to my Workshop Blog.

    Comment

    • Richard in Smithville
      Veteran Member
      • Oct 2006
      • 3014
      • On the TARDIS
      • BT 3100

      #3
      Thanks db. This is the link that I used.

      http://www.taunton.com/finewoodworking/pages/w00115.asp

      Instead of the thumb screws and t-nuts, I used a regular nut and bolt. The nut was epoxied into the base and I made shop built knobs to turn the bolts.
      From the "deep south" part of Canada

      Richard in Smithville

      http://richardspensandthings.blogspot.com/

      Comment

      • pelligrini
        Veteran Member
        • Apr 2007
        • 4217
        • Fort Worth, TX
        • Craftsman 21829

        #4
        That's really cool. How'd you fasten the jig to the workmate?

        I use the same grinder and a 225 Workmate, but I just C clamp it down. I haven't got around to building a base & jig. I'm not too fond of the OE rests.
        Erik

        Comment

        • Turaj
          Veteran Member
          • Dec 2002
          • 1019
          • Toronto, Ontario, Canada.
          • BT3000 (1998)

          #5
          Richard, the station looks great and thanks for the link (please ignore my PM on the other site).
          Turaj (in Toronto)
          "When I read about the evils of drinking, I gave up reading!" Henny Youngman

          Comment

          • Richard in Smithville
            Veteran Member
            • Oct 2006
            • 3014
            • On the TARDIS
            • BT 3100

            #6
            Originally posted by pelligrini
            That's really cool. How'd you fasten the jig to the workmate?

            The workmate was just there while I constructed the base. It's actually screwed into a wooden cart that I had built a while ago.
            From the "deep south" part of Canada

            Richard in Smithville

            http://richardspensandthings.blogspot.com/

            Comment

            • Bill in Buena Park
              Veteran Member
              • Nov 2007
              • 1865
              • Buena Park, CA
              • CM 21829

              #7
              Richard, great station - just what I was looking for. A question - how would you recommend keeping the tool at a set angle for a particular bevel, say, 25 dg? Or is that only a problem for chisels and not turning tools?
              Bill in Buena Park

              Comment

              • dbhost
                Slow and steady
                • Apr 2008
                • 9238
                • League City, Texas
                • Ryobi BT3100

                #8
                Thanks for the link...

                No worries. I have a mess of T-nuts so that isn't a problem. I tend to epoxy in T nuts anyway. I have really bad luck with them...
                Please like and subscribe to my YouTube channel. Please check out and subscribe to my Workshop Blog.

                Comment

                • Richard in Smithville
                  Veteran Member
                  • Oct 2006
                  • 3014
                  • On the TARDIS
                  • BT 3100

                  #9
                  Originally posted by b0330923
                  Richard, great station - just what I was looking for. A question - how would you recommend keeping the tool at a set angle for a particular bevel, say, 25 dg? Or is that only a problem for chisels and not turning tools?
                  The slide will , er, well, slide back and forth in the base. Match up the angle and lock it in place with the shop built knob.

                  I got a lot of help( plus links) from this thread
                  From the "deep south" part of Canada

                  Richard in Smithville

                  http://richardspensandthings.blogspot.com/

                  Comment

                  • bmyers
                    Veteran Member
                    • Jun 2003
                    • 1371
                    • Fishkill, NY
                    • bt 3100

                    #10
                    Now that you are all setup, here is a trick for matching the grind of a chisel. Take some black magic marker and color the beveled edge of the chisel.

                    Eyeball the angle by varying the length of the slide fixture. Start and stop the grinder so it's spinning but not still at full speed. Touch the chisel to the wheel and remove it. Look at the marker on the bevel. If you matched the bevel perfectly, you'll see that it is erased from the front to the back of the chisels bevel. Otherwise the black will only be missing from one side or another of the bevel. Adjust accordingly.

                    Bill
                    "Why are there Braille codes on drive-up ATM machines?"

                    Comment

                    • jgrobler
                      Established Member
                      • Dec 2005
                      • 259
                      • Salinas, CA, USA.
                      • TS3650

                      #11
                      Nice work Richard.

                      Originally posted by bmyers
                      Take some black magic marker and color the beveled edge of the chisel.
                      Eyeball the angle by varying the length of the slide fixture. Start and stop the grinder so it's spinning but not still at full speed. Touch the chisel to the wheel and remove it. Look at the marker on the bevel. If you matched the bevel perfectly, you'll see that it is erased from the front to the back of the chisels bevel. Otherwise the black will only be missing from one side or another of the bevel. Adjust accordingly.
                      Yep, that's what I do too, except I just spin the disk by hand, it's enough to show whether you've got it spot on. I also marked the slide to be able to get almost spot-on first time when I have to put it back in.

                      Comment

                      • Richard in Smithville
                        Veteran Member
                        • Oct 2006
                        • 3014
                        • On the TARDIS
                        • BT 3100

                        #12
                        Great tips. Thanks.
                        From the "deep south" part of Canada

                        Richard in Smithville

                        http://richardspensandthings.blogspot.com/

                        Comment

                        Working...