Router table advice

Collapse
This topic is closed.
X
X
 
  • Time
  • Show
Clear All
new posts
  • chopnhack
    Veteran Member
    • Oct 2006
    • 3779
    • Florida
    • Ryobi BT3100

    #1

    Router table advice

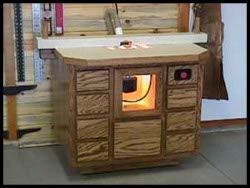
    Hi all, I have a need of an inexpensive router table. I am enticed by the ryobi combo table and router for obvious reasons (i.e. cheap!) I understand that I will never raise panels on one of these, but I also can not afford $100 buck for a router raizer or insert plate alone. Drawback is that I do have a mv12 (old hitachi) and some 1/2" bits but I have no fence and I need a new insert. The hitcachi is in need of some maintenance (the plunge feature is a bit stiff at the moment). The hitachi, as great as it is, is a bit awkward for table use unmodified.

    Any advice on router tables?

    Thanks!
    I think in straight lines, but dream in curves
  • LCHIEN
    Super Moderator
    • Dec 2002
    • 22012
    • Katy, TX, USA.
    • BT3000 vintage 1999

    #2
    depends what features you are looking for.

    A very inexpensive table can be made from two layers of 3/4" MDF laminated together.
    Cut a router-base sized hole in the center of the (bottom) layer to mount the router and a smaller bit opening hole in the center of the top layer. Mount the router to the bottom of the top layer.

    If you are really not up to cutting a round 6" hole in the bottom layer, you'll probably do just as well using four pieces of MDF to frame a 6" square hole in the middle to make up the bottom layer. You can glue the four pieces to the back of the top layer.

    Put a 12" base on the table and make it a bench top router table.

    An inexpensive fence can be made with a planed and edge jointed 2x3 as long as the table is wide and a couple of clamps. Cut a breakout hole of about 2" dia. centered in the length, and 3/4" from the edge of the 2x3 for a recessed bit.

    This will do probably 80% of what you will need for a long time. And probably cost around $25.

    No plate required, no fancy fence but quite functional. As time goes you can add a taller fence and route a T-track into the fence and a miter track into the table top.
    Last edited by LCHIEN; 07-17-2010, 08:36 PM.
    Loring in Katy, TX USA
    If your only tool is a hammer, you tend to treat all problems as if they were nails.
    BT3 FAQ - https://www.sawdustzone.org/forum/di...sked-questions

    Comment

    • tommyt654
      Veteran Member
      • Nov 2008
      • 2334

      #3
      I,d go get this and p/u a cheap mounting plate elsewhere and then build a small stand for it., http://www.infinitytools.com/Standar...tinfo/RTT-001/

      Comment

      • JimD
        Veteran Member
        • Feb 2003
        • 4187
        • Lexington, SC.

        #4
        I've built 3 or 4 router tables over the years. I still have two which I will describe in case it gives you or others useful ideas.

        I built a router table function into the extension table of my BT3100. The extension table surface is melamine coated particle board. It has some stiffening ribs of 3/4 plywood glued to the underside. All I did for the router table is I routed the shape of one of my routers bases into the underside of the melamine to reduce the thickness to about 3/8 inch. Then I poked a hole with a hole saw about 3 1/2 inches in diameter. I put two t-nuts on the underside I use to cinch the fence down with. The fence also has melamine surfaces and some 3/4 plywood for structure. It has long sloted holes over top of the t-nuts and I put knobs with studs on them down through the fence into the t-nuts. There are pictures of BT3100 including this router table function as "Spruce and Sandeply" in the old articles portion of this website.

        My main router table has a top made of a sink cutout edged with maple. My router table is based upon an article in an old issue of American Woodworker and hangs the router off a moving carriage that attaches to the back of the router table. It is screw adjustable for height. The fence of this router table attaches with short pipe clamps on each end. I've posted pictures of this router table you may be able to find by searching my old posts. One of the neat things about this arrangement is you can swap bits by hinging up the top rather than removing the motor or getting down on your knees or adjusting the collett up real high. I use the motor (only) from an old Ryobi R-500 that is a little like your Hitachi in my router table.

        Jim

        Comment

        • LinuxRandal
          Veteran Member
          • Feb 2005
          • 4890
          • Independence, MO, USA.
          • bt3100

          #5
          Start at your local library, and check out Woodworking with the router, by Bill Hylton. Well worth the read.
          She couldn't tell the difference between the escape pod, and the bathroom. We had to go back for her.........................Twice.

          Comment

          • cwsmith
            Veteran Member
            • Dec 2005
            • 2807
            • NY Southern Tier, USA.
            • BT3100-1

            #6
            I have an older Ryobi combo table/router (the R161). It is okay to start out with and I still use it as a portable for minor needs when I'm working somewhere else. But, it's only 1/4-inch collet, single speed and, at least on my model, the table can sag from the weight of the router (about a 32nd").

            A source for a good table top for your own build/modification is to check with local home/kitchen installer's. The sink "cutout" makes for a nice medium-sized top. Often these are just scrapped. You may end up with some wierd color pattern with the laminate, but the price is usually right.

            I hope this helps,

            CWS
            Think it Through Before You Do!

            Comment

            • cabinetman
              Gone but not Forgotten RIP
              • Jun 2006
              • 15216
              • So. Florida
              • Delta

              #7
              It's easy and inexpensive to make your own router table. There's enough info on just the tops and inserts on this forum. You have many choices with materials. As for bits with bearings you need no fence. You could simply make adjustable fences that will do a variety of procedures.

              I would make a stab at that before spending money on a table or fence assembly. You may decide that what's available to buy might serve you better than one you make. Maybe by that time you will have a better idea of what your needs will be.
              .

              Comment

              • chopnhack
                Veteran Member
                • Oct 2006
                • 3779
                • Florida
                • Ryobi BT3100

                #8
                Thanks all, the first table I built was about 9 years ago, and I still have it today. It was a nice 2x6 trestle base, m&t joinery with lags for disassembly. The top was (LOL) two melamine shelves from home depot butted together and then a piece of 3/4" ldpe over the entire top. Roughly 4'x2' in dimension. The router insert was a piece of leftover laminate flooring. The main drawbacks with it are the lack of convenience w/ bit change, height change...I almost threw it all out when trying to dial in a lockmiter joint bit some time ago. The other problems weres not getting the insert level with the table and always having to break down the router for freehand use. I was looking at the cheapy from HD, but perhaps I need to rebuild a decent table and get a smaller router for freehand work. This needs more thought! Thank you for your inputs.
                I think in straight lines, but dream in curves

                Comment

                • Chris_B
                  Established Member
                  • Apr 2006
                  • 216
                  • Cupertino, CA

                  #9
                  Link to *lots* of router table ideas

                  I'm in the planning stages of a new router table myself, and stumbled across this link at ToolCrib to a large variety of free router table ideas. They list 28 distinct designs, with links to an additional assortment of relevant good-quality articles and forum threads.

                  The minimalist award goes to this contribution by Fine Wood Working:


                  How about mounting a router table directly on top of a trash can? Presumably this helps with half of the dust collection issues!


                  They also include more conventional ideas like this variation on Norm's classic:


                  So far this is the most thorough free router-table resource I've found online.

                  Comment

                  • chopnhack
                    Veteran Member
                    • Oct 2006
                    • 3779
                    • Florida
                    • Ryobi BT3100

                    #10
                    Thanks Chris, I did see that myself yesterday. Quite a lot of ideas in there.
                    I think in straight lines, but dream in curves

                    Comment

                    Working...