Building the Ultimate Tool Stand.

Collapse
This topic is closed.
X
X
 
  • Time
  • Show
Clear All
new posts
  • Neal
    Established Member
    • Apr 2012
    • 181
    • Williamstown, WV (Mid Ohio Valley)
    • Ryobi BT3000

    Building the Ultimate Tool Stand.

    This weekend I began the buildout of my ultimate tool stand. There were many good ideas included in this thread, some of which will be incorporated.

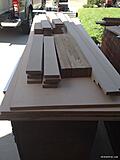
    This all started with acquiring 4 sheets of MDF. I was not impressed with the selection of the plywood at Home Depot or Lowes, at least at the price point i was willing to pay, so I decided to stick with the MDF. I had the stores rip the pieces in half so I could handle them by myself. At nearly 100 pounds, I was not too keen on being a hero. Besides, the widest piece I needed was 24". Might as well let then do it.

    I got to try out my new grizzly track saw....


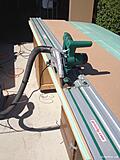
    I also acquired one of those foam insulation boards to use as a cutting backer board. That worked quite well.

    When all was said and done, on Saturday I had done 90% of the cutting to get to the components on the cut list.


    Since Sunday was filled with other projects and my daughter's graduation. Monday was the next "sawdust" day. And I set out to build the torsion box.

    My apologies for not having pictures of the internal grid....I simply was "on a roll" and didn't stop to take pictures of the guts of the torsion box.

    Some comments about this...

    1. The internets can be a wonderful thing. Many people who have built this previously have provided their comments and insights which saved me many hassles from trial and error. This was true for the dado's on the torsion box.

    2. Using the setup for my freud 208 stacked dado to get to 3/4" and then adding one of the thin shims was just enough for the pieces to go together easily without breaking a single one.

    3. I don't know how you could cut the internal members of this and the sides well without a table saw which enables the more precise repeatablility of of cuts.

    4. Gang and clamp the members together to cut the dados. This allows for correct alignment.

    5. Pocket Hole screws don't hurt either, as I used them to attach the outside frame to the bottom of the box.

    6. A brad nailer is a must as well.

    When all was said and done, this is what I got....


    I attached the casters, and set it down on the ground.


    May put some poly on the bottom of this thing while I can still get it tipped up. Also have to add the leveling blocks to each end, Which I have cut, but not drilled, yet. Then I will work on adding the cabinet section. It is HEAVY.
  • russde
    Forum Newbie
    • Aug 2013
    • 50

    #2
    Nice work Neal...keep it going and keep posting, I'm leaning in the direction of the UTS myself and will follow this with interest.
    R

    Comment

    • parnelli
      Senior Member
      • Aug 2004
      • 585
      • .
      • bt3100

      #3
      Originally posted by Neal
      1. The internets can be a wonderful thing. Many people who have built this previously have provided their comments and insights which saved me many hassles from trial and error.

      Which is exactly why I'll be following this carefully as you progress. My stuff is being kicked out of the unfinished basement into "my" side of the garage...

      so thank you for documenting this!

      Comment

      • Neal
        Established Member
        • Apr 2012
        • 181
        • Williamstown, WV (Mid Ohio Valley)
        • Ryobi BT3000

        #4
        Most who have built this, particularly from MDF, have recommended to paint/poly/something the exposed surfaces of the MDF. So last night, while I still could, I poly'd the underside of the torsion box while I could still lift it and tip it up on edge.

        No pictures of this, though.

        I also attached the leveling blocks while I had it on edge as well. I'll try to get pics of this later tonight.

        Comment

        • Brian G
          Senior Member
          • Jun 2003
          • 993
          • Bloomington, Minnesota.
          • G0899

          #5
          Thanks for posting this, Neal. Like you said, once you're on a roll, stopping to take pictures isn't a priority. That probably influences why we don't have very many project build discussions.

          Stay the course!
          Brian

          Comment

          • Neal
            Established Member
            • Apr 2012
            • 181
            • Williamstown, WV (Mid Ohio Valley)
            • Ryobi BT3000

            #6
            SO last night I was able to do a few things, but was confined to the (over croweded) garage due to the toad choker rain storm we so badly needed. As a result, I wasn't able to get my table saw out to do some much needed cuts. However, I was able to get the sides of the cabinet installed. (garage over crowding is due largely in part to my step-daughter's stuff stacked in boxes before she moves to Dallas in about a month).


            While the spacing of the two inner portions is somewhat arbitrary, I made the center "space" 24" wide. I have opted to leave the back of the center portion open while closing off the other two with 1/4" ply.

            The bottoms were attached with wood glue and pocket screws.


            One of the things I opted to do which are not part of the original plans was to cut dado's in both the back, and top of these pannels. The one in the back is for a 1/4" piece of plywood. The one in the top is for a cleat, which will allow me to fasten the top piece. I will have one cleat in the front and one cleat in the rear (I will simply rip this one in half when I can get my table saw out).

            As I had mentioned, last night I had attached the leveling blocks to the underside.

            Comment

            • Neal
              Established Member
              • Apr 2012
              • 181
              • Williamstown, WV (Mid Ohio Valley)
              • Ryobi BT3000

              #7
              A little more progress...

              So my son, 15, was over last night, and he never balks at an opportunity to use power tools, and I am more than willing to let him do so.

              We accomplished a little more....

              First we attached the top of the bottom cabinets and fastened them to the cleats shown in yesterday's photo.

              Then we started on the "top boxes" (which aren't going to be the top...More on that shortly).


              The tops of these are not yet attached, but the ribs are attached to the bottoms with glue and pocket screws. (for the record, I use the HF version of the pocket hole jig, and it works amazingly well! I've used if for all sorts of projects).

              THere are some deviations from the original design...

              First, the "side boxes" in the original design call for a set of ribs in the middle. I have opted to not put these in. I also will not be cutting slots in the tops of these as is called for by the original. This is not going to be the top layer of my UTS. There will be drawers going in both of these.

              There will also be two narrower boxes going in right beside them which will also have drawers.

              The reason this is not the top, is because it is 3 3/8 shorter than it needs to be in order to be used as an outfeed table for my BT3K. So I will be building another layer on top of this one for the finished version (as was suggested by another forum member).

              I'm thinking I will likely have the drawers accessible from both sides, but I also have considered using my soft close drawer slides I have left over from another project.

              It is a beast, though.
              Last edited by Neal; 05-30-2014, 07:18 AM.

              Comment

              • russde
                Forum Newbie
                • Aug 2013
                • 50

                #8
                Going to be a sturdy beast...heavy too!

                Comment

                • Neal
                  Established Member
                  • Apr 2012
                  • 181
                  • Williamstown, WV (Mid Ohio Valley)
                  • Ryobi BT3000

                  #9
                  Progress continues, albeit slowly. This weekend was full of "other" things (graduation party, yard work....)

                  I did apply a coat of Poly to basically everything. I found it easier to go ahead and apply the poly before doing any more assembly. Some parts would be impossible to poly after assembly. I'm hoping to get some more assembly done at some point during the evenings this week.

                  Right now on the 'to do',

                  *Cut a hole in the top of the cabinet for the Router (Router table)
                  *Assemble the top boxes.
                  *make drawers to put in those boxes.

                  I'm starting to refine my designs for the "top layer" as it needs to be 3.375" taller than it will finish according to the original plans. These may have to wait until July, as the rest of this month is going to be very busy with other obligations, and saw dust time will be limited.

                  Comment

                  • ivwshane
                    Established Member
                    • Dec 2003
                    • 446
                    • Sacramento CA

                    #10
                    Yeah another ultimate workbench!!

                    http://www.bt3central.com/showthread.php?t=57822

                    A couple of months ago I bought a car from a guy and he had one as well. I suspect that this design is a lot more popular than people think.

                    Comment

                    • Neal
                      Established Member
                      • Apr 2012
                      • 181
                      • Williamstown, WV (Mid Ohio Valley)
                      • Ryobi BT3000

                      #11
                      Progress has come to a grinding halt it seems. Other priorities have a tendency to take over at times. Yard and garden work has to get done, Other obligations for the weekends (graduations, birthday BBQ's, etc.) Once I get through June...(other projects will eat into sawdust time! )

                      Anyhow....I had some spare time last night before dark so I finished one of the two drawers for my UTS build.


                      It isn't particularly deep, but it will serve its purpose. Drawer sides are made from 1/2 ply with a 1/4 plywood bottom. I had some soft close drawer slides left over from another project (purchased 10) and used those for this.

                      Next up is finishing the assembly of the other wide drawer, and then two (very) narrow drawers for the two narrower slots. Then it is on to the design and construction of the top layer. I'm still working through some details on this as I am trying to think "long term" functionality as well.

                      Comment

                      • ivwshane
                        Established Member
                        • Dec 2003
                        • 446
                        • Sacramento CA

                        #12
                        Hopefully the top level you plan to add will be deep enough to allow for a clamp to slide through.

                        Using the demensions of the original design also lead the table to be too short to be used as an outfeed table for my TS, so I just adjusted the demensions which also allowed me to have deeper drawers (deep enough I can fit my sure-grip clamps in one drawer).

                        Comment

                        • Neal
                          Established Member
                          • Apr 2012
                          • 181
                          • Williamstown, WV (Mid Ohio Valley)
                          • Ryobi BT3000

                          #13
                          Originally posted by ivwshane
                          Hopefully the top level you plan to add will be deep enough to allow for a clamp to slide through.
                          The top will be at least 3 1/8 from the current top, so that gives me 2 3/8 from the current top to the top of the top layer on top.

                          However, I am strongly considering raising the height of my table saw by 3/4 of an inch which would increase the top of the UTS by 3 7/8. TO do this I simply have to add plywood under the feet of the table saw on the mobile base.

                          I'm leaning towards doing the latter.

                          Comment

                          • Neal
                            Established Member
                            • Apr 2012
                            • 181
                            • Williamstown, WV (Mid Ohio Valley)
                            • Ryobi BT3000

                            #14
                            So I completed the other drawer over the weekned.

                            I also came to the conclusion of the heght issue. I raised my table saw 3/4" to give me a little more height for the overall workbench.

                            Now I will work on finishing he "top" section, but here is an idea of the finished height. Right now (with the parts I had previously cut) it sits 3/8" below the top of my BT3000.


                            I don't know if I'll get to the top this coming weekend or not. If it isn't this weekend it won't be until Indepence day weekend at the earliest.
                            Last edited by Neal; 06-23-2014, 07:39 AM.

                            Comment

                            • Neal
                              Established Member
                              • Apr 2012
                              • 181
                              • Williamstown, WV (Mid Ohio Valley)
                              • Ryobi BT3000

                              #15
                              Work got started on the tops.

                              First order of business was to poly and sand the tops to a near finished state. The first coat of poly pretty much soaks into the MDF. Sanded that to 320 grit, and applied the second coat. That was sanded to 600 grit, and a third coat applied. Once that coat cured, I sanded again to 600. This was done in advance of the next step.


                              In my research, it was suggested that you finish the top so as to not have to sand or remedy drips in the holes.

                              To do that, I had found someone on ebay who offered CNC services for $25 per hour. I had him make a template from 1/4 aluminum, it is 12"x12" with 20mm holes on 96mm centers.


                              I first drilled out the holes with a 15mm forstner bit, and then used a 1/2" pattern cutting router bit to finish the holes.

                              It worked quite well as the holes are square to each other (using my framing square.


                              I was able to complete one "top" and have two more to go plus my router table top (all of which are poly'd and sanded.) Then I have to figure out the best way to attache them.

                              Comment

                              Working...