Inletting for hardware with router

Collapse
This topic is closed.
X
X
 
  • Time
  • Show
Clear All
new posts
  • milanuk
    Established Member
    • Aug 2003
    • 287
    • Wenatchee, WA, USA.

    #1

    Inletting for hardware with router

    Hello,

    I'm trying to work out the steps in my head for how to go about inletting some wood for a piece of custom hardware:


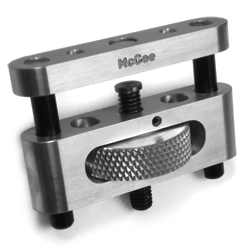
    So... I need to fit said piece into two pieces of wood - the top part goes into one, and the bottom part goes into another. They are the same contour, and everything comes apart well enough that I should be able to get up close where I need to...

    If I'm looking at this the right way, it should be kinda like inletting for a router mounting plate in a router table - I think. Run around it with a guide bushing setup with a specific offset to create a 'hole' in the template board, then change out the bit & bushing to a different size and use the template to create the inlet in the workpiece? The fit needs to be pretty snug - not interference fit (i.e. pound it into place) but no slop/play either.

    I plan on making plenty of 'trial runs' on practice pieces of wood before I 'go live' on this one, but I *think* I've got the general concept down. Yes/no/maybe?

    TIA,

    Monte
    All right, breaks over. Back on your heads!
  • LCHIEN
    Super Moderator
    • Dec 2002
    • 21886
    • Katy, TX, USA.
    • BT3000 vintage 1999

    #2
    inletting? you mean mortising?

    Is this thing supposed to edge join two pieces? How does the thumbwheel get accessed, then?
    Loring in Katy, TX USA
    If your only tool is a hammer, you tend to treat all problems as if they were nails.
    BT3 FAQ - https://www.sawdustzone.org/forum/di...sked-questions

    Comment

    • phi1l
      Senior Member
      • Oct 2009
      • 681
      • Madison, WI

      #3
      It looks to me like this is some sort of adjusting mechanism, right? If so, do you need access to the thumb wheel on the bottom part?

      If I am interpreting it right, what you are talking about is just making a mortise, which can be made first using a Forstner bit in a drill press, to take out most of the material, then using a sharp chisel for cleanup. Providing access to the thumb wheel would of course depend on the application. I also looks liek you will have to provide additional room in the lower piece of wood for the posts & adjusting screw at teh "closed" setting.

      Comment

      • cabinetman
        Gone but not Forgotten RIP
        • Jun 2006
        • 15216
        • So. Florida
        • Delta

        #4
        Your concept with a router bit and collar would work. You would have a problem with the wider dimension of the thumb wheel. The sides are fairly smooth and getting a tight enough fit to prevent slippage poses a problem.

        The bottom section (with the thumb wheel) may be done in two sections allowing for the extra width to be chiseled out, insert the mechanism, and then glue the sections back together.
        .

        Comment

        • Black wallnut
          cycling to health
          • Jan 2003
          • 4715
          • Ellensburg, Wa, USA.
          • BT3k 1999

          #5
          Given the source of the "part" I'd say inletting is the correct wording.

          I think making an inside template would work but I do not see how you can attach it to a curved object, or will you just bandsaw the two parts from one piece? Whichever I'd like to see pics of the final project and am interested in which game you're building for.
          Donate to my Tour de Cure


          marK in WA and Ryobi Fanatic Association State President ©

          Head servant of the forum

          ©

          Comment

          • milanuk
            Established Member
            • Aug 2003
            • 287
            • Wenatchee, WA, USA.

            #6
            The 'application' - take one of these:


            and add one of these:


            The first already comes with an adjustable cheek piece... but having used true 'custom' rifles before I'm somewhat of a fan of the McGee hardware - much more beefy and robust, plus it has some other features that I want. The installed hardware looks almost frail by comparison. There is an existing hole for both the lower portion of the adjuster and the thumbwheel but the new adjuster is a good bit wider so the recess will need opened up. Happily it looks as if the existing opening for the thumbwheel will work just fine. The holes for the rods to extend into will need opened up as well to a larger diameter.

            So the real challenge after making the templates and getting everything working on a flat piece of wood is going to be jigging/clamping/shimming the workpiece(s) so I can sit the template on top and do the work. That and the bit is going to have to extend several inches down in at the furthest reach because of that curved rise on the back of the buttstock; normally those are cut off flat instead of cut-out like that, probably for the simple reason it makes the machining easier. Unfortunately the factory had to 'reinvent the wheel' by making their own adjuster hardware rather than using one of several pre-existing designs, and going a different (more difficult) route when it comes to cutting the cheekpiece.
            All right, breaks over. Back on your heads!

            Comment

            • JimD
              Veteran Member
              • Feb 2003
              • 4187
              • Lexington, SC.

              #7
              Milanuk,

              It looks like you are adding a new and different cheek piece to a new Savage target rifle, right? I like the design of the new Savages but I need them to come out with a left hand action. I am right handed but shoot from the left because my left eye is my master eye. I have a couple Savage bolt actions and my son has one.

              Anyway, with respect to your mortiseing, you need a spiral up cutting bit long enough to get to the bottom of your mortise or you could possibly use a straight bit with a end cutter. I ususally get bits from MLCS but I am sure others have good bits. The diameter doesn't matter except that you need to make holes for the rods. You could do that with a forstener bit but I would try to do it all with a plunge router. So I would get a router bit the same diameter as the posts, if possible, and a templage guide big enough to have the bit come through it. The difference between the bit diameter and the outer diameter of the template guide times two, defines how much you have to add to the width of the metal piece to get the width of the opening in the jig you need to make. For instance, if you put a 1/2 inch bit through a 5/8 template guide, your router bit will be 1/8 inside of where your template guide is. So the opening has to be 1/4 inch wider than the piece to be inletted and 1/4 inch longer. What I usually do is to take a piece of 3/4 plywood scrap and rip a piece the right width. The remaining piece gets ripped in half. Then shorter pieces of the initial rip gets glued back into the middle. It seems like a fair amount of work but I have little luck cutting an opening with good and straight sides. I find it much easier to rip a piece this way. You could secure the jig to the gunstock a number of ways but the easiest would be to just screw it temporarily (or pin nail it if you want a smaller blemish) to the gunstock. The holes will be under the cheekpiece so it seems like that would not be an intolerable blemish.

              The biggest problem you're going to have is the cheekpiece cutout does not seem to be long enough. You could make your jig thick enough the router can travel far enough but then you're going to need a really long router bit. Otherwise you need to extend the flat part of the main stock and possibly glue that piece back later. A flush cutting saw would have a small kerf to minimize the problem of glueing it back and reshaping. But it would still effect the piece that gives you adjustable length of pull. So if you can get a router bit long enough to do this with a thick jig, that is probably best - even if you have to drill for the guide rods.

              Jim

              Comment

              • milanuk
                Established Member
                • Aug 2003
                • 287
                • Wenatchee, WA, USA.

                #8
                Jim,

                Pretty much. It's occurred to me to take the bandsaw and remove that rear 'curved' bit entirely, as the new cheekpiece blank extends back far enough that it could cover that entire area. Unfortunately for political reasons (I shoot on a factory sponsored team for Savage) I want to be able to keep the gun at least visibly 'stock' - meaning I want to be able to use the factory cheekpiece if need be - so it's getting inletted and fitted first, then I move on to figuring out how to clamp that odd shaped McGee cheekpiece. FWIW, we had a guy at the match yesterday clean house with a new Savage 12 F/TR rifle - shooting south-paw.

                Because of those curves, I can't really use the surfaces between the cheekpiece and buttstock for fastening - well I could use the flat surface on the factory cheekpiece I suppose, but I was thinking for the buttstock and aftermarket cheekpiece of making a board to function as a base plate for clamping to a bench top, then a riser on one side to provide a clamping surface to shim the stock against. I might extend another riser around one side, and butt the end of the stock or the cheekpiece against that - and then once everything is 'level', shoot a couple brads through ala Norm to help make sure they stay put. The template would then sit over the top of the riser and be screwed/nailed in place.

                Gotta make the template first, though.
                All right, breaks over. Back on your heads!

                Comment

                • Bruce Cohen
                  Veteran Member
                  • May 2003
                  • 2698
                  • Nanuet, NY, USA.
                  • BT3100

                  #9
                  Hey Monte,

                  As a former long gun shooter, The cheek piece you are showing if really nifty. I'm confused though, if you can work out such a nice piece, you shouldn't have any trouble inletting the stock to the cheek piece.

                  After all, ya done all the hard stuff already.

                  Bruce

                  BTW. I'm looking for a set of grips for my Diamondback, how are you with pistol grips?
                  "Western civilization didn't make all men equal,
                  Samuel Colt did"

                  Comment

                  • milanuk
                    Established Member
                    • Aug 2003
                    • 287
                    • Wenatchee, WA, USA.

                    #10
                    Bruce,

                    Ha! I wish.

                    Purchased the cheekpiece here: McGee Competition Stocks

                    Handguns: I'm of the opinion that the sole useful purpose of a hangun is to allow one to fight their way to a long gun...

                    Monte
                    Last edited by milanuk; 01-10-2010, 03:41 PM.
                    All right, breaks over. Back on your heads!

                    Comment

                    • lapdog

                      #11
                      A bit off topic, but have you bedded the barrel? And how accurate have you been able to shoot with that sweet rifle?

                      Comment

                      • JimD
                        Veteran Member
                        • Feb 2003
                        • 4187
                        • Lexington, SC.

                        #12
                        Milanuk,

                        Your arrangement would work fine. I would have two risers, to make sure the template on top stays level. I put a little pressure on the plunge router when plunging it and you wouldn't want it to tilt. You could also put an angled piece the reverse image of the gunstock bottom taper on one riser to help support the stock.

                        If you wanted to fasten it only from the top, you might have to make a spacer piece and bed the bottom to the existing stock shape. I have successfully used bondo for this before. I slather the bondo onto the wood and then cover it with aluminum foil before pushing it up against my "mold". It's a little messy but pretty cheap and easy. And the bondo is sturdy enough for this sort of thing.

                        If you do not already have a good bench vise arrangement to hold the gun, I would definitely do it your way. If you can hold the gun steady, then it's up to you whether you make a cradle or come up with another way to hold the template guide to the stock, such as the method I envision.

                        Jim

                        Comment

                        • milanuk
                          Established Member
                          • Aug 2003
                          • 287
                          • Wenatchee, WA, USA.

                          #13
                          Originally posted by lapdog
                          A bit off topic, but have you bedded the barrel? And how accurate have you been able to shoot with that sweet rifle?
                          This one... has been an on-going project for a while now. The action was bedded as well as just a bit of the barrel forward of the lug (with some clearance for the barrel nut). There were some issues with the original stock as we got some very early production models before they had the stock inletting program set up properly. Rather than send the cheek piece back to the factory for fixin', I attempted to do it myself and kinda botched the job So this time around I'm trying to be a little more precise (and less hurried, which should help). Given the above, I've never really got the gun to where I felt like it was truly 'firing on all cylinders' by my standards. Certainly tight enough for iron-sight competition, but the F-Class target is a little tougher. It's getting there.
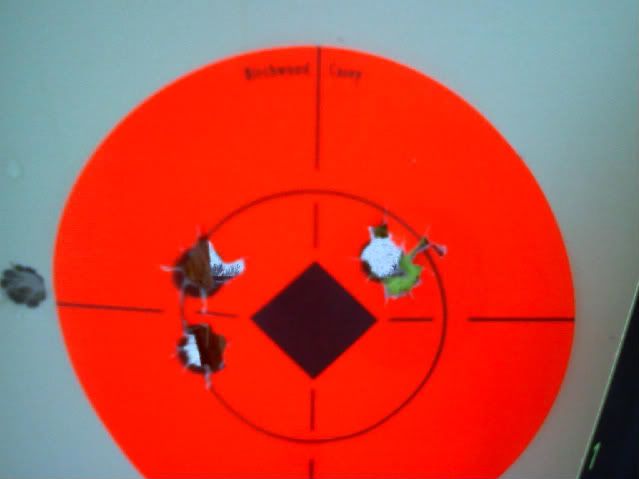
                          So far... this is about what I'm getting @ 300yds (5 shots):


                          The inner circle is about 1.5", the distance is 300yds. A little bit of wind that day, but I think most of the wiggle side-to-side is me - can't get comfortable with the bipod I have on there. I've got a different one on order, but I'm about half tempted to just stick with my tried-n-true (albeit slightly heavy) Harris 6-9" with Pod-Paws and Pod-Loc...
                          All right, breaks over. Back on your heads!

                          Comment

                          Working...