

 Tweet
Tweet
I am working on my first major furniture project in my new shop. This is something that I hope will look good enough to display in our living room. I have always liked the arts and crafts stlye and have have serveral pieces that I purchased over the years most of which is in my living room and dining room. What I do not have and have always wanted is a suitable coffee table. I am not working from any plans but have finished the leg sections and am now designing the top. My first thought was to glue up a top with QSWO (quarter-sawn white oak) but my dining room table, which is mission stlyed, has end caps that are about 6 inches deep and perpendicular to the length of the table. The 4/4 QSWO I have already purchased for a glue up is about 6 inches wide so I decided to try to emulate the dining room table pattern. This past weekend however I was able to purchase several sheets of QSWO 1/4 inch plywood at a bargain and so now instead of doing a glue up I have decided to "cheat" and glue the 1/4 inch plywood to a piece of 3/4 plywood then edge it all the way around with the 4/4 QSWO solid stock that I already have using bisquits and glue of course. I am hoping to dress it up with some butterfly inlays as well. My only fear is that the two woods will expand and contract differently and cause a major failure later on. Any thoughts on any of this from anyone? Please don't hate me for cheating a little to save some money on my first project. I feel bad enough already. If it is just a bad idea though... I want to hear about it.
-
I feel more like I do today than I did yesterday... -
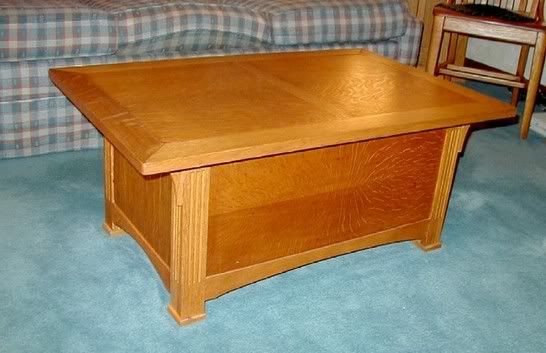
It's not cheating, it's all part of the creative process, or just plain getting the most from what you've got. I did pretty much what you described with the coffee table below...about 4-5 years ago. No issues yet, and don't expect any.
 Happiness is sort of like wetting your pants....everyone can see it, but only you can feel the warmth.

-
That is one sweet table
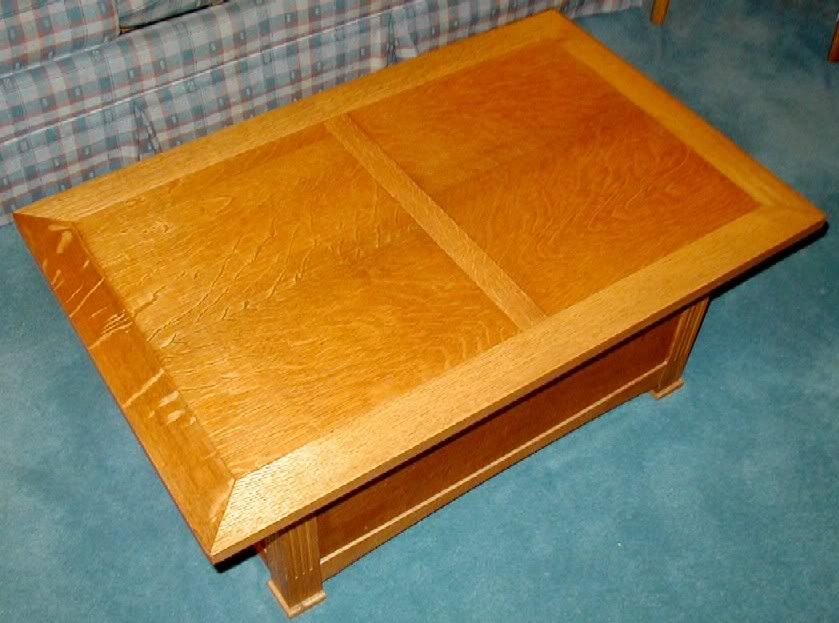
Thank you for showing this piece. I can't wait to really get started on this top now that I know that my idea is sound. Can you tell me the dimensions of this table. I haven't decided yet how big to make mine. I know how long I can make it with the wood I have, but not how long I want it to be. The photos make your table-top seem as if the edge pieces might be beveled. That would be interesting idea anyway. Is this just an illusion? Thanks again for the spot on advice and the photos.Last edited by Iansaws; 03-22-2009, 08:13 AM.I feel more like I do today than I did yesterday...Comment
-
Good morning Ian.. You ask this question on my old thread.. Simply a Coffee Table. I just replied to that thread I would reply here so you can get other opinions thrown at you. So... here I am.. again. ha.. ha...
My top is 22" x 42"...
The kit and caboodle is 18" tall..
1 1/4" overlap on front facing people sitting and 2" overlap on ends with corbels...
15" wide bottom shelf..
1 5/8" x 1 5/8' legs tapered at bottom..
Slats are 1" wide. I used six, some use and odd amount as there is no cut and dry with Mission or A & C for that matter. A & C was simply a period of rebellion by various designers to protest the ornate of Victorian assembly line furniture.
The bottom end stretcher is 1 1/2" wide and the top is 4".. Now.. I would not go that wide on the top unless you are adding a drawer or drawers. It puts it somewhat out of proportion but.. if you are adding a drawer you simply must.
And.. don't use anyone's dimentions as "cut and dry". I built mine to fit the area in front of our sofa with a love seat L'ed at 90 degrees next to it. I took room for traffic pattern between the sofa-love seat.. traffic on the other sides between the table and TV.. general room size and what is already there in the way of furniture.. lamps.. etc. into consideration.
In other words... build proportionally for the space you have to compliment it and allow free flowing traffic around all sides. Whatever all that means.
"This past weekend however I was able to purchase several sheets of QSWO 1/4 inch plywood at a bargain and so now instead of doing a glue up I have decided to "cheat" and glue the 1/4 inch plywood to a piece of 3/4 plywood then edge it all the way around with the 4/4 QSWO solid stock that I already have using bisquits and glue of course. I am hoping to dress it up with some butterfly inlays as well. My only fear is that the two woods will expand and contract differently and cause a major failure later on. Any thoughts on any of this from anyone? Please don't hate me for cheating a little to save some money on my first project. I feel bad enough already. If it is just a bad idea though... I want to hear about it".. Iansaw...
I don't see a problem with doing it. If you were glueing the ply to solid wood I would see a problem as I just faced that with an A & C computer desk-huthch I am currently building. I was going to veneer QS on ply then end cap it with the end grain showing. What I learned is both sides must be veneered or movement will occur. But.. that is a different scenario and I feel you will be fine as Scott mentioned with his.
Now... THE IMPORTANT QUESTION (to me anyway).. where did you get 1/4" QSWO ply.. how much and do you want to sell a sheet. I couldn't find any in Atlanta period other than 3/4". I need a sheet of 1/4" to back a desk and hutch or... I end up having to re-saw veneer and press it on a sheet of standard ply 34" x 55" as I am frame and paneling the back of the hutch in the various compartments.
And.. how does the QS ply look? Is there relatively good fleck on the sheets? Just curious as in 37 years of doing this.. I have never seen a sheet of QSWO ply. Atlanta Hardwoods has 3/4"... but I need 1/4" in this case. Please let me know the source and how much here... I am desperate as re-saw and veneer will take me another week.
Also... if you want to make short work of the mortises... I have a perfectly good 650 pound Industrial mortiser down here in Lawrenceville. If you want to drop by.. we can bump out the mortises for the slats in 20 minutes if you lay the increment lines out in advance.
Good luck.. sorry to be so long winded but you got my interest for sure mentioning the 1/4" QS ply.
Regards..Attached FilesComment
-
-
Good morning Ian, I have two links for you to see. One is from overstock, it has a table I love.
The other is another internet mission coffee table site, which will give you different
looks as well as sizes.
I love Mission and Arts and Crafts furniture and fashioned my kitchen, family room, and main floor bath, all in that style --in white QS oak. (it is addicting)
next you'll be on to making the end tables!
This is the overstock table
http://www.overstock.com/Home-Garden...?sec_iid=33964
This is the other site, for ideas and sizes.
http://www.nextag.com/mission-style-...le/search-html
I will post pics next of the table tops we made with QS white oak, we used four-quarter
rift and QS white oak. We splined the the top together, and so far a year later, it hasn't seperated. I'm sure since you'll be using the plywood in the center, it'll be even better.
JoannComment
-
Truthfully, I came up with this design for the top, because we had a bunch of scraps
of wood and wanted to use them. Necessity is the Mother of invention.
We edged the ends with walnut. I stained the top with a mix of diluted stain, as I wanted a sepia tone against the dark bottom and walnut clad ends.
I want to mention that I like the two coffee tables posted here. I love tables that have a botom shelf like Sarges, as it comes in handy for books, magazines, remotes, whatever.
I keep my laptop under my table.Attached FilesComment
-
-
This is the two tables together.Attached FilesComment
-
-
Ian as others have mentioned you will not have problems with mixing ply and solid wood as you plan. Wood mostly moves across the grain so edging ply with solid wood will not have movement problems. Most of the projects (case goods anyway) that have come from my shop have been ply edged in solid wood. My curio cabinet and the gun cabinet I made for my boss are the two notable exceptions.Donate to my Tour de Cure
marK in WA and Ryobi Fanatic Association State President �
Head servant of the forum
�
Comment
-
Ian - The top on my table is 36"x 23". No bevel, it's 90� on all four sides, but you could certainly do any edge treatment you wanted.Happiness is sort of like wetting your pants....everyone can see it, but only you can feel the warmth. Comment
-
I just finished my table set this weekend, so I thought this was the perfect place to post. The tops and shelves are birdseye maple, and the frame work is walnut. I inlaid glass on them for a different look. Finished them off with 2 coats of danish oil and 7 coats of spray lacquer. Thanks for looking.Attached FilesComment
-
-
Those are beautiful Exodus! Welcome to the forum.Donate to my Tour de Cure
marK in WA and Ryobi Fanatic Association State President �
Head servant of the forum
Comment
-
I just commented over at the other thread, Exodus.
Cliff and Jo Anne.. Thanks and that is indeed a very unusual usage of QS on top. I may have missed it as I'm in a hurry here as a computer desk-hutch awaits but.. how long has the table been built and is there any evidence of movement. I really like the way you did the top and would consider following suit down the road.
Gotta go as things are ready to come out of clamps..
Regards to all..Comment
-
Sarge, we did it last February, so it has gone through four seasons.
I think there was a bit of luck involved though. WE figured what the heck, if it
separated we would make another top(s), as this was all scraps that we scrounged
together from our workshop. Nothing ventured nothing gained.
JoannComment
-
Wow Exodus, those are beautiful. You should be very proud. Thanks for sharing. I thought about using a glass top inlay in mine project but have opted for the solid top to hide all the junk I know will wind-up underneath. I love the contrast of light and dark wood as well. I am going to use this element on my table-top as well but with the butterfly inlays. I plan on staining the entire table with a walnut stain to match the mission funiture I already have but I will leave the inlays natural. I hope to achieve a similar contrasting effect to what you have done here. I am glad to see that it works very well.
Thanks againI feel more like I do today than I did yesterday...Comment
-
Cliff and Joann, thanks for the response, the encouragement and the advice. Very nice work. I hope mine turns out as well. I love the chessboard too. Is that one of your pieces as well? i checked out the links you sent and one of them has a table-top that is almost exactly what I have planned to do with the butterfly inserts as well and them same exact dimensions I am considering. It is the "Jofran Inc. - Viejo Lift-Top Cocktail" on Nextag.com. I think that will look pretty good with my feet up on it.
http://www.allcoffeetables.com/Jofra...5-JFI1006.htmlLast edited by Iansaws; 03-22-2009, 09:03 PM.I feel more like I do today than I did yesterday...Comment


 Black wallnut
Comment