BT Mobile Base Diary

Collapse
This topic is closed.
X
X
 
  • Time
  • Show
Clear All
new posts
  • poolhound
    Veteran Member
    • Mar 2006
    • 3195
    • Phoenix, AZ
    • BT3100

    BT Mobile Base Diary

    After many years of owning my BT and many weeks of thinking through what I wanted in my mobile base and table extensions I finally started work this weekend. As much as I would like to just get it all done in one go I think its going to take a few weekends to get this finished and thought I would start a thread and document the various build stages.

    Weekend 1 - The Torsion Box.

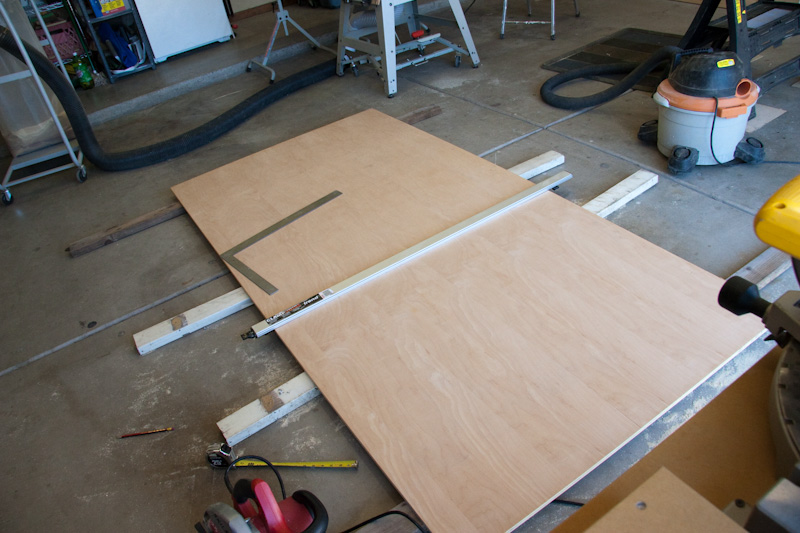
    Like many others before me I elected to create a torsion box base as the foundation. I looked at a few other bases that folks had made and liked the idea of using dadoes to aid with registration as Ray (UK) had done. Much thanks to Ray for a useful phone call on Saturday before I started cutting. To ensure everything goes together perfectly accurate layout is essential.

    After cutting the top and bottom to final size I figured out where my long dadoes needed to be and marked them out the exact same distance from each edge. This way when the internal pieces are cut the two outside rows will be the same length.

    Using the straight edge from the opposing skin I routed the long dadoes (thanks for the tip Ray).


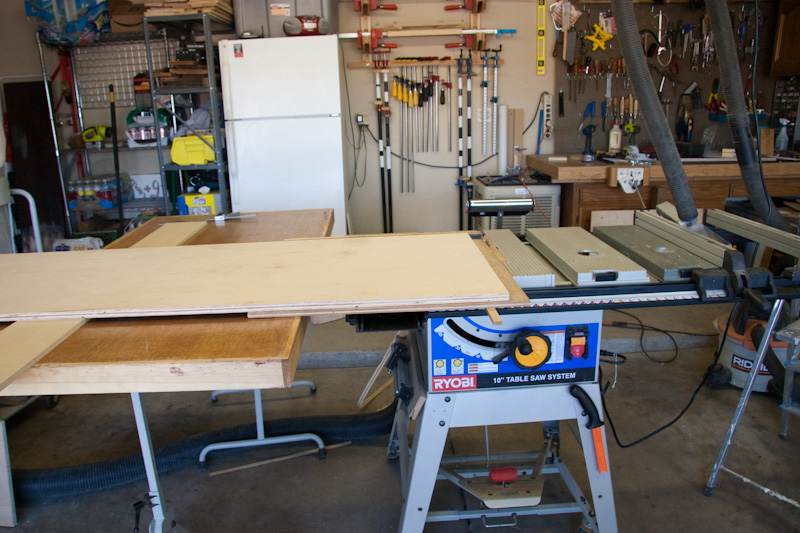
    Next having clamped the two skins together I carefully laid out for the cross dadoes and using an edge guide routed bothe skins togther so I could be sure the dadoes would be in identical positions.


    Using a router edge guide I then added rabbets around both skins.


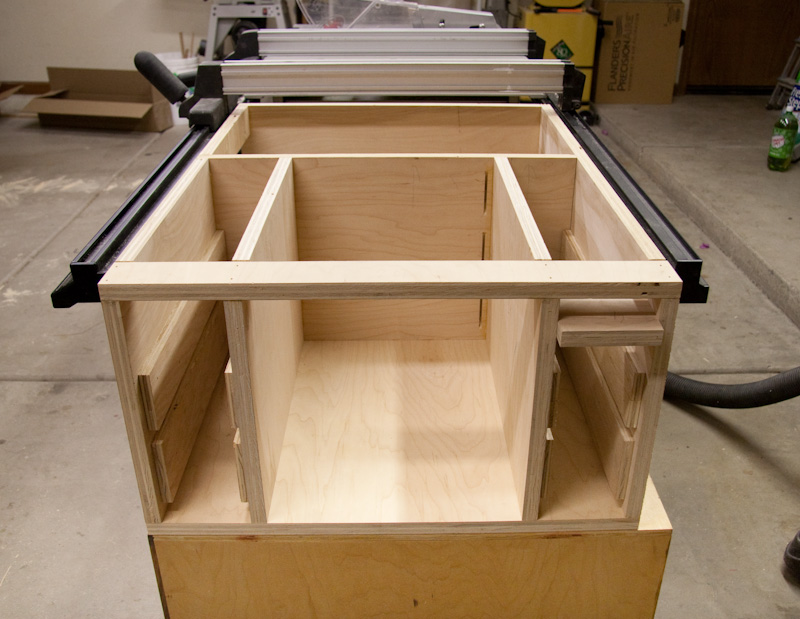
    I glued and clamped the plywood blocks to what will be the topside of the tosion box to give me something more solid than the MDF to screw the cabinet carcass to. I also added plywood blocks to the 4 lower corners to help with the wheels.


    Dry fit time. I cant tell you how many times a dry fit has saved my A$$ (I am sure you all have similar stories). In this case I came across my first GOTCHA. I am using 1/2" MDF for the internal structure and having routed 1/2" dadoes found them to be a perfect fit, great - NO! Both my MDF and router bit were dead on 1/2" but this left zero room for glue or even the tinyest amount of slop to help with fitting. I gently sanded the edges of all the internal ribs and this made fitting a lot easier.

    However, when it came to adding the top things were not so simple. Even having sanded the rib edges trying to get the top to fit became a PITA. I had done everything else before lunch today and expected to simply glue and nail the top down in 30 mins. No such luck and it actually took me the rest of the day. Bottom line is that IMHO tight fitting dadoes in this application are not a good idea. Having a little "wiggle" by either using slightly undersized MDF or cutting oversized dadoes would have been best. I ended up having to shave a hairs width from each of the ribs to get it to fit.


    Here is the completed Torsion box. The eagle eyed amongst you will notice a little mistake - yes that gap in the corner near the water bottle. This is a prime example of "measure twice - cut once, measure once and SCREW UP!" I had setup all my cuts for the sides and ribs using my x-cut sled and a stop block. My usualy routine is to first cut slightly overszie and then trim down to final length. I always make a squaring trim cut on the first end before cutting to final length and in this case I didnt bother to meaure how much room for error I had and ended up taking off too much with my first cut Leaving that side a 1/16" short Its not too much of a problem as I intend to skin the edges of the torsion box with ply to match the rest of the cabinet.


    Thats all for now, I should be doing the main cabinet next weekend and will add the 2nd installment to the BT Mobile Base Diary.
    Jon

    Phoenix AZ - It's a dry heat
    ________________________________

    We all make mistakes and I should know I've made enough of them
    techzibits.com
  • jking
    Senior Member
    • May 2003
    • 972
    • Des Moines, IA.
    • BT3100

    #2
    Great Pics

    A couple of questions, though. How did you construct the internal ribs? Are they notched to fit into each other, or is it just two long pieces & three sets of shorter ones to fit in between?

    Is the depth of the torsion box typical? It appears to be pretty deep (over 6"), maybe is appears deeper than it is.

    I am also curious about your work surface on the sawhorses. It appears these are probably two torsion boxes as well? What about the wood frame that is visible directly on top of one of the sawhorses? I like the way you have use this setup. It provides support but still allows for clamping in the middle. Plus, you can take it down & store it when finished.

    Comment

    • DUD
      Royal Jester
      • Dec 2002
      • 3309
      • Jonesboro, Arkansas, USA.
      • Ryobi BT3000

      #3
      Jon

      That looks great, can't wait for next weekend. Bill
      5 OUT OF 4 PEOPLE DON'T UNDERSTAND FRACTIONS.

      Comment

      • pelligrini
        Veteran Member
        • Apr 2007
        • 4217
        • Fort Worth, TX
        • Craftsman 21829

        #4
        Originally posted by jking
        I am also curious about your work surface on the sawhorses. It appears these are probably two torsion boxes as well? What about the wood frame that is visible directly on top of one of the sawhorses? I like the way you have use this setup. It provides support but still allows for clamping in the middle. Plus, you can take it down & store it when finished.
        There's some more on his boxes in this thread http://www.bt3central.com/showthread.php?t=42916&page=4. Looks like they're working out nicely.
        Erik

        Comment

        • pelligrini
          Veteran Member
          • Apr 2007
          • 4217
          • Fort Worth, TX
          • Craftsman 21829

          #5
          Originally posted by poolhound
          However, when it came to adding the top things were not so simple. Even having sanded the rib edges trying to get the top to fit became a PITA. I had done everything else before lunch today and expected to simply glue and nail the top down in 30 mins. No such luck and it actually took me the rest of the day. Bottom line is that IMHO tight fitting dadoes in this application are not a good idea. Having a little "wiggle" by either using slightly undersized MDF or cutting oversized dadoes would have been best. I ended up having to shave a hairs width from each of the ribs to get it to fit.
          I could imagine how much of a PIA it was. I tried something similar on a much smaller scale with even fewer components. I finally just used a flat piece for the other side without any dadoes.

          Do you have a sketch or plans of the design, or are you going to make us wait. Keep up the detailed posts!
          Last edited by pelligrini; 03-09-2009, 09:57 AM.
          Erik

          Comment

          • poolhound
            Veteran Member
            • Mar 2006
            • 3195
            • Phoenix, AZ
            • BT3100

            #6
            Originally posted by jking
            A couple of questions, though. How did you construct the internal ribs? Are they notched to fit into each other, or is it just two long pieces & three sets of shorter ones to fit in between?

            Is the depth of the torsion box typical? It appears to be pretty deep (over 6"), maybe is appears deeper than it is.

            I am also curious about your work surface on the sawhorses. It appears these are probably two torsion boxes as well? What about the wood frame that is visible directly on top of one of the sawhorses? I like the way you have use this setup. It provides support but still allows for clamping in the middle. Plus, you can take it down & store it when finished.
            The internal construction is as you said, two long pieces and three sets of shorter ones. The dadoes really helped to keep everything sq and as the long dadoes were equal distances from each edge the outside ribs were identical lengths. I dialed in the correct sizes and then batch cut them with my x-cut sled and a stop block. With glue in the dadoe and on one edge I just held it against a square and added a brad or two to hold them as they dried.

            The depth is actually 4" (at least I thought it was you just made me go out and check it ) which is pretty typical.

            My bench/assembly table setup is just as you describe and the reasoning behind why I chose to do it this way was for flexibility and storage. As Pelligrini points out there is more in this thread including some pics and basic construction notes towards the end. If you have more questions let me know.

            http://www.bt3central.com/showthread.php?t=42916
            Jon

            Phoenix AZ - It's a dry heat
            ________________________________

            We all make mistakes and I should know I've made enough of them
            techzibits.com

            Comment

            • poolhound
              Veteran Member
              • Mar 2006
              • 3195
              • Phoenix, AZ
              • BT3100

              #7
              Originally posted by pelligrini
              I could imagine how much of a PIA it was. I tried something similar on a much smaller scale with even fewer components. I finally just used a flat piece for the other side without any dadoes.
              I must admit at one point I was tempted to just cut a new flat top and do as you said. In hindsight (isnt that always the case) Ray's original method with the longer notched ribs may have helped. I guess I just traded the extra work in making the notches for more work and pain in tuning the top to fit.
              Given the tightness of fit of my ribs/dadoes any single piece not perfectly vertical would have caused the problem hence my note on building in some minimal slop or "wiggle."


              Originally posted by pelligrini
              Do you have a sketch or plans of the design, or are you going to make us wait. Keep up the detailed posts!
              Funny you should say that but as Ray and I were discussing on Saturday neither of us has every drawn out any detailed plans for anything

              I keep a sketch book for my ideas and design notes and rough out generally what I want and basic dimensions and then go from there. When it comes to calculating cuts and allowances for material thickness, rabbets etc I work those out as I go along. Often I create small drawings or do the math directly on the workpiece in pencil. If you were to open up the torsion box you would see various notes and size calcs.

              I can post my rough sketches if you would like although I am sure it wont be much of a suprise as it looks like a BT with extension on a cabinet rather than say a space ship
              Jon

              Phoenix AZ - It's a dry heat
              ________________________________

              We all make mistakes and I should know I've made enough of them
              techzibits.com

              Comment

              • pelligrini
                Veteran Member
                • Apr 2007
                • 4217
                • Fort Worth, TX
                • Craftsman 21829

                #8
                Originally posted by poolhound
                I can post my rough sketches if you would like although I am sure it wont be much of a suprise as it looks like a BT with extension on a cabinet rather than say a space ship
                You ought to hold onto the rough sketch and post it at the end. I'd think I would prefer watching it come togeather. This will be some good info for anyone else wanting to do a mobile base. Looking forward to the rest.
                Erik

                Comment

                • poolhound
                  Veteran Member
                  • Mar 2006
                  • 3195
                  • Phoenix, AZ
                  • BT3100

                  #9
                  Just ordered a bunch of full extension slides from Woodworkers HW (Thanks for the tip CABMAN) and a Woodpecker quicklift.

                  I also went to Rockler yesterday and picked up a couple of the Phenolic Ply sheets they have on sale for $20. That stuff is really slick and should make for a great extension and router table surface plus there should be enough left for some router fence faces and maybe even an extension face for the BT fence.
                  Jon

                  Phoenix AZ - It's a dry heat
                  ________________________________

                  We all make mistakes and I should know I've made enough of them
                  techzibits.com

                  Comment

                  • poolhound
                    Veteran Member
                    • Mar 2006
                    • 3195
                    • Phoenix, AZ
                    • BT3100

                    #10
                    Weekend 2

                    Weekend #2. Trim out the base, add wheels and build the main cabinet.

                    First job this weekend was to trim the edges of the torsion box with the same ply as the cabinet will be. This is partly cosmetic and partly to give the wheels (which I took from dismantling the HTC2000 from my jointer) something more substancial to screw through.

                    I also realized that if I wait until the whole thing is finished and then have to take the wheels off to apply some finish it would be really heavy and a PITA. I therefore took an hour to sand it down and apply a couple of coats of poly.

                    Here is the ply trim glue up.


                    Here its is with the HTC wheels fixed. This looks like it will be a great solution and means I gain over 3" of useable height from not using castors.


                    Now to start cutting the ply. These straight edge clamp guides are a real godsend for cutting down large sheets.


                    Trimming up the panels. Given all the discussions about why have a panel cutting sled, here is a perfect example.


                    I elected to cut the dadoes and rabbets with a dadoe blade. Having done so I wished I had used the router as managing these panels on the TS was rather tricky and as I didnt have a blank ZCTP handy (my stock had run out - must make some more ) I got quite a lot of tearout. I'm not too worried as they will be on the inside and unseen but the perfectionist in me is still ticked off...


                    Glueing up the main carcass. I did also cut the back to size and put it in dry to help hold the case sq. I havent fixed it yet as it will be easier to attached the draw slides with access from both sides.


                    Thats it for this weekend. I hope to get the saw mounted and begin on the router cabinet next weekend and maybe even start drawers.
                    Jon

                    Phoenix AZ - It's a dry heat
                    ________________________________

                    We all make mistakes and I should know I've made enough of them
                    techzibits.com

                    Comment

                    • poolhound
                      Veteran Member
                      • Mar 2006
                      • 3195
                      • Phoenix, AZ
                      • BT3100

                      #11
                      Weekend #3 The Drawers

                      Although I am keen to get the saw mounted on its new base I realized that it made the most sense to make the drawers and do a prefinish on the base cabinet as this would be easier to do before the back went on.

                      I also wanted to trim out the exposed ply on the front edges. I milled up some walnut stock and here you can see the base carcass with it glued and pinned on.


                      Next step was to premount the drawer slides. I used a 1/2" spacer to raise the lower set off the base. They are inset by the depth of the false fronts that will be fitted later. I used a larger spacer to set the height of the upper drawers


                      Here you can see the base which has been attached to the torsion box after a couple of coats of thinned poly and the drawslides mounted just prior to attaching the back.


                      Next it was on to making the drawers. If you had read my other post about "Arrgh cutlists" you will see that I wasted most of my Saturday afternoon as I found that the stash of 1/2" ply I had inteded to use was smaller than I thought. I then decided to make the larger drawers from some extra 5/8" that I had but trying to figure out how to cut them from the pieces I had became a headache. Thanks to the suggestion to use CutListPlus software I downloaded it on Sunday morning and had my puzzle solved. With a perfect cutting diagram in my hand I cut and sized all the drawer parts.


                      The simplest and most reliable method I have found for making drawers is using dadoe and rabbet construction. The sides have the dadoes and the fronts and backs have the rabbets.


                      The completed joint looks like this.


                      Here are the completed drawers. I still have to make up the false fronts but that will come later.


                      Next weekend I will be able to mount the saw and start building the top router cabinet. I am still anxiously awaiting for my new woodpecker router lift and hope it will be here by the time I have to make the table top.
                      Jon

                      Phoenix AZ - It's a dry heat
                      ________________________________

                      We all make mistakes and I should know I've made enough of them
                      techzibits.com

                      Comment

                      • RayintheUK
                        Veteran Member
                        • Sep 2003
                        • 1792
                        • Crowborough, East Sussex, United Kingdom.
                        • Ryobi BT3000

                        #12
                        Lookin' good!

                        Ray
                        Did I offend you? Click here.

                        Comment

                        • cgallery
                          Veteran Member
                          • Sep 2004
                          • 4503
                          • Milwaukee, WI
                          • BT3K

                          #13
                          Looking good. Some of that plywood seems to have an OSB core?

                          Comment

                          • poolhound
                            Veteran Member
                            • Mar 2006
                            • 3195
                            • Phoenix, AZ
                            • BT3100

                            #14
                            Originally posted by cgallery
                            Looking good. Some of that plywood seems to have an OSB core?
                            Sort of. This ply has a wafer style core sandwiched between regular ply layers. Its not quite as rough as standard OSB. It seems to be more stable than some of the regular ply I have seen and has less voids, infact on this sheet of 5/8 I didnt see a single on. Thats a real improvement on the 3/4" that made the main carcass as there were quite a few in that. I have started seeing this more and more in the suppliers I use, I quite like it.
                            Jon

                            Phoenix AZ - It's a dry heat
                            ________________________________

                            We all make mistakes and I should know I've made enough of them
                            techzibits.com

                            Comment

                            • poolhound
                              Veteran Member
                              • Mar 2006
                              • 3195
                              • Phoenix, AZ
                              • BT3100

                              #15
                              Weekend #4 The Router Cabinet

                              My main task this weekend was to build the top cabinet that will act as the table extension, router table and house my router.

                              Before I could get started on that I had to first seal coat the drawers and mount them in the main cabinet. I also had to disasemble my BT from its current stand so I could make sure I get all my measurements correct.

                              Here is a pic of my BT sitting on its new base with all the drawers fitted on their runners and working (drawer fronts will come later).


                              This cabinet design allows me to get two extra small drawers (11" W) in the front with the router and some extra small bit drawers accesible from the end. I decided that the best construction was to use biscuit joinery for the upright parts and then screw on the base to keep everything aligned and square. Once all the parts were cut I did a dry fit in position to make sure everything was as it should be. I did also place the top on it to check for level (sorry forgot to take a pic) with the main table. As intended it is slightly lower so that gives me some room to shim it up to the right height.


                              Here are some pics after its all glued up. I notched the fronts and added a cross support. I also glued and nailed in the plywood runners for the bit drawers like in Norm's router station. The block in the right hand set of drawers is a spacer cut to the correct width to ensure the internal dividers were set sq and to the correct width when I glued and nailed in the cross support.


                              I guess you can see my "OOPS" where I cut one of the rows of biscuits slots in the wrong place I did also make a much more painful error as I completely forgot to cut the holes in the right side of the router compartment to fit the DC piping. Now I am going to have to retrofit something which will be a pain - more fun next weekend I guess. My next jobs will be the drawers for this cabinet and of course the top. I cant really start on the top until I receive my new Woodpeckers router lift and that hasnt even shipped yet. I hope it will arrive sometime soon - Watch this space!!
                              Jon

                              Phoenix AZ - It's a dry heat
                              ________________________________

                              We all make mistakes and I should know I've made enough of them
                              techzibits.com

                              Comment

                              Working...