Glueup with spindles

Collapse
This topic is closed.
X
X
 
  • Time
  • Show
Clear All
new posts
  • JR
    The Full Monte
    • Feb 2004
    • 5636
    • Eugene, OR
    • BT3000

    #1

    Glueup with spindles

    I need a little advice. I'm about ready to glue up this project:
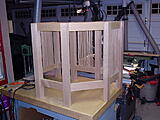


    This is turning out to be a very complicated assembly, with odd angles, lots of parts that need to be aligned pefectly, etc. The spindles make it even more complicated.

    My questions:
    1. Do the spindles have to be glued, or can they float freely? They don't really have to contribute the structural integrity, but could help if I can find a way to get them glued in.
    2. Can you recommend glues with long setup times?
    TIA,
    JR
    JR
  • cabinetman
    Gone but not Forgotten RIP
    • Jun 2006
    • 15216
    • So. Florida
    • Delta

    #2
    If the frame is structurally sturdy without the spindles, it may not be necessary to glue in the spindles. But, every little bit helps. Gluing them in does present a time restriction, just to get them aligned by yourself. I know what a PITA it can be. It's, like gluing in slats for shutters and closet doors.

    Regular white glue, Titebond, and TB III, have a longer open time than TB II. Chilling the glue prolongs it's set up time. You could also use "Plastic Resin Glue" - from Weldwood. It's a powder you mix and could give you about 45 minutes to an hour before the point of no return.

    Just a suggestion: You could make an alignment jig to properly space the spindles for insertion.
    .

    Comment

    • jackellis
      Veteran Member
      • Nov 2003
      • 2638
      • Tahoe City, CA, USA.
      • BT3100

      #3
      It seems to me trying to do the whole thing at once is risking disaster. You'd need a glue with a looooong open time - maybe as much as an hour.

      This advice is worth less than you paid for it but here's how I think I would approach the problem:

      1) Get yourself some helpers. Preferably folks who have put complex projects together before.

      2) Assemble each pair of rails and their spindles independently. Since the rails are mortised, you might build a glue-up jig that allows the rails and spindles to lie flat and keeps them squared.

      3) Once all of the rail/spindle sets are assembled and the glue has dried, attach them to the posts. You might assemble four stand-alone pairs of posts with their rail/spindle assemblies and once these are strong enough to tolerate being handled, attach the reamining pairs of rails. I assume you've done a dry fit to verify that it all works out.

      4) If you decide to let the spindles float, then your task seems to be much easier, but I think you should still assemble four stand-alone sides, first let them dry, then tie the sides together. You might consider building jigs to hold the rail and spindle sets together so you can handle the complete set as a single part - something like a pair of screw clamps.

      It'll look nice when it's done.

      Comment

      • MilDoc

        #4
        Titebond makes Titebond II Extend Wood Glue with an open time of 15 minutes and a total work time of 20-25 minutes:
        http://www.titebond.com/IntroPageTB....torIntroTB.asp

        Regular Titebond can also be slightly diluted with water (no more than 5% H2O) which will approximately double its open time without affecting its holding strength.

        And there are slow-set epoxies available.

        Comment

        • JR
          The Full Monte
          • Feb 2004
          • 5636
          • Eugene, OR
          • BT3000

          #5
          Both good suggestioins, cabinetman. Thanks.

          45 minutes to an hour is about what I'd need. I gave it a run through last night, without spindles, and it was a bear. In your experience does the plastic resin glue clean up ok? Similar or different to yellow glue in that respect?

          I think the jig idea is an excellent one. I have tried doing the assy with a couple of little standoffs to get the spindles at the right height from the workbench, but it was still difficult.

          JR
          JR

          Comment

          • JR
            The Full Monte
            • Feb 2004
            • 5636
            • Eugene, OR
            • BT3000

            #6
            Woops, a couple more good suggestions while I was responding to c'man.

            Jack, I have pretty much determined the assembly order - I think. As you point out, I would like to do the whole thing at once, but it's not practical.
            1. I think I can do the whole back side in one go. That's three sets of spindles and four legs. The lower shelf (not seen in the photo)will be dry fit to aid in alignment.
            2. The two sides and lower shelf come next.
            3. The open sections on front come last.
            MilDoc, I'll check out the extended-time TBII. It may not be long enough, though.

            JR
            JR

            Comment

            • LCHIEN
              Super Moderator
              • Dec 2002
              • 22012
              • Katy, TX, USA.
              • BT3000 vintage 1999

              #7
              The item I built with spindles, they were a snug fit so I just placed the spindles in without glueing them - saved a lot of time in the glue-up.

              When I varnished it, that sort of locked them in place even though it was hard to rotate them by hand before finishing. No problems since...
              Loring in Katy, TX USA
              If your only tool is a hammer, you tend to treat all problems as if they were nails.
              BT3 FAQ - https://www.sawdustzone.org/forum/di...sked-questions

              Comment

              • JR
                The Full Monte
                • Feb 2004
                • 5636
                • Eugene, OR
                • BT3000

                #8
                Originally posted by LCHIEN
                ... it was hard to rotate them by hand before finishing. No problems since...
                These are square tenons, fit into 1/4" holes done on the mortising machine. Youre experience is exactly why I'd consider avoiding the glue step for these.

                JR
                JR

                Comment

                • cabinetman
                  Gone but not Forgotten RIP
                  • Jun 2006
                  • 15216
                  • So. Florida
                  • Delta

                  #9
                  Originally posted by JR
                  Both good suggestioins, cabinetman. Thanks.

                  45 minutes to an hour is about what I'd need. I gave it a run through last night, without spindles, and it was a bear. In your experience does the plastic resin glue clean up ok? Similar or different to yellow glue in that respect?

                  I think the jig idea is an excellent one. I have tried doing the assy with a couple of little standoffs to get the spindles at the right height from the workbench, but it was still difficult.

                  JR

                  The last time I used it it was sort of brownish/purple color...very easy to see. They may have changed the color. I don't know. It does clean up like yellow glue, right away with a water wet rag. I don't like waiting for it to dry and then chisel off. That's a real fire drill.

                  I would lightly coat the inside of the mortises (it might be quicker than doing each of the spindles) and insert spindles. Experiment with some samples for the consistency of the mix to get the hang of it.
                  .

                  Comment

                  • jrnewhall
                    Forum Newbie
                    • Oct 2005
                    • 57
                    • Rochester, NY.
                    • Ryobi 3100

                    #10
                    Titebond also has an Extend for regular Titebond with an open time of about 1/2 an hour. That is what I am using on my Morris chair currently in progress. I skipped gluing in the slats on the bottom tray of the arts & crafts end table I posted a while ago. Worked just fine.

                    Comment

                    • LCHIEN
                      Super Moderator
                      • Dec 2002
                      • 22012
                      • Katy, TX, USA.
                      • BT3000 vintage 1999

                      #11
                      Originally posted by JR
                      These are square tenons, fit into 1/4" holes done on the mortising machine. Youre experience is exactly why I'd consider avoiding the glue step for these.

                      JR
                      are they shouldered tenons to hide the mortise hole edges or are they just straight square dowels? If shouldered you may want to glue to prevent gaps from appearing under the shoulders.
                      Loring in Katy, TX USA
                      If your only tool is a hammer, you tend to treat all problems as if they were nails.
                      BT3 FAQ - https://www.sawdustzone.org/forum/di...sked-questions

                      Comment

                      • JR
                        The Full Monte
                        • Feb 2004
                        • 5636
                        • Eugene, OR
                        • BT3000

                        #12
                        Yep, shouldered.

                        I built the jig recommended by Cabinetman last night. That's going to speed up proceedings quite a bit. I think I can get this thing done over the weekend.

                        Now to choose a glue.

                        JR
                        JR

                        Comment

                        • Uncle Cracker
                          The Full Monte
                          • May 2007
                          • 7091
                          • Sunshine State
                          • BT3000

                          #13
                          Another thing you could think about if you decide to go without glue on the spindles, but are concerned about looseness, is to use a pin nailer from the back side to fix them in place after assembly is complete. The pins would be practically invisible, even if you knew they were there. You wouldn't even have to decide if you wanted the pins until after assembly, so you could see if there was any appreciable looseness first.

                          Comment

                          • JR
                            The Full Monte
                            • Feb 2004
                            • 5636
                            • Eugene, OR
                            • BT3000

                            #14
                            Well, here the bad dude is.


                            Cabinetman's advice to build a jig for the spindles saved the day. You can see it there on the shelf. It's just a couple of pieces of 1/4" hardboard with pieces of spindles nailed to them. The pieces had been used to set the spacing of the spindles when I cut their mortises, so that worked well.

                            I ended up using TBII glue. HD didn't have anything remotely like what I wanted and I was determined to get this thing together. I sharpened my pencil on the assy plan and dove in.

                            As always, thanks for the help and support!

                            JR
                            JR

                            Comment

                            Working...