Fence mounted hold-down roller

Collapse
This topic is closed.
X
X
 
  • Time
  • Show
Clear All
new posts
  • niki
    Senior Member
    • Nov 2006
    • 566
    • Poland
    • EB PK255

    Fence mounted hold-down roller

    Good day

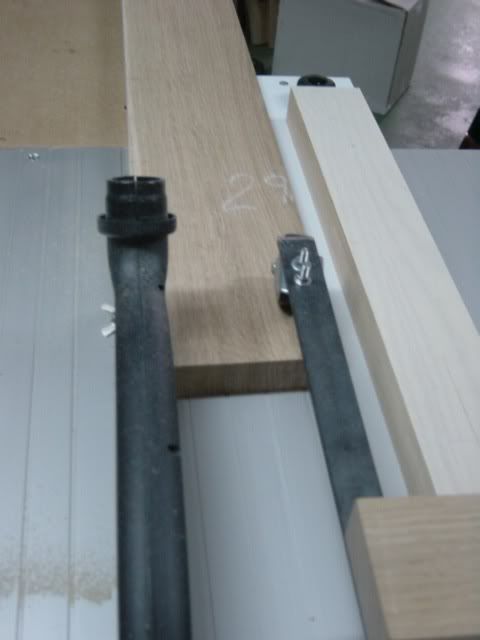
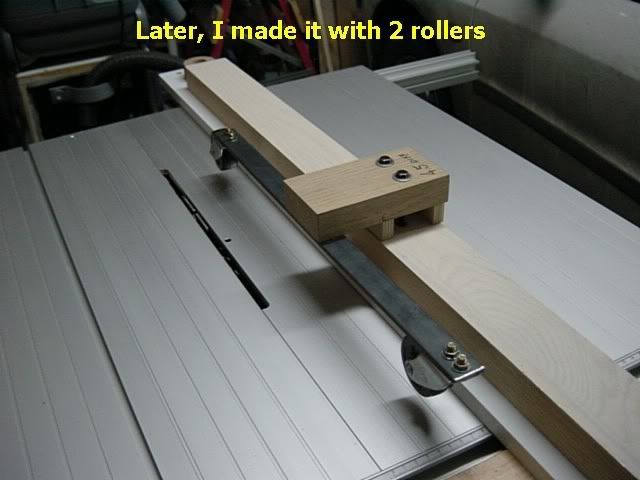
    Believe it or not but it was the idea of Cabinetman (yes, our good ol’ cabinetman).

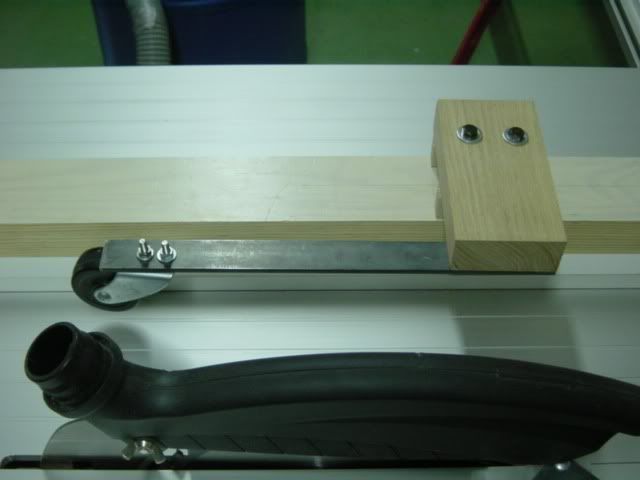
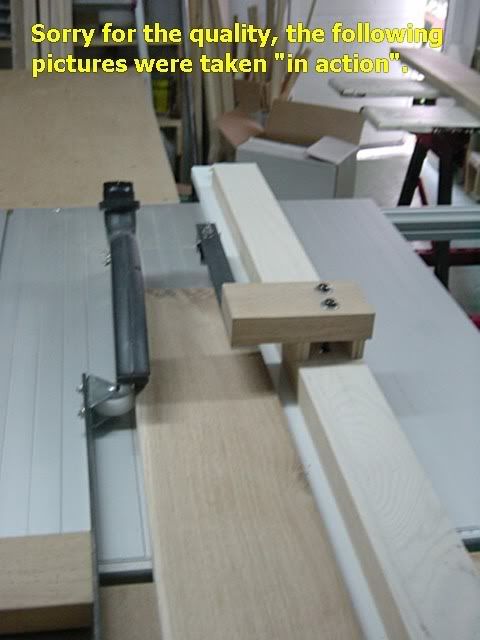
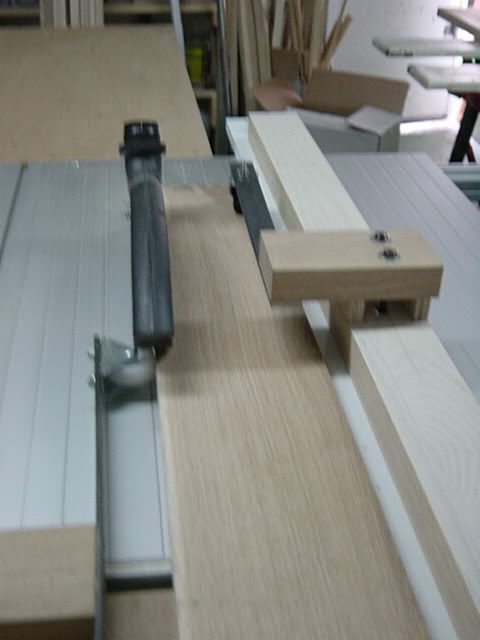
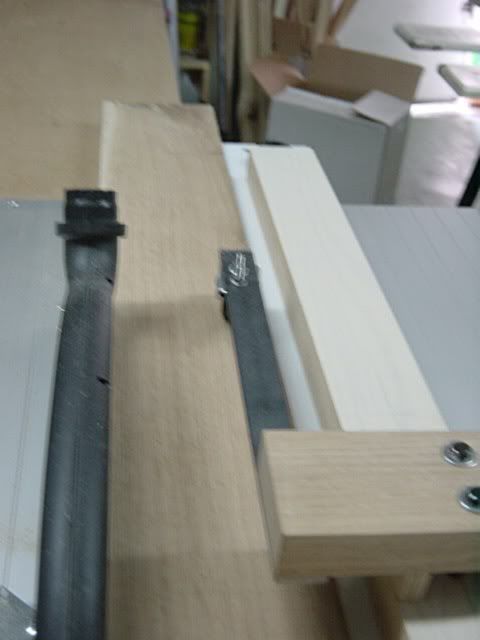
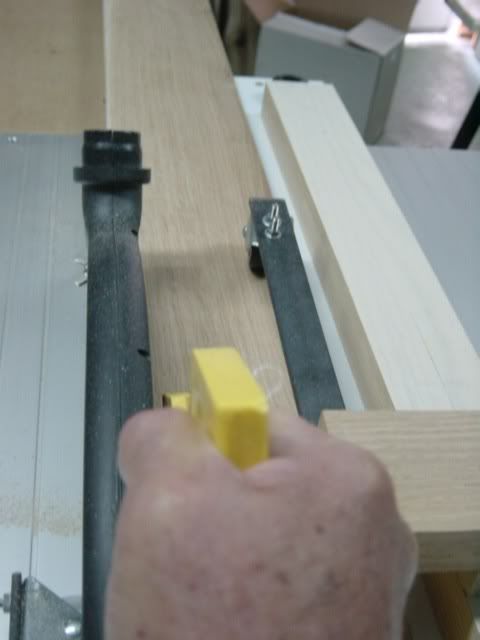
    When I posted the “Feeder rollers” (in other forum), Cabinetman asked me “what about fence mounted hold down roller?”, and I thought that it’s actually very good idea and went to work on it.

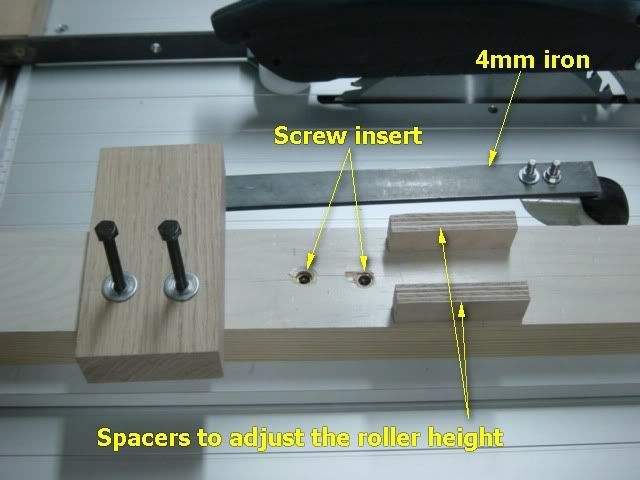
    After I made it, I found is so useful that now, the roller is mounted almost permanently on the fence.

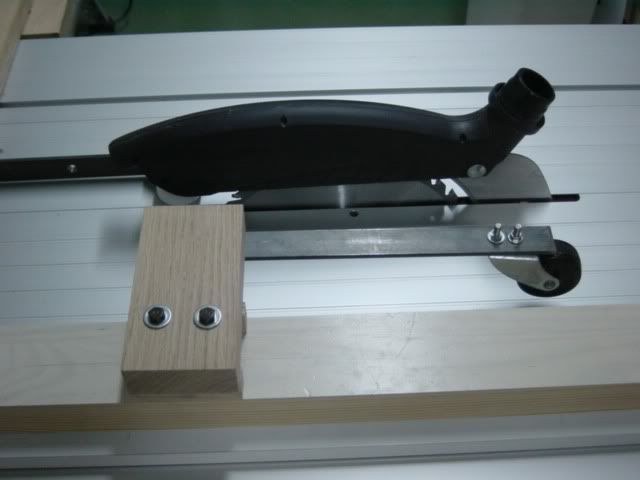
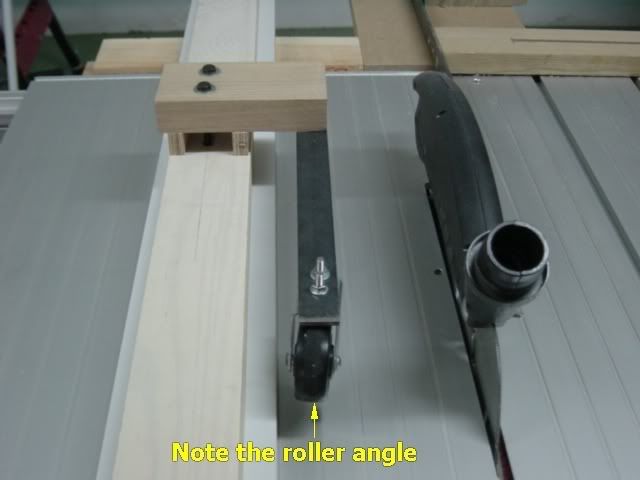
    I use it together with the “feeder rollers” that are holding the work against the fence before entering the blade and the hold down roller keeps the work piece down and against the fence, after the blade.

    On the pictures, I was “shaving” a few boards to make them exactly the same width, so you will not see any cutoff piece but only a little bit of dust.

    In this occasion, I would like to thank Cabinetmat for this idea and many other good advices.

    Regards
    niki


    Please click on the link to see the first pic


    Last edited by niki; 10-01-2007, 01:44 PM.
  • Ed62
    The Full Monte
    • Oct 2006
    • 6021
    • NW Indiana
    • BT3K

    #2
    Another great one, Niki. Thank you.

    Ed
    Do you know about kickback? Ray has a good writeup here... https://www.sawdustzone.org/articles...mare-explained

    For a kickback demonstration video http://www.metacafe.com/watch/910584...demonstration/

    Comment

    • Ed62
      The Full Monte
      • Oct 2006
      • 6021
      • NW Indiana
      • BT3K

      #3
      What did you do to get the angle on the roller?

      Ed
      Do you know about kickback? Ray has a good writeup here... https://www.sawdustzone.org/articles...mare-explained

      For a kickback demonstration video http://www.metacafe.com/watch/910584...demonstration/

      Comment

      • Pappy
        The Full Monte
        • Dec 2002
        • 10453
        • San Marcos, TX, USA.
        • BT3000 (x2)

        #4
        Cool idea, and I think I have all the parts laying around.
        Don, aka Pappy,

        Wise men talk because they have something to say,
        Fools because they have to say something.
        Plato

        Comment

        • niki
          Senior Member
          • Nov 2006
          • 566
          • Poland
          • EB PK255

          #5
          Thank you so much

          Ed
          You just drill the holes on the iron strip a little bit off center to each side.

          Pappy
          For all the jigs that I built, the parts and hardware are very easy to get.
          Her in Poland, we don't have much of a selection like in US, even not a simple T track.

          Regards
          niki

          Comment

          • Ed62
            The Full Monte
            • Oct 2006
            • 6021
            • NW Indiana
            • BT3K

            #6
            I think even I can do that. Thanks.

            Ed
            Do you know about kickback? Ray has a good writeup here... https://www.sawdustzone.org/articles...mare-explained

            For a kickback demonstration video http://www.metacafe.com/watch/910584...demonstration/

            Comment

            • LinuxRandal
              Veteran Member
              • Feb 2005
              • 4889
              • Independence, MO, USA.
              • bt3100

              #7
              Hmmm, change the angle for the size of the wheel, and ...


              I think he just found a way to make those bt3 wheels, one of the more usefull things in the accessory kit, LOL.
              She couldn't tell the difference between the escape pod, and the bathroom. We had to go back for her.........................Twice.

              Comment

              • radhak
                Veteran Member
                • Apr 2006
                • 3061
                • Miramar, FL
                • Right Tilt 3HP Unisaw

                #8
                Niki,

                a) is the roller height adjustable? if not, would one need multiples - one for each stock thickness? what is the clearance between the wheel and the table surface?

                b) what does the roller angle achieve?

                c) maybe some details/pics on the feeder roller too?
                It is the mark of an educated mind to be able to entertain a thought without accepting it.
                - Aristotle

                Comment

                • rosesunkist
                  Forum Newbie
                  • Jun 2006
                  • 55
                  • LaVernia, TX
                  • BT3100

                  #9
                  I have been thinking up an idea for the same thing. But mine would be a bit more complicated. I might change my plan a bit, but idk right now, but I will know when I get back home and make it.
                  One thing I am unsure about your setup is the hard plastic wheels....do you have any issues with it marking the wood? But I love the idea of using the steel to keep the tension stable.
                  Last edited by rosesunkist; 11-22-2006, 03:54 AM.
                  Just think of something witty and pretend you saw it here.

                  Comment

                  • niki
                    Senior Member
                    • Nov 2006
                    • 566
                    • Poland
                    • EB PK255

                    #10
                    Thank you

                    LinuxRandel
                    I don’t know the BT3 so I cannot comment.

                    Radhak
                    a) I’m adjusting the roller height by changing the spacers to different thickness to achieve ¼”~1/2” deflection of the roller. Usually, I work with the same wood thickness for a project so it’s not much of a problem. I can also use each spacer for 2 dimensions, horizontally and vertically.

                    b) When I push the work piece forward, the work piece wants to push the roller to the left side but it cannot because the roller is in fixed position, the reaction is, that the roller pushes the work to the right (toward the fence). I made the same on the “Feeder Rollers” to push the work piece down to the table.

                    c) Here they are.

                    Rosesunkist
                    This roller id made of some hard rubber, if the down pressure is too strong (more that ½” deflection of the roller), sometimes I get some light black line on the wood, but it removes very easy.

                    In total, I would say that it’s real pleasure and I’m very relaxed, especially when I work together with the “Feeder rollers” that are pushing the work into the fence and down to the table before hitting the blade, and the hold down roller takes care after the work leaves the blade.

                    niki


                    Comment

                    • niki
                      Senior Member
                      • Nov 2006
                      • 566
                      • Poland
                      • EB PK255

                      #11


                      Comment

                      • niki
                        Senior Member
                        • Nov 2006
                        • 566
                        • Poland
                        • EB PK255

                        #12


                        Comment

                        • dlminehart
                          Veteran Member
                          • Jul 2003
                          • 1829
                          • San Jose, CA, USA.

                          #13
                          Niki, I wonder if there isn't some simple way to use sliding wedges, under a correspondingly wedge shaped top piece, to avoid having to have a bunch of spacers. Could glue sandpaper to one or both surfaces to increase the grip.
                          - David

                          “Be yourself; everyone else is already taken.” -- Oscar Wilde

                          Comment

                          • niki
                            Senior Member
                            • Nov 2006
                            • 566
                            • Poland
                            • EB PK255

                            #14
                            Hi David

                            Maybe it can be done with two L shaped angle irons, one stationary on the fence and the other one, connected to the roller arm (or part of it) and sliding up/down on two elongated holes (channels) and bolts/ wing nuts.

                            Usually, I’m working with ¾” ply, MDF, Melamine or 1-1/4” Oak and the spacers, mounted horizontally (1/2”) or vertically (1”) are enough for me. I’m an amateur and “time is not money” for me not to mention that during the Polish winter my woodworking is also “frozen”.

                            But, I’m “buying” the sanding paper, very good idea.

                            Thanks
                            niki

                            Comment

                            • lcm1947
                              Veteran Member
                              • Sep 2004
                              • 1490
                              • Austin, Texas
                              • BT 3100-1

                              #15
                              Now that's pretty slick Niki. What an amazingly easy and simple method for a hold down/ feeder rollers. I'll be working on one this weekend for sure. Thanks for the great walk through and pictures.
                              May you die and go to heaven before the Devil knows you're dead. My Best, Mac

                              Comment

                              Working...