Cablift

Collapse
This topic is closed.
X
X
 
  • Time
  • Show
Clear All
new posts
  • chopnhack
    Veteran Member
    • Oct 2006
    • 3779
    • Florida
    • Ryobi BT3100

    Cablift

    It didn't take long to make, probably about as much time as it would have taken me to find my way wayward helper! Inexpensive to build, easy to store flat and will never complain...


    I think in straight lines, but dream in curves
  • eezlock
    Senior Member
    • Feb 2006
    • 997
    • Charlotte,N.C.
    • BT3100

    #2
    cablift

    I see what you have here,a winch operated lift.....only thing that I see right off
    that may need your attention is some type of counter weight on the base
    to prevent it tipping over while loaded. I don't know what you plan to use it for,
    but it is better safe now than sorry later on!

    Comment

    • T...K21
      Forum Newbie
      • Feb 2012
      • 90
      • Southern Idaho
      • BT3100

      #3
      Nice! I could've used something like that a time or two. Great idea!

      Comment

      • LCHIEN
        Internet Fact Checker
        • Dec 2002
        • 21007
        • Katy, TX, USA.
        • BT3000 vintage 1999

        #4
        cool! design it yourself? or found some plans?

        Cabinet lift, I presume? only needs to handle 30-70 pounds or so?
        Loring in Katy, TX USA
        If your only tool is a hammer, you tend to treat all problems as if they were nails.
        BT3 FAQ - https://www.sawdustzone.org/forum/di...sked-questions

        Comment

        • cabinetman
          Gone but not Forgotten RIP
          • Jun 2006
          • 15218
          • So. Florida
          • Delta

          #5
          A cablift??? So, you made something to get me high? It looks very innovative. Are the rollers against the column bedframe casters?

          Just a suggestion, cable or rope style lifts become almost effortless when using two double pulleys (you need sufficient cable/rope). So, in looking at your lift, you would be installing the upper cabinets first, and likely adjusting their wall position by using shims, or some other method?

          .

          Comment

          • Pappy
            The Full Monte
            • Dec 2002
            • 10453
            • San Marcos, TX, USA.
            • BT3000 (x2)

            #6
            Great idea! May have to file those pics away for future reference.
            Don, aka Pappy,

            Wise men talk because they have something to say,
            Fools because they have to say something.
            Plato

            Comment

            • atgcpaul
              Veteran Member
              • Aug 2003
              • 4055
              • Maryland
              • Grizzly 1023SLX

              #7
              That is pretty cool. I like the rollers you have against the beam. Was that forethought or "live and learn"?

              You need to make a people lift version with a remote control electric winch. It would be great for working in tight spots where ladders wouldn't fit.

              Paul

              Comment

              • jdon
                Established Member
                • Feb 2010
                • 401
                • Snoqualmie, Wash.
                • BT3100

                #8
                You can also stand on it while using your drill press

                Comment

                • chopnhack
                  Veteran Member
                  • Oct 2006
                  • 3779
                  • Florida
                  • Ryobi BT3100

                  #9
                  Thanks guys 
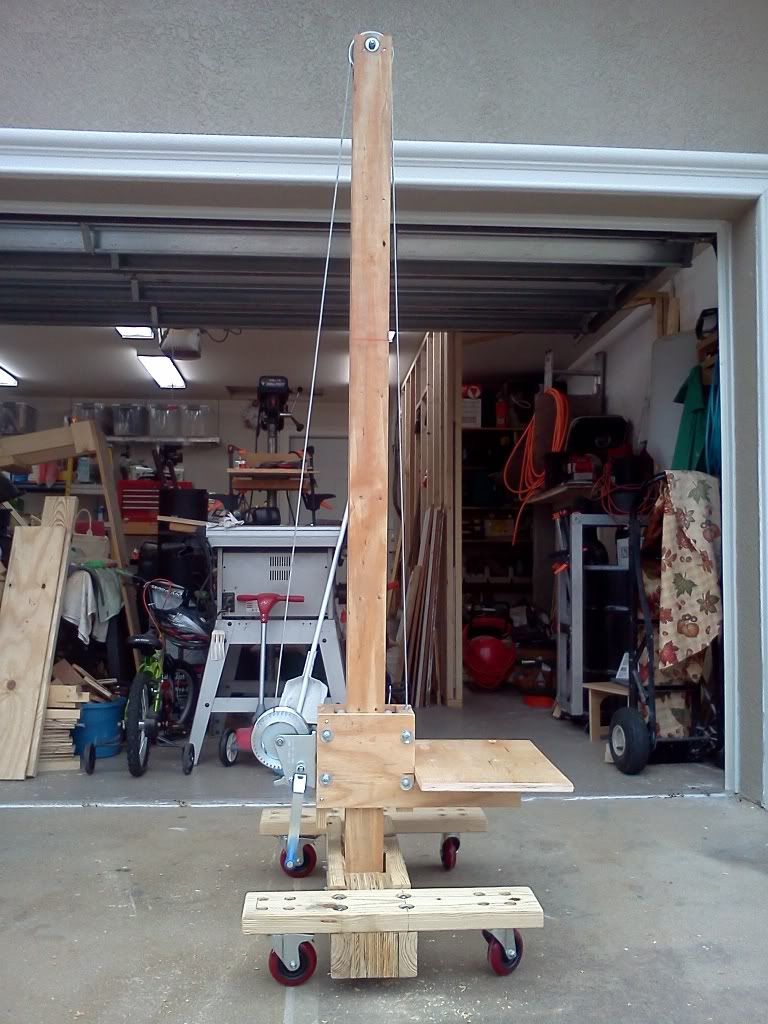
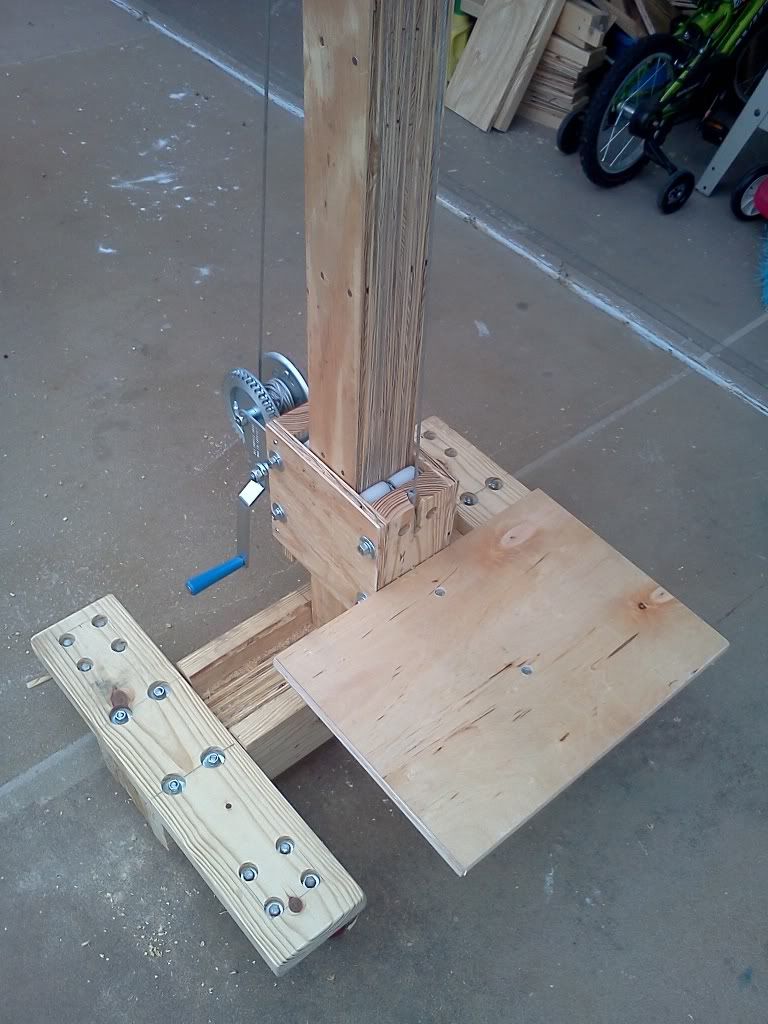
The original design was from a series of woodweb photos. No plans per se but its not hard to figure out. The casters are appliance casters and work really well. The load limit is yet to be determined, I did crank myself up though so I figure it could safely handle at least 300 lbs. As for steadiness, I too was concerned about it, but I did test it on the incline of my driveway with my body weight and it seemed steady. I locked the rear wheels, stepped onto the platform and cranked away! I also gave the wife a lift and the two boys. Good times.

                  Sorry to get you high C-Man Yes, since I end up doing a lot of things solo, the uppers will be installed first in the next job coming up in a few weeks. And yes shimmed as necessary to get to level line and faced level as well, scribe molding to hide differences. If I can mull together 3 units (a 3930, 3012 and a 2130) I'll have the small wall done in one lift... I am still "mulling" this over I am not so sure of the sturdiness of three units mulled together with the middle unit being only 12" high.

                  If anyone else is also on LJ there are some other pics there too.
                  Last edited by chopnhack; 08-04-2012, 12:01 PM.
                  I think in straight lines, but dream in curves

                  Comment

                  • cabinetman
                    Gone but not Forgotten RIP
                    • Jun 2006
                    • 15218
                    • So. Florida
                    • Delta

                    #10
                    You must be planning a lot of installations to want to lug that around to the jobsite. I've worked alone too many times, and have tried to minimize what I have to load up, unload, and reload.

                    Do you remember the discussion we had with what to use for upper cabinet installations. I found it rather simple to use deadmen, and the small jack with a saddle plate. Another one is the single adjustable pole, which I give very high marks to...especially for installing crown.

                    I'm thinkin' that your threesome may get a bit tipsy with the cantilevered weight. I'm re-posting this method for aligning multiple cabinets with a face frame, could also apply in theory to frameless.

                    When installing multiple cabinets, there's the tedious task of getting the face frames to line up flush. This is a tip that may be of some help. For example if you have three upper cabinets each having their own face frame call the first "A", the second "B", and the third "C". If you've installed the face frame on the cabinets, lay them on their backs and line them up so the face frames are as close to flush as possible. Start with "A" and "B". Clamp the two FF's together. From whichever side you are comfortable drilling and screwing, drill pilot holes and countersink in at least three places (top, middle, bottom) from one FF into the other. Make sure the holes are not drilled where hinges will be installed. Insert screws that will be shorter by 1/4" to 1/2" than the ones you will use when installing. Bump screws in tight. Remove clamps. Do the final scraping or sanding on the two FF's at once so they are flat and even. Then go to the "B" and "C" cabinets and do the same thing, etc.

                    When installing, after placing them where they are to go and leveling them, screw cabinets to the wall, but not up tight. Using the slightly longer screws, align the FF's, clamp, and insert screws into the same holes and bump tight. Then do the final tightening of the cabinets to the wall. If the wall is not flat, (how many are?) shimming the back of the cabinets may be necessary, so that there is no strain on the FF's. This method helps make final alignment easier.


                    .

                    Comment

                    • chopnhack
                      Veteran Member
                      • Oct 2006
                      • 3779
                      • Florida
                      • Ryobi BT3100

                      #11
                      I haven't forgotten your advice, C-man :-) There is a certain wow factor that some clients will have when you come in with large handmade tools. A mark of a craftsman - fake it until you make it kinda thing Totally agree, there will be a time where I will not want to take those three bolts out of the bottom that hold the mast to the base and there are some cases where I will not be able to use this, like my laundry room install. Plus there is the ever present storage issue... but a jig like this? I had to build it!!

                      Thanks for your input, I didn't think that I would be able to pull off putting together those three cabs... I was really concerned about trying to balance the weight of a cabinet on either side of a 12" high cab's face frame with only two screws per side.. it seemed dicey at best.

                      I like the method you described of laying them on their backs, the last kitchen I did, I mulled units together while the cabs where standing upright on a low assembly table. Lying on their backs you can approach either the left or right side with your dominant hand by just going to the bottom or top of the cabinet (i.e. - you would have to flip the cab upside down if it were upright to get to say the left side if you were right handed and still being able to use your right hand). I like this!! That way if the run is going right to left into a corner the left side would be the side to hide the mull screws - less visible. I am still not as comfortable using the left hand on expensive finished cabs
                      I think in straight lines, but dream in curves

                      Comment

                      • LinuxRandal
                        Veteran Member
                        • Feb 2005
                        • 4889
                        • Independence, MO, USA.
                        • bt3100

                        #12
                        This brought back flashbacks of a shingle lifter I saw on YouTube. I found it again:

                        Cheap and effective trolley apparatus for one man to get 80 pound bundles of shingles on the roof of a house without carrying them up a ladder. Cost is abou...
                        She couldn't tell the difference between the escape pod, and the bathroom. We had to go back for her.........................Twice.

                        Comment

                        • cabinetman
                          Gone but not Forgotten RIP
                          • Jun 2006
                          • 15218
                          • So. Florida
                          • Delta

                          #13
                          Originally posted by LinuxRandal
                          This brought back flashbacks of a shingle lifter I saw on YouTube. I found it again:

                          http://www.youtube.com/watch?v=CR7h7_Dscyk
                          That's pretty darn cool. I needed that when I did my roof 22 squares.

                          .

                          Comment

                          • chopnhack
                            Veteran Member
                            • Oct 2006
                            • 3779
                            • Florida
                            • Ryobi BT3100

                            #14
                            Originally posted by LinuxRandal
                            This brought back flashbacks of a shingle lifter I saw on YouTube. I found it again:

                            http://www.youtube.com/watch?v=CR7h7_Dscyk
                            Wow, thats some ingenuity! Poor guy must be some where that the boom truck can't get to
                            I think in straight lines, but dream in curves

                            Comment

                            • LCHIEN
                              Internet Fact Checker
                              • Dec 2002
                              • 21007
                              • Katy, TX, USA.
                              • BT3000 vintage 1999

                              #15
                              Originally posted by LinuxRandal
                              This brought back flashbacks of a shingle lifter I saw on YouTube. I found it again:

                              http://www.youtube.com/watch?v=CR7h7_Dscyk
                              ha,ha, won't work for midgets.
                              Loring in Katy, TX USA
                              If your only tool is a hammer, you tend to treat all problems as if they were nails.
                              BT3 FAQ - https://www.sawdustzone.org/forum/di...sked-questions

                              Comment

                              Working...