
 LCHIEN
Cutting Circles with your Router
Copyright 2012 by Loring Chien
OK, so you need to cut a large circle or arc in a piece of wood or panel. Freehanding with a jigsaw is a possibility, but for a really smooth and accurate circle the router is the best tool.
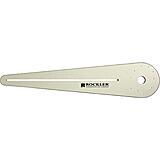
There�s a number of jigs on the market for sale and they cost around $40 to $60 like this one from Rockler:
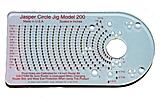
And this one from Jasper:
They are nice but unless you do a lot of circles of different sizes then the DIY solution is much cheaper.
Here�s my solution and it cost me a scrap piece of cedar 5-1/2� x 12� long x 5/8� thick. $0.00. Probably hardwood would be better but this works fine.
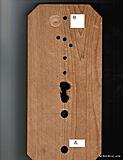
On the long axis I drew a center line. About a inch and a half from the end I drilled a �� hole carefully centering the hole (marked�A�) on the centerline and the cross-mark I made. As you can see, I have drilled other hole �A�s where needed.
Now if I need a circle 18� in diameter, or 9� radius, then I mark a spot on the axis 8-7/8� away from the center of hole �A�. This is because the center of the router bit will be at 8-7/8� from the center of A but the outer edge of the �� straight router bit will be at 9� from the center of the hole �A�. Here I drill Hole �B� which is ��.
In the center of the workpiece where I want the 18� hole I drill a �� hole.
Now I mount a router guide bushing to the router base plate. I use a �� O.D. guide bushing which is probably 3/8� to �� long. And I mount a �� Straight router bit to the router � if the bushing is properly centered to the router then there will be less than 1/8� clearance around the bit because the side wall of the bushing will be probably .030� thick.
Set the router on top of the jig so that the bushing goes into hole A � it should be able to rotate with low effort but be a near-snug fit � it definitely should have little of no play.
Set the router so that the bit is just shy of the bottom of the jig, so that with the jig set on the table the bit does not contact the table. Now set the router aside for a while.
Next you will need a 1� to 1-1/4� long �� dowel peg. Use a small mallet to push this into the bottom side of hole B so that half of it is buried. Set the jig onto the workpiece so the peg goes into the center hole. You probably should have to press the peg in, make sure it does not rise up any more into the jig. The jig should be able to swing right and left with a little friction from the snug fit. It should not have any play.
Place the router back on the jig. Holding onto the handles of the router; you should be able to run the router and the jig around a whole 360 degrees. Both the router should spin in the jig around hole A and the jig should spin around pivot hole B. This is the practice run � make sure the workpiece is solidly held and the clamps don�t interfere with the router motion. Make sure the cord does not get tangled or limit travel. If you do it right the cord won�t get twisted. The jig should go clockwise around the workpiece; the router should appear to go counterclockwise in the jig hole A.
Now we�re ready for the exciting part � the cutting.
Adjust the router bit depth so that it protrudes 1/16th to 1/8� below the bottom of the jig. This should be the setting for a fixed router, if you have a plunge router, set the first plunge limit to that amount. With a fixed router, you will have to tilt the router a small amount to start the bit above the workpiece. Tilt it to be level and start rotating the router. Go around the circle twice, keeping the router flat on the jig and the jig flat on the workpiece. Try and keep the router moving. Turn off the router.
Inspect your groove, it should be a perfect circle and about 1/16th to 1/8� deep. It is? Great!
Now you are ready for subsequent passes. With a �� bit, its actually a rather weak bit because the thickness inside the flutes is rather less than �� and it doesn�t like to be pushed sideways too hard. For that reason, the recommended cut depth is about 1/8� to 3/16th� per pass. That means you may have to make 5 or 6 passes to cut a �� board.
Now you should be well on your way. I�m going to take minute to give some advice that we sort of glossed over before.
A carbide spiral upcut bit will give the best results � but cost more. A shear-cutting bit will be better than a straight flute bit but not as much as a carbide spiral bit.
Keep a spare bit, as I mentioned, these bits are easy to break if you are too aggressive.
Make sure your router bit cutting length is long enough� for �� material you shold have like a 1� cutting length bit even though we go 1/8� at a time.
I routed a small radius on the bottom edges of the jig so it won�t catch on anything.
Make sure the workpiece is on a sacrificial surface, because the router bit will cut into the table below when you cut through.
Make sure the workpiece is clamped firmly to the table.
Be prepared for when the cutoff circle is free of the hole � even if the workpiece is clamped, if the cutoff moves you may gouge the inside edge of your hole with the router bit as the cutoff, the jig and the router break free from the workpiece. More on this later.
If you want to cut a 9� circle rather than a 9� hole, set the distance from A to B to 9-1/8� instead of 8-7/8� to allow for half the kerf of the bit.
If your bit is not long enough, you can cut halfway on one side of the workpiece and then flip it over and cut the remainder from the other side. (consider using a spiral downcut bit to minimize tearout). The alignment should be very good.
Make sure the guide bushing is centered around the bit, otherwise the hole will be eccentric by the amount it�s offcenter.
If you don�t have a router guide bearing set, the alternative is to cut a 1� hole for the bit and collet access, then remove the router base plate and mount the router base to the top of the jig using three or four flathead screws. I think my method is better because its easier to locate the center of the hole A than the center of the router mounting pattern, and my method also does not twist up the power cord as you make multiple passes. However, the screwed-down router method does yield more perfectly round circles - there�s no eccentricity caused by the bushing concentricity errors.
No go ahead and make more passes, lowering the bit 1/8� at a pass and circling twice on each pass. Each time you�ll have to tilt the fixed base router in or plunge it if you have a plunge router.
When you get close to cutting through you have to be extra careful. As pointed out above, you may cut into your table surface, and the cutoff, jig and router will break free and may do some damage.
You might double-stick tape the center of the workpiece under the cutoff to the table so it won�t move when cut free.
Or, you might cut to a razor thin web remainder and cut it free with a sharp knife.
Or you can make the center pivot pin longer and extend into the table so the cutoff circle won�t move from the center.
You can elevate the workpiece on some 1x2s temporarily nailed to the back of the workpiece � three is good, one at the top, one at the bottom and one in the middle. The one in the middle should have a couple of nails into the cutoff center as well as the remainder so that once cut off it won�t move. This also protects the table surface but sacrifices the 1x2.
In any case the workpiece must also be solidly clamped to the table.
As you can see from my jig, I�ve used this for more than a few circles. I just add new Hole A and Hole Bs where needed. If the hole B is too close to another hole, it�s OK to drill it a bit offcenter so they won�t overlap. If you need longer, get a new scrap of wood an appropriate length. If the circle is smaller than the radius of the router base, this still works fine.
The big jagged hole in the middle of my jig? I don�t even remember what caused that.
Turns out you don't really need all the adjustability of the store-bought jigs, as you can see from mine, a few sizes have met all my needs and it's easy to add a hole or make a new jig.
Good luck! Hope I saved you $50.
Copyright 2012 by Loring Chien
OK, so you need to cut a large circle or arc in a piece of wood or panel. Freehanding with a jigsaw is a possibility, but for a really smooth and accurate circle the router is the best tool.
There�s a number of jigs on the market for sale and they cost around $40 to $60 like this one from Rockler:
And this one from Jasper:
They are nice but unless you do a lot of circles of different sizes then the DIY solution is much cheaper.
Here�s my solution and it cost me a scrap piece of cedar 5-1/2� x 12� long x 5/8� thick. $0.00. Probably hardwood would be better but this works fine.
On the long axis I drew a center line. About a inch and a half from the end I drilled a �� hole carefully centering the hole (marked�A�) on the centerline and the cross-mark I made. As you can see, I have drilled other hole �A�s where needed.
Now if I need a circle 18� in diameter, or 9� radius, then I mark a spot on the axis 8-7/8� away from the center of hole �A�. This is because the center of the router bit will be at 8-7/8� from the center of A but the outer edge of the �� straight router bit will be at 9� from the center of the hole �A�. Here I drill Hole �B� which is ��.
In the center of the workpiece where I want the 18� hole I drill a �� hole.
Now I mount a router guide bushing to the router base plate. I use a �� O.D. guide bushing which is probably 3/8� to �� long. And I mount a �� Straight router bit to the router � if the bushing is properly centered to the router then there will be less than 1/8� clearance around the bit because the side wall of the bushing will be probably .030� thick.
Set the router on top of the jig so that the bushing goes into hole A � it should be able to rotate with low effort but be a near-snug fit � it definitely should have little of no play.
Set the router so that the bit is just shy of the bottom of the jig, so that with the jig set on the table the bit does not contact the table. Now set the router aside for a while.
Next you will need a 1� to 1-1/4� long �� dowel peg. Use a small mallet to push this into the bottom side of hole B so that half of it is buried. Set the jig onto the workpiece so the peg goes into the center hole. You probably should have to press the peg in, make sure it does not rise up any more into the jig. The jig should be able to swing right and left with a little friction from the snug fit. It should not have any play.
Place the router back on the jig. Holding onto the handles of the router; you should be able to run the router and the jig around a whole 360 degrees. Both the router should spin in the jig around hole A and the jig should spin around pivot hole B. This is the practice run � make sure the workpiece is solidly held and the clamps don�t interfere with the router motion. Make sure the cord does not get tangled or limit travel. If you do it right the cord won�t get twisted. The jig should go clockwise around the workpiece; the router should appear to go counterclockwise in the jig hole A.
Now we�re ready for the exciting part � the cutting.
Adjust the router bit depth so that it protrudes 1/16th to 1/8� below the bottom of the jig. This should be the setting for a fixed router, if you have a plunge router, set the first plunge limit to that amount. With a fixed router, you will have to tilt the router a small amount to start the bit above the workpiece. Tilt it to be level and start rotating the router. Go around the circle twice, keeping the router flat on the jig and the jig flat on the workpiece. Try and keep the router moving. Turn off the router.
Inspect your groove, it should be a perfect circle and about 1/16th to 1/8� deep. It is? Great!
Now you are ready for subsequent passes. With a �� bit, its actually a rather weak bit because the thickness inside the flutes is rather less than �� and it doesn�t like to be pushed sideways too hard. For that reason, the recommended cut depth is about 1/8� to 3/16th� per pass. That means you may have to make 5 or 6 passes to cut a �� board.
Now you should be well on your way. I�m going to take minute to give some advice that we sort of glossed over before.
A carbide spiral upcut bit will give the best results � but cost more. A shear-cutting bit will be better than a straight flute bit but not as much as a carbide spiral bit.
Keep a spare bit, as I mentioned, these bits are easy to break if you are too aggressive.
Make sure your router bit cutting length is long enough� for �� material you shold have like a 1� cutting length bit even though we go 1/8� at a time.
I routed a small radius on the bottom edges of the jig so it won�t catch on anything.
Make sure the workpiece is on a sacrificial surface, because the router bit will cut into the table below when you cut through.
Make sure the workpiece is clamped firmly to the table.
Be prepared for when the cutoff circle is free of the hole � even if the workpiece is clamped, if the cutoff moves you may gouge the inside edge of your hole with the router bit as the cutoff, the jig and the router break free from the workpiece. More on this later.
If you want to cut a 9� circle rather than a 9� hole, set the distance from A to B to 9-1/8� instead of 8-7/8� to allow for half the kerf of the bit.
If your bit is not long enough, you can cut halfway on one side of the workpiece and then flip it over and cut the remainder from the other side. (consider using a spiral downcut bit to minimize tearout). The alignment should be very good.
Make sure the guide bushing is centered around the bit, otherwise the hole will be eccentric by the amount it�s offcenter.
If you don�t have a router guide bearing set, the alternative is to cut a 1� hole for the bit and collet access, then remove the router base plate and mount the router base to the top of the jig using three or four flathead screws. I think my method is better because its easier to locate the center of the hole A than the center of the router mounting pattern, and my method also does not twist up the power cord as you make multiple passes. However, the screwed-down router method does yield more perfectly round circles - there�s no eccentricity caused by the bushing concentricity errors.
No go ahead and make more passes, lowering the bit 1/8� at a pass and circling twice on each pass. Each time you�ll have to tilt the fixed base router in or plunge it if you have a plunge router.
When you get close to cutting through you have to be extra careful. As pointed out above, you may cut into your table surface, and the cutoff, jig and router will break free and may do some damage.
You might double-stick tape the center of the workpiece under the cutoff to the table so it won�t move when cut free.
Or, you might cut to a razor thin web remainder and cut it free with a sharp knife.
Or you can make the center pivot pin longer and extend into the table so the cutoff circle won�t move from the center.
You can elevate the workpiece on some 1x2s temporarily nailed to the back of the workpiece � three is good, one at the top, one at the bottom and one in the middle. The one in the middle should have a couple of nails into the cutoff center as well as the remainder so that once cut off it won�t move. This also protects the table surface but sacrifices the 1x2.
In any case the workpiece must also be solidly clamped to the table.
As you can see from my jig, I�ve used this for more than a few circles. I just add new Hole A and Hole Bs where needed. If the hole B is too close to another hole, it�s OK to drill it a bit offcenter so they won�t overlap. If you need longer, get a new scrap of wood an appropriate length. If the circle is smaller than the radius of the router base, this still works fine.
The big jagged hole in the middle of my jig? I don�t even remember what caused that.
Turns out you don't really need all the adjustability of the store-bought jigs, as you can see from mine, a few sizes have met all my needs and it's easy to add a hole or make a new jig.
Good luck! Hope I saved you $50.
 Loring in Katy, TX USA