
Upgrading the shims avoids the issue of the BT3000 shims dropping out and causing the blade-raising mechanism to bind.
Before you begin:
Call Ryobi technical support at 1-800-525-2579 with the serial number from your saw to
verify that your saw is eligible for the upgrade. Some earlier BT3000s are not.
verify that your saw is eligible for the upgrade. Some earlier BT3000s are not.
ĹRightĺ and ĹLeftĺ designations assume you are starting by looking at the front of the saw.
These instructions assume a stock saw with no modifications to the blade guard assembly
or saw body.
or saw body.
Parts you will need for the conversion:
2 each 0181010314 spring shims BT3100 part $0.43 ea
1 each 0181010110 guide holder BT3100 part $15.07
When you order these parts to save on shipping costs, it is recommended that you also
order the following parts. Inspect the flat shims and belts and replace if necessary while you have
the saw torn down. It is a good idea to have the belts on hand as spares.
2 each 969600001 flat shim BT3000 & BT3100 part $0.45 ea
2 each 662329001 belt BT3000 & BT3100 $13.49 ea
You can order from www.ordertree.com, www.bilious.com, www.dixiesales.com
Tools needed:
Phillips screwdriver
2 Quick Clamps (suggested)
BT3000 Wrenches
Socket Wrench
Rubber Mallet
Pointed Awl (suggested)
2 Quick Clamps (suggested)
BT3000 Wrenches
Socket Wrench
Rubber Mallet
Pointed Awl (suggested)
Other suggested supplies:
A small amount of grease
#10-24 round or button-head machine screws 1 Żö long
Dry lubricant ľ NOT Silcone-based!
Anti-seize lubricant
#10-24 round or button-head machine screws 1 Żö long
Dry lubricant ľ NOT Silcone-based!
Anti-seize lubricant
Upgrade Procedure:
UNPLUG THE SAW!
Remove the accessory table, SMT and rip fence. Remove the rails or slide them all the
way to the right. Raise the blade to full height. Remove the throat plate. Bag and label
the screws.
the screws.
Remove the blade guard/riving knife assembly. Remove the blade. Bag the
arbor nut, washers and arbor shims.
Remove the left access panel from the saw. Bag
and label the screws.
Remove the blade shroud cover. Bag and label the screws.
There are 4 screws in each corner of the blade guide holder and 2 smaller screws on either side of the arbor. Remove the two screws around the arbor. If the 4 screws in the blade guide holder will not turn, use the rubber mallet and rap on the end of the handle of the
screwdriver while backing the screws out. Using a power/drill driver to remove these screws is NOT recommended ľ the screws are easily stripped. Once all 6 screws are removed, bag and label the screws. Us the rubber mallet to rap gently on the end of the saw arbor while wiggling the blade guide holder off. Stop and pick up the flat shims that
have fallen on the floor.
have fallen on the floor.
Finish removing the blade guide holder. Remove the nuts and
shims from the bolts that hold the riving knife/blade guard. Push on the ends of the bolts to free the retaining clip from the guide holder and remove the bolts While the saw is
disassembled, it is a good idea to give the motor assembly a thorough cleaning.
disassembled, it is a good idea to give the motor assembly a thorough cleaning.
Reassembly:
Inspect the belts and flat shims. Replace as necessary. Install the bolts and retaining clip for the riving knife in the new guide holder. Install the shims and nuts onto the bolts.
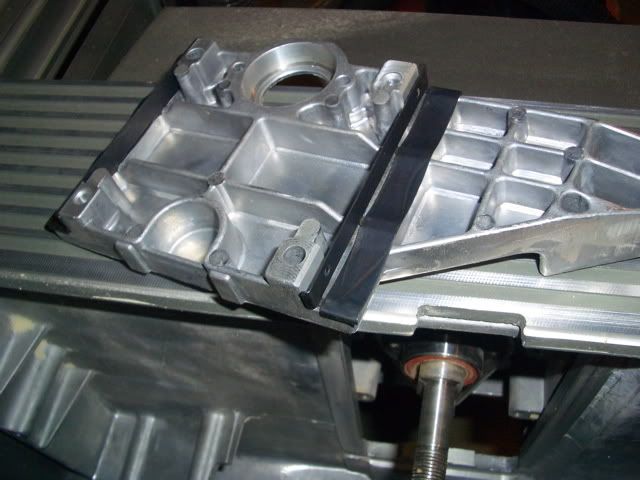
Tighten the nuts at least finger-tight to ensure they stay in place. Put some dri-lube into the arbor hole in the guide holder. Put a small dab of grease onto the guide holder in each of the shim locations and add the new spring shims. This picture shows the positioning
of the shims:
Put a small dab of grease on the flat shims and install them onto the saw motor. The grease will help hold the shims in place. Install the new guide holder/shims onto the saw. Use the awl in the screw holes to get the flat shims, guide holder, brackets, etc lined up. Depending on tolerances, the guide holder may bind on the arbor during installation. There are two methods to get it fully seated on the saw.
Method 1: Use the quick clamps and alternately tightening each one to seat the guide
holder.
Method 2: I found this more effective, easier is to use and gave me more control. Use the 4 1 Żö screws to seat the guide holder. Tighten each screw alternately until the guide holder is seated far enough on the arbor to use the stock screws. A power drill/driver is NOT recommended. Since these screws are longer than the stock screws, tightening them too much will cause them to bottom out and bind. Only tighten them enough to seatthe guide holder far enough onto the arbor so that the stock screws can be used. Remove the longer screws. Apply some anti-seize to the stock screws and reinstall the stockscrews. Finish the guide holder installation.
Reinstall the two smaller screws around the saw arbor. Again, use the awl to get everything lined up. Use more dri-lube to lubricate the travel for the new shims. Test the blade raising/lowering mechanism to ensure nothing is binding.
Reassemble the saw and double-check the alignment.