Show off your Workbench

Collapse
This topic is closed.
X
X
 
  • Time
  • Show
Clear All
new posts
  • ryan.s
    Senior Member
    • Feb 2006
    • 785
    • So Cal
    • Ridgid TS3650

    #1

    Show off your Workbench

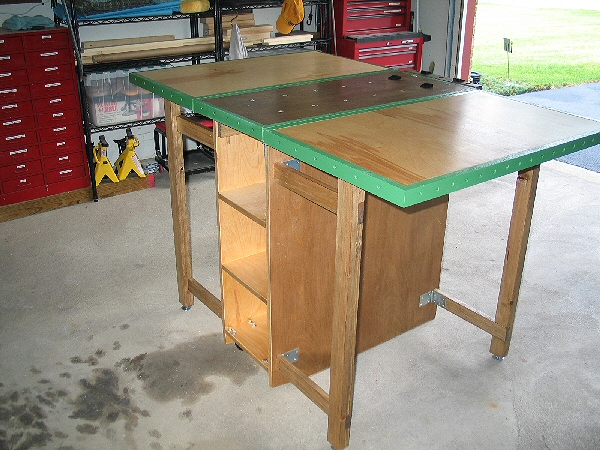
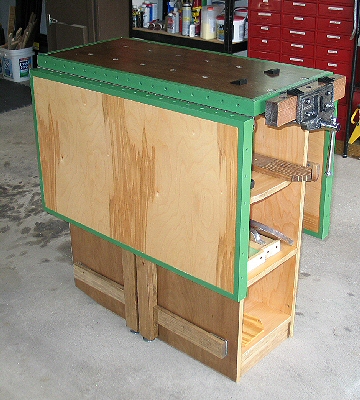
    Okay I decided it's time to build a workbench to be used as an outfeed table behind the table saw, storage cabinet, assembly table and all around work bench. Can you please post pictures of your workbenches and a brief description of materials used and any other helpful tips. Trying to get some ideas on a design. I'm trying to fit it flush behind a TS3650.

    Much appreciated!
    Last edited by ryan.s; 03-01-2007, 12:18 AM.
  • Russianwolf
    Veteran Member
    • Jan 2004
    • 3152
    • Martinsburg, WV, USA.
    • One of them there Toy saws

    #2
    I will have to try and find mine. It's buried under one of the piles in my shop. Probably be faster to just build a new one.
    Mike
    Lakota's Dad

    If at first you don't succeed, deny you were trying in the first place.

    Comment

    • IBBugsy
      Established Member
      • Jan 2006
      • 160
      • Allentown, PA.
      • BT3100

      #3
      Here's mine:


      Plans from WoodPlansOnline.com - Drop-Leaf Mobile Workbench
      Dave - Weekend Garage Junkie
      "I'm no physicist but I know what matters" - Popeye

      Comment

      • bthere
        Established Member
        • Jan 2007
        • 462
        • Alpharetta, GA

        #4
        Originally posted by Russianwolf
        I will have to try and find mine. It's buried under one of the piles in my shop. Probably be faster to just build a new one.
        As they say, I resemble that remark. I know I've at one time have had 3 different work surfaces in the shop. They must still be there.

        One is a cutting table made of plywood and sacrificial 2x4's sitting on saw horses. The other is a regular folding table that I use for misc.

        The last is my "workbench". I took an old full size desk and built up a frame that sits on the desk top to raise it to the height I want. On top of the frame is a glued up top. The desk has drawers and a cabinet that are good for storing stuff. The weight of the desk combined with the frame/top make it pretty heavy.

        Comment

        • DonHo
          Veteran Member
          • Mar 2004
          • 1098
          • Shawnee, OK, USA.
          • Craftsman 21829

          #5
          Sorry that I don't have a "full" pic of the bench but my shop is so small I can't get far enough away to get it all in one shot

          The bottom is made from cheap HD birch ply with a base made of 2X4 and mounted on 4" swivel locking casters. the top is made from 2 pieces of 3/4" MDF laminated with yellow glue and a few screws and edged with pine 1X2s. The top is attached to the bottom cabinet with 3 2X6 that were trimed to give an exact match to the hight of the saw. The bench is very sturdy and being mobile helps with clean up and in case I ever want to change the layout of the shop. The bench is 2' X 5'.
          DonHo
          Attached Files
          Don

          Comment

          • final_t
            Veteran Member
            • Nov 2003
            • 1626
            • .

            #6
            Mine. And mine. And mine. And one hers.
            http://wilsonmanorcrafts.com/gallery...nch-1.jpg.html
            http://wilsonmanorcrafts.com/gallery...ation.jpg.html
            http://wilsonmanorcrafts.com/gallery...nch-1.jpg.html
            http://wilsonmanorcrafts.com/gallery...nch-2.jpg.html

            (I won't mention that the first link is the 3rd or 4th iteration of the main work bench, and the only one I'm finally happy with and proud to say "mine!")

            Comment

            • ryan.s
              Senior Member
              • Feb 2006
              • 785
              • So Cal
              • Ridgid TS3650

              #7
              Very nice guys. Keep the pictures coming, i'm really getting motivated now. =)

              Comment

              • footprintsinconc
                Veteran Member
                • Nov 2006
                • 1759
                • Roseville (Sacramento), CA
                • BT3100

                #8
                you may have seen my post earlier on of what mine was going to look like, but i have changed it somewhat to look like this. just sharing it with you in case you like something from it. the new one is attached at the end of this message and the link to the old version is here:

                http://www.bt3central.com/showthread.php?t=27670


                good luck, if you get your done before i start, maybe i'll get an idea from yours

                regards,

                ooops, i cant seem to attach it this time, it says it exceed the 19.5kb size. pm me and i can send it to you.
                _________________________
                omar

                Comment

                • Jeffrey Schronce
                  Veteran Member
                  • Nov 2005
                  • 3822
                  • York, PA, USA.
                  • 22124

                  #9
                  Originally posted by final_t
                  Mine. And mine. And mine. And one hers.
                  http://wilsonmanorcrafts.com/gallery...nch-1.jpg.html
                  http://wilsonmanorcrafts.com/gallery...ation.jpg.html
                  http://wilsonmanorcrafts.com/gallery...nch-1.jpg.html
                  http://wilsonmanorcrafts.com/gallery...nch-2.jpg.html

                  (I won't mention that the first link is the 3rd or 4th iteration of the main work bench, and the only one I'm finally happy with and proud to say "mine!")
                  Wow! That bench looks almost identical to the one I am building! I had never saw a Walnut base before and had some common walnut to use. What is your top made out of? I am using Ash (slightly harder than maple but I will have to fill the pores).

                  Comment

                  • final_t
                    Veteran Member
                    • Nov 2003
                    • 1626
                    • .

                    #10
                    Originally posted by Jeffrey Schronce
                    Wow! That bench looks almost identical to the one I am building! I had never saw a Walnut base before and had some common walnut to use. What is your top made out of? I am using Ash (slightly harder than maple but I will have to fill the pores).
                    The first link is my bench, and the top is Maple. The last link is one of a pair studio benches made from Hickory.
                    Filling the pores - I would try simple sanding sealer followed by poly and see how that works for you. Or you can find the stuff Home Depot sells that is advertised as "50 coats of poly" - its a type of epoxy that I would think could be flowed around to fill in the pores and level out.

                    Comment

                    • Jeffrey Schronce
                      Veteran Member
                      • Nov 2005
                      • 3822
                      • York, PA, USA.
                      • 22124

                      #11
                      Originally posted by final_t
                      The first link is my bench, and the top is Maple. The last link is one of a pair studio benches made from Hickory.
                      Filling the pores - I would try simple sanding sealer followed by poly and see how that works for you. Or you can find the stuff Home Depot sells that is advertised as "50 coats of poly" - its a type of epoxy that I would think could be flowed around to fill in the pores and level out.
                      I usually just use Behlen Pore-O-Pac. I have filled with Lacquer based sanding sealer in that past. The "50 coats of poly" stuff is too expensive!

                      Comment

                      • ExYankee
                        Established Member
                        • Mar 2005
                        • 126
                        • Pleasant View, Tn.
                        • BT3100-frankensaw

                        #12
                        I am at work so I don't have a better pic, but here it is. I built a "frankensaw base" and then a large assembly table to its rear. The bench to its left runs 16' back to the corner and is the exact same height so it supports lwide crosscuts. Then I placed my 8" jointer to the side. The construction is 2x4 with a double thickness MDF top and a pegboard top layer. The plan was/is to make bench dogs to fit the pegboard pattern and make pneumatic clamps for glue up projects. Haven’t QUITE got around to that yet. They also could be used with the Rockler vises. There is one on the left side as well. The area underneath is the black hole of the shop storing seldom used stuff. I am building a cover for the romex and 4" DC line and now have three circuits and whole ton of outlets. I am building a battery charger board that will cover the planer out feed table to hold all the chargers.

                        BTW note the Panorama factory watermark. If you go to their site you can download a trial version (it adds the watermark until you buy a full version). But is nice if you want to blend pics to give a full shot of your workshop. This pic is from the center area only.
                        Attached Files
                        John Dyer
                        ExYankee Workshop...

                        I think history would have been very much different if Leonardi DiVinci had a belt sander.

                        Comment

                        • Tom Miller
                          Veteran Member
                          • Mar 2003
                          • 2507
                          • Twin Cities, MN
                          • BT3000 - Cuttin' it old school

                          #13
                          For an outfeed table that doubles as a working surface (not exactly what I'd call a workbench), with a drawer/cabinet base:


                          Click image for larger version

Name:	Outfeed Bench.jpg
Views:	2
Size:	28.3 KB
ID:	780536


                          The base is a torsion box base (more necessary for a mobile piece than a stationary piece), with a simple cabinet on that. The 2.5' x 4' top is 2 layer mdf, with 1/2" baltic birch on top (with a poly finish). The BB top is not holding up (cosmetically) as well as my mdf-topped workbench, BTW.

                          Regards,
                          Tom

                          Comment

                          • greglwood
                            Forum Newbie
                            • Feb 2007
                            • 17

                            #14
                            Very Nice

                            Did you do the tablesaw cabinet off the cuff or did you have a plan to go by?


                            Originally posted by final_t
                            Mine. And mine. And mine. And one hers.
                            http://wilsonmanorcrafts.com/gallery...nch-1.jpg.html
                            http://wilsonmanorcrafts.com/gallery...ation.jpg.html
                            http://wilsonmanorcrafts.com/gallery...nch-1.jpg.html
                            http://wilsonmanorcrafts.com/gallery...nch-2.jpg.html

                            (I won't mention that the first link is the 3rd or 4th iteration of the main work bench, and the only one I'm finally happy with and proud to say "mine!")

                            Comment

                            • final_t
                              Veteran Member
                              • Nov 2003
                              • 1626
                              • .

                              #15
                              Originally posted by greglwood
                              Did you do the tablesaw cabinet off the cuff or did you have a plan to go by?
                              Heh, this seems to be a common question about that unit! Yes and no - the "plan" I used was one I made myself using my personal design choices and measurements of the saw + desired drawer sizes. I just went at the graph paper with pencil and ruler.

                              Comment

                              Working...