Dressup clothes armoir WIP

Collapse
This topic is closed.
X
X
 
  • Time
  • Show
Clear All
new posts
  • atgcpaul
    Veteran Member
    • Aug 2003
    • 4055
    • Maryland
    • Grizzly 1023SLX

    Dressup clothes armoir WIP

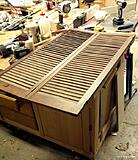
    The girls' dress up clothes was getting out of control and my wife wanted me to build a small armoir to contain it. The only constraint was that I needed to use these salvaged shutters (Habitat Restore) for the doors. I enjoy projects like these--feels like making a built-in--and I don't have to make doors.


    I'm kinda' working off the cuff on this one. Some quick dimensions. I'll make up the rest as I go.

    uh, oh, can't attach any more pics to BT3. will update later once these are uploaded elsewhere
  • Cochese
    Veteran Member
    • Jun 2010
    • 1988

    #2
    You are using doors. I never got that fancy.

    One of the first projects I did was a dressup closet. Three bin spaces on the bottom and a hanger rod. All out of prelaminated boards I found at Lowes. This is going on probably three years ago.

    Still standing, although I don't know why. I need to redo ours, make it taller, put doors on, and utilize some storage to the ceiling.
    I have a little blog about my shop

    Comment

    • atgcpaul
      Veteran Member
      • Aug 2003
      • 4055
      • Maryland
      • Grizzly 1023SLX

      #3
      ...continued


      I milled up two wide walnut boards, cut them to size, and glued up for width. At that point, I wasn't sure if I wanted to build to last or just built. I opted for the former and started laying out to dovetail the case together. Here's one part marked. After this, I layout my DTs.


      I was taught tails first so that's what I do. My gent saw is badly in need of sharpening so I've been using a Japanese dozuki saw. After I cut the tail angle, I use a coping saw to cut away most of the waste and then chisel to the line.


      After cleaning up the tails, I transferred the tail locations to the pin board using a small Swiss army knife and then finished laying out the pins with a mechanical pencil and square. I used to mark everything with the knife, but when I cut my last set of DTs for my daughter's dresser drawers, I had a lot of gaps which I had to fill with veneer. After reading a Fine Woodworking article on marking with a pencil instead of knife, I found my problem. When marking with the knife, I tended to rest my saw in the knifed line. This cut away too much material. With the pencil, I was more mindful of leaving the line.

      If you've ever cut DTs by hand, maybe you'll agree that the real challenge is properly cleaning up the pin boards. There is a lot of material to remove and you have to do it precisely to get a clean fit. When I cut the drawers, I had a jig that let me rest a router on top of the pins and waste away the material with a router bit. Well, my jig wasn't big enough for these wider boards and FWing to the rescue again. I simply jointed the edge of a 2x4 with a handplane and clamped the board to the back of my pin board. I set the depth of a DT router bit to the height of the pin and rested the palm router on that board for stability while I routed away the waste. In less than a minute I had a nicely cleaned up board. I noticed my nose/throat are more sensitive to wood dust now so for this operation, I'm wearing a dust mask, face shield and earmuffs. I'm covered in dust when I'm done.


      Although you're really not supposed to hammer home the DTs on a test fit, I couldn't help myself. The first corner took some time to sneak up to a good fit, but the second corner took me just 20 minutes to cut the pins, route, and fit. Very nice fit. I'm pleased because these are the widest boards I've ever DTed.


      Paul
      Last edited by atgcpaul; 10-21-2013, 01:44 PM.

      Comment

      • chopnhack
        Veteran Member
        • Oct 2006
        • 3779
        • Florida
        • Ryobi BT3100

        #4
        Looking good Paul
        I think in straight lines, but dream in curves

        Comment

        • Black wallnut
          cycling to health
          • Jan 2003
          • 4715
          • Ellensburg, Wa, USA.
          • BT3k 1999

          #5
          Originally posted by atgcpaul

          uh, oh, can't attach any more pics to BT3.
          Paul, why? Have you reached the site limit?

          Project is looking great. It looks like you have mastered hand cut dovetails. I'm envious of your project.
          Donate to my Tour de Cure


          marK in WA and Ryobi Fanatic Association State President ©

          Head servant of the forum

          ©

          Comment

          • atgcpaul
            Veteran Member
            • Aug 2003
            • 4055
            • Maryland
            • Grizzly 1023SLX

            #6
            Originally posted by Black wallnut
            Paul, why? Have you reached the site limit?

            Project is looking great. It looks like you have mastered hand cut dovetails. I'm envious of your project.
            Thanks Mark.

            If the site limit is 25, then I'm at the limit.

            Comment

            • Black wallnut
              cycling to health
              • Jan 2003
              • 4715
              • Ellensburg, Wa, USA.
              • BT3k 1999

              #7
              Originally posted by atgcpaul
              Thanks Mark.

              If the site limit is 25, then I'm at the limit.
              Member album size is set at 100 images. Let me know if you have problems or need to exceed this number. It really is in the best interest of the forum that images posted here are hosted here. Longstanding members like you that have been a big part of the forum need to feel welcome and appreciated.
              Donate to my Tour de Cure


              marK in WA and Ryobi Fanatic Association State President ©

              Head servant of the forum

              ©

              Comment

              • atgcpaul
                Veteran Member
                • Aug 2003
                • 4055
                • Maryland
                • Grizzly 1023SLX

                #8
                Has it really been 3 months since I worked on this? Ugh.

                Anyway, while the family napped, I was finally able to finish cutting the biscuit slots for the bottom shelf and drawer divider. I glued the divider to the shelf. Maybe this week I'll glue up the whole thing. It has to be done in a specific order because of the DTed case.

                Comment

                Working...