Office desk sneak peek

Collapse
This topic is closed.
X
X
 
  • Time
  • Show
Clear All
new posts
  • atgcpaul
    Veteran Member
    • Aug 2003
    • 4055
    • Maryland
    • Grizzly 1023SLX

    #1

    Office desk sneak peek

    Really just a teaser to an office desk that is nearing completion.

    This is probably one of the most challenging and involved projects I have
    ever done. I just wanted to show one aspect of it--the bent lamination of
    the curved door.

    My wife gave me a crude drawing which I cleaned up in Sketchup. She
    wanted something Art Deco-ish. It's not really there but she likes the design.
    The sketch doesn't show the top on it, just the base units.

    Left side unit is where the computer will be. The right side unit is the writing
    area which faces the office entrance. The two units are separate from each
    other.
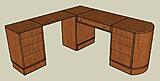


    The curved door on the right side if what I'm showing today.

    I determined the inner radius of the curved door and used a router trammel
    jig to make 8 curves. Those were evenly spaced and attached to 1/4" ply.
    More 1/4" ply is glued in between the arcs for stiffness during the bending
    process.
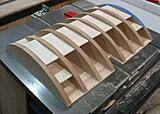


    I used 6 layers of 1/8" bending ply. I drew a centerline on the ply and
    screwed them to the form through the centerline to keep everything straight.
    I used plastic resin glue to hold everything together. The ply was glued up
    in the form in my vacuum press overnight. Not my first bent lamination but
    the first time using bending ply in the vac press. A little nerve wracking. The
    excess ply edges need to be trimmed flat.


    Trimming the edges was a tricky operation. I screwed the bending form to
    my table saw saddle fence, screwed the door to the form, and made the cuts.
    Not pretty but it worked.


    I hope to have something to show off soon. I'll elaborate on the other parts
    when I'm done.

    Paul
  • lkazista
    Established Member
    • Jan 2004
    • 330
    • Nazareth, PA, USA.

    #2
    Ummmmm.......WW

    Lee

    Comment

    • catta12
      Established Member
      • Jan 2008
      • 250
      • Reno, NV
      • BTS20R

      #3
      Looking like a good project IMHO. I look forward to seeing finished pics.

      One question, where do you get your bending ply?

      Alan
      If you can read this you assembled wrong.


      Alan

      Comment

      • Pappy
        The Full Monte
        • Dec 2002
        • 10490
        • San Marcos, TX, USA.
        • BT3000 (x2)

        #4
        Good start, Paul! About to try my first bentwood lamination. A lot smaller than that one and will be pressed between MDF forms. I should be able to get away with yellow glue.
        Don, aka Pappy,

        Wise men talk because they have something to say,
        Fools because they have to say something.
        Plato

        Comment

        • drumpriest
          Veteran Member
          • Feb 2004
          • 3338
          • Pittsburgh, Pa, USA.
          • Powermatic PM 2000

          #5
          Looks excellent, where did you buy the bending ply? And what kind of vac press do you have? I can't wait to see more info on this project, thanks for the sneak peak.
          Keith Z. Leonard
          Go Steelers!

          Comment

          • jhart
            Veteran Member
            • Feb 2004
            • 1715
            • Minneapolis, MN, USA.
            • BT3100

            #6
            Should be a great looking project when finished. Can't wait to see it all.
            Joe
            "All things are difficult before they are easy"

            Comment

            • atgcpaul
              Veteran Member
              • Aug 2003
              • 4055
              • Maryland
              • Grizzly 1023SLX

              #7
              The bending ply was from my local hardwood dealer. Cost me $45 for a 4x8
              sheet and another $5 to make 2 cuts I don't know if that's a good
              price for this ply but it's what I needed and they had it.

              The press is homemade from parts from JoeWoodworker. I spoke about it in
              Jeffrey Schronce's recent post in the Tool Forum.

              http://www.bt3central.com/showthread.php?t=35498

              I'll be pressing the face and back veneers tomorrow so I'll take a snapshot
              with the whole thing being squeezed down.

              Paul

              Comment

              • crokett
                The Full Monte
                • Jan 2003
                • 10627
                • Mebane, NC, USA.
                • Ryobi BT3000

                #8
                Very very nice and I can't wait to see the finished product. How long did it take to make the form?
                David

                The chief cause of failure in this life is giving up what you want most for what you want at the moment.

                Comment

                • SHADOWFOX
                  Veteran Member
                  • May 2005
                  • 1232
                  • IL, USA.
                  • DELTA 36-675

                  #9
                  Looking good, Paul! Can't wait to see the finish product. A vac press is definitely a tool I need to put together this year.
                  Chris

                  "The first key to wisdom is constant and frequent questioning, for by doubting we are led to question and by questioning we arrive at the truth." -Pierre Abelard 11th Century philosopher.

                  Comment

                  • atgcpaul
                    Veteran Member
                    • Aug 2003
                    • 4055
                    • Maryland
                    • Grizzly 1023SLX

                    #10
                    Only a tiny update today. I'm pressing the front of the door right now and
                    will do the back after lunch. I veneered the door sides and tops during the
                    week. I'm using the same form to hold the door. White glue is holding the
                    veneer in place. The veneer starts to curl within seconds of touching the
                    glue so it's important to work fast. After I closed up the bag, I used my
                    vacuum cleaner to suck out the majority of the air. Then I let my vacuum
                    press take over.

                    I'm more nervous about doing the back panel. The bag won't be pressing
                    against the back veneer and I worry about adhesion. I have some contact
                    cement and I'm seriously considering going that route for the back.


                    Paul


                    Cherry veneer on my bent door lam:


                    My homemade vacuum pump using JoeWoodworker parts:

                    Comment

                    • John Hunter
                      Veteran Member
                      • Dec 2004
                      • 2034
                      • Lake Station, IN, USA.
                      • BT3000 & BT3100

                      #11
                      Looking great, can not wait to see the finished desk.
                      John Hunter

                      Comment

                      • JohnnyLisa
                        Forum Newbie
                        • Oct 2005
                        • 33
                        • Pensacola, Florida
                        • Sears Craftsman # 21829

                        #12
                        Thanks for posting the photos - I've been wanting to do something similar for a while and you've given me a good idea on how to get started. Joewoodworker.com has been a great resource for answering a number of questions I've had regarding vacuum pressing and clamping.

                        John
                        Last edited by JohnnyLisa; 01-13-2008, 07:09 PM. Reason: added website

                        Comment

                        • atgcpaul
                          Veteran Member
                          • Aug 2003
                          • 4055
                          • Maryland
                          • Grizzly 1023SLX

                          #13
                          OK, final teaser picture until the finish. I did the veneer on the back last. It
                          was kind of a head scratcher because it was my first time on a curved
                          surface. I felt the ribs of my form wouldn't provide even pressure on the thin
                          veneer. I needed the vacuum bag to be in direct contact with the veneer to
                          apply force. I didn't want to build another form so I tried contact cement.
                          Don't do it! Luckily I have a lot of veneer.

                          So I had a DUH moment. I removed the large flat platen in the bag, glued on
                          the veneer with white PVA, and started up the press. Without the platen,
                          the bag could draw itself around the curved door on the top and bottom.
                          The bag couldn't crush my door and and now the veneering is done.

                          On my front glue up, I had some veneer bubbles. I heated up a clothes iron
                          to the cotton setting and pressed on the bubbles. The PVA glue reactivated
                          and held fast to my veneer. Problem solved. This technique is also described
                          on JoeWoodworker.


                          Paul

                          Comment

                          Working...