Double decker drawers?

Collapse
This topic is closed.
X
X
 
  • Time
  • Show
Clear All
new posts
  • Rob3100
    Forum Newbie
    • Jun 2005
    • 77
    • New Braunfels, TX, USA.
    • BT3100

    #1

    Double decker drawers?

    Does anyone have any experience with making double decker drawers like the ones you see on some tool chests? I'm considering something like this for my wifes cutlery drawer where the depth is wasted and we don't have space to waste.

    The idea is a standard drawer with slides, but with the box only about half the height of the opening and with the face attached to this piece, then another box that sits on top of the base and can be slid back giving two "footprints" for thin items in the size and appearance of a single drawer.

    I'm wondering:
    If there is a name for this type of drawer outside of "double decker"?
    How to attach top part to bottom part? Dado + runner or another set of metal slides?

    Here is a conceptual drawing:
    Attached Files
    Last edited by Rob3100; 04-12-2007, 09:04 AM. Reason: Forgot questions
  • cabinetman
    Gone but not Forgotten RIP
    • Jun 2006
    • 15216
    • So. Florida
    • Delta

    #2
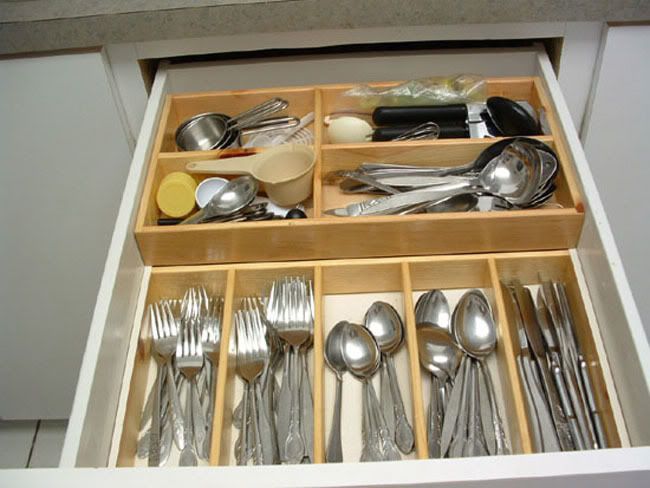
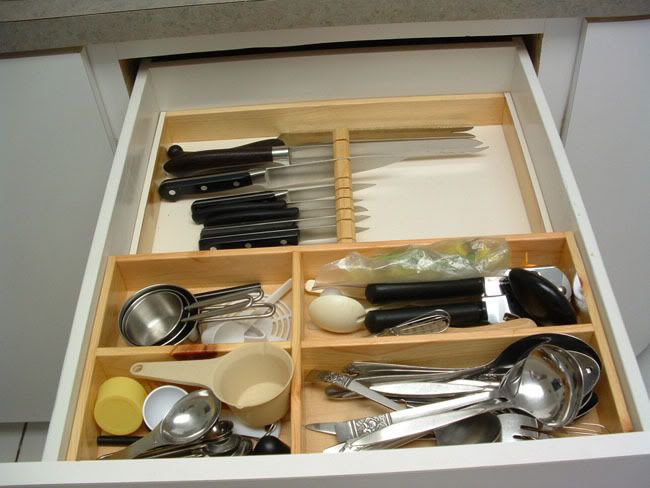
    It can be much simpler than that drawing. I made a "double decker" cutlery drawer in an existing drawer. It was too deep to be maximized with one level for silverware. So, basically made dividers for the bottom layer as a one piece insert. For the top layer made a tray that lifts out (it's loose), but has its own bottom. On the top outside edges of the bottom layer, laminated strips of formica. On the underside of the top layer laminated strips of formica , so that when the tray is dropped in it will slide - formica on formica is pretty slippery.

    Drawer with tray slid to rear:
    .


    Drawer with tray slid forward:
    .

    Comment

    • movnup
      Established Member
      • Aug 2006
      • 190
      • Seattle
      • BT3000

      #3
      That's a cool idea and looks very doable... what type of wood / width did you use and how did you do the joints as I can't tell from the picture????

      I'm guessing brad nails from the bottom / sides and glue ???

      Comment

      • radhak
        Veteran Member
        • Apr 2006
        • 3061
        • Miramar, FL
        • Right Tilt 3HP Unisaw

        #4
        CM, that is one sexy set of drawers...with a simple but effective design.
        It is the mark of an educated mind to be able to entertain a thought without accepting it.
        - Aristotle

        Comment

        • LarryG
          The Full Monte
          • May 2004
          • 6693
          • Off The Back
          • Powermatic PM2000, BT3100-1

          #5
          Haven't built anything like that, but I won't let that stop me from commenting.

          The concept is interesting but you have a couple problems. Usually, a sliding till is half the depth (front to back) or less of what's underneath, otherwise it won't be possible to access the full extent of the bottom layer. By the time you've slid your upper section far enough to do that, it will either be falling off its tracks, or will start to bind (because of gravity) and be hard to slide.

          Three possible solutions, offhand:

          1. Reduce the sliding till's front-to-back depth to not more than 1/2 the fixed lower area.

          2. Make the full-depth till a simple lift-out tray. Put your most-used items in it, so they will be readily accessible as soon as you open the drawer; lift out the tray to get at the lesser-used stuff below it.

          3. Mount both drawers on their own set of slides, affixed to the cabinet carcase; i.e., have no direct connection whatsoever between the upper and lower drawers. Open the main drawer to get at your most-used items in the lower section; with it open, you can pull out the upper drawer to access the less-used items it contains.

          Options #2 and #3 both provide the maximize storage space, with #2 being the simpler of the two and #3 the most "trick."
          Larry

          Comment

          • atgcpaul
            Veteran Member
            • Aug 2003
            • 4055
            • Maryland
            • Grizzly 1023SLX

            #6
            Originally posted by LarryG

            3. Mount both drawers on their own set of slides, affixed to the cabinet carcase; i.e., have no direct connection whatsoever between the upper and lower drawers. Open the main drawer to get at your most-used items in the lower section; with it open, you can pull out the upper drawer to access the less-used items it contains.

            Options #2 and #3 both provide the maximize storage space, with #2 being the simpler of the two and #3 the most "trick."
            In this mode, your pull-out pull-out tray sticks out twice as far. Another option
            is to have the drawer slide on your top tray point backwards. Your top tray
            then pushes back into the carcass to access the contents underneath.

            No, I haven't tried this.


            Paul

            Comment

            • LarryG
              The Full Monte
              • May 2004
              • 6693
              • Off The Back
              • Powermatic PM2000, BT3100-1

              #7
              Originally posted by atgcpaul
              In this mode, your pull-out pull-out tray sticks out twice as far.
              No ... note that I said both sets of slides attach to the cabinet carcase. Basically, opening the bottom drawer first does nothing except to get its front out of the way, so the "hidden" upper drawer can slide out above the open lower drawer. Both drawers would be exactly the same width, left to right. The upper drawer would need to be slightly shorter, front to back, than the bottom, but not by much ... just enough to allow for the front on the lower drawer, and a pull on the upper.

              Your idea would work if the upper's slides were attached to the sides of the lower (the sides would have to be full height, and the upper drawer would be correspondingly narrower than the lower drawer). That'll work, too.
              Larry

              Comment

              • gabedad
                Established Member
                • May 2005
                • 142
                • Chelmsford, MA.
                • unfortunately bts-15

                #8
                maybe these will help

                http://cgi.ebay.com/KRAFTMAID-WOOD-T...QQcmdZViewItem

                http://www.easy2diy.com/cm/easy/diy_...ge_id=35721287

                Comment

                • Rob3100
                  Forum Newbie
                  • Jun 2005
                  • 77
                  • New Braunfels, TX, USA.
                  • BT3100

                  #9
                  Interesting info from all. I would like them to both be full depth and I too worry that with a simple dado / runner that I would encounter tipping/binding issues.

                  -Rob

                  Comment

                  • LarryG
                    The Full Monte
                    • May 2004
                    • 6693
                    • Off The Back
                    • Powermatic PM2000, BT3100-1

                    #10
                    The links gabedad posted are exactly what Paul proposed. Very neat, really slick. Bad news is, I guess Paul is going to be a little late applying for that patent ...
                    Larry

                    Comment

                    • Lee4847
                      Established Member
                      • Feb 2006
                      • 200
                      • Canton, Oh
                      • BT3100

                      #11
                      I made this one last winter when I was building my kitchen. The outer drawers are 3/4 oak that I routed out 1/2 deep for the reversed drawer slides. The main slides are 22 inch and the ones reversed are 20 inch. With the sides of the big drawer routed out it conceals the inner slides which are reversed in direction. Both slides are full extension. I placed a rubber bumper on the back inside of the cabinet caucus to push the top tray back into place when you close the drawer.
                      Attached Files
                      Cut twice.... measure??

                      Comment

                      • atgcpaul
                        Veteran Member
                        • Aug 2003
                        • 4055
                        • Maryland
                        • Grizzly 1023SLX

                        #12
                        Originally posted by LarryG
                        The links gabedad posted are exactly what Paul proposed. Very neat, really slick. Bad news is, I guess Paul is going to be a little late applying for that patent ...
                        Trust me, this wouldn't have been the first thing I missed the boat on.

                        Comment

                        • Rob3100
                          Forum Newbie
                          • Jun 2005
                          • 77
                          • New Braunfels, TX, USA.
                          • BT3100

                          #13
                          Wow Lee4847, that's seems to almost exactly fit the bill. VERY nicely done and thanks for sharing your work. It seems you went with a thin top drawer and a larger one below, which is seems most appropriate now that I think about it: The stuff you use the most often right at your fingertips and the rest below.

                          Comment

                          • Rob3100
                            Forum Newbie
                            • Jun 2005
                            • 77
                            • New Braunfels, TX, USA.
                            • BT3100

                            #14
                            Lee4847,

                            I was just re-reading your post and you mention that you used 3/4" stock for the main drawer and routed a channel 1/2" deep. I got to thinking, how did you attach the slides given only 1/4" of meat behind the slide, glue?

                            Comment

                            • cabinetman
                              Gone but not Forgotten RIP
                              • Jun 2006
                              • 15216
                              • So. Florida
                              • Delta

                              #15
                              Originally posted by Rob3100
                              Wow Lee4847, that's seems to almost exactly fit the bill. VERY nicely done and thanks for sharing your work. It seems you went with a thin top drawer and a larger one below, which is seems most appropriate now that I think about it: The stuff you use the most often right at your fingertips and the rest below.
                              I'm familiar with that setup. I've made those 25 years ago. One big disadvantage is that the drawer has to be totally open and the top tray slid all the way to the rear to get anything out of the rear of the bottom tray. In addition, there is a substantial cost to that particular drawer. In making a similar drawer the drawback is the cost of two sets of slides, and the modification of the drawer parts to facilitate the movement.

                              The setup in my original post is an addition to an existing drawer, or can be made in a drawer and only one set of slides is needed, and one drawer movement which allows access to half the bottom and the top tray at once, and half movement to the top tray to get to the bottom.

                              Comment

                              Working...