
arrrrr, mateys!
Another project done in the nick of time, says me:
http://lumberjocks.com/projects/73520
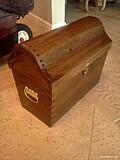
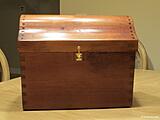
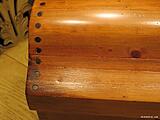
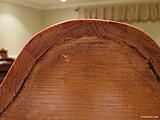
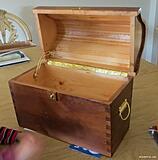
Done in time for Halloween!!! The boys wanted to be pirates this year and naturally needed a treasure chest to collect their booty from the neighborhood! LOL My search for plans yielded a few plans that were free but nothing fit the bill. I really wanted something special and the youngest watches a show that has a treasure chest in it and he wanted it to be that shape. A few quick renderings sketchup and some tweaking in the shop for proportions and a box joint jig later and we have a chest! Well it wasn�t really that fast�. The main pieces were cut out very quickly, the coopering of the top is another story. If only I had a pair of dividers�. I did the top by carefully marking and fitting each piece using a block plane and sandpaper. I needed to use a dremel to carefully grind the underside of the slats to allow the side supports of the top to �notch� into the top slats as the slats started around the upper curve. Around the lower curve, the underside of the slats needed to be relieved to follow the curve. Fun, but time consuming and I probably should have jointed the slats first�.
I used Transtint dyes and some van dyke glaze with shellac as the finish. The shellac was rubbed down with fine steel wool to take the sheen down a few notches.
The brass latch in the front was improved upon by adding a small plastic �washer� cut out of a thin sheet of plastic from an electrical tape box cover. It stuck to the new finish well and allows the brass lock to pivot smoothly.
Thanks for looking, hope you liked it!
Another project done in the nick of time, says me:
http://lumberjocks.com/projects/73520
Done in time for Halloween!!! The boys wanted to be pirates this year and naturally needed a treasure chest to collect their booty from the neighborhood! LOL My search for plans yielded a few plans that were free but nothing fit the bill. I really wanted something special and the youngest watches a show that has a treasure chest in it and he wanted it to be that shape. A few quick renderings sketchup and some tweaking in the shop for proportions and a box joint jig later and we have a chest! Well it wasn�t really that fast�. The main pieces were cut out very quickly, the coopering of the top is another story. If only I had a pair of dividers�. I did the top by carefully marking and fitting each piece using a block plane and sandpaper. I needed to use a dremel to carefully grind the underside of the slats to allow the side supports of the top to �notch� into the top slats as the slats started around the upper curve. Around the lower curve, the underside of the slats needed to be relieved to follow the curve. Fun, but time consuming and I probably should have jointed the slats first�.
I used Transtint dyes and some van dyke glaze with shellac as the finish. The shellac was rubbed down with fine steel wool to take the sheen down a few notches.
The brass latch in the front was improved upon by adding a small plastic �washer� cut out of a thin sheet of plastic from an electrical tape box cover. It stuck to the new finish well and allows the brass lock to pivot smoothly.
Thanks for looking, hope you liked it!

Comment