

the bevel adjust on my ryobi bt3000 don't work so i would like to know if anyone has built a sled that you can cut a 45 with the blade set at 90, i can use my sliding miter on the left of the saw but can only bevel a 4" or less board as that is as high as the blade will go,i bought a side mount miter extension so i have a miter slot, sometimes i need to bevel a 10 to12" board.
-
-
I dont recall anyone building this type of sled. I second JR's advise, pull off the side panel, where the outlet and ground screw are, and inspect the mechanism. Post some pics, chances are someone here has seen or fixed this issue before.I think in straight lines, but dream in curves
Comment
-
I have seen a few jigs over the years for beveled edges, and IIRC, they could handle 12 inches, but not on boards longer than about 2 or 3 feet, or it would be too hard to hold. The ones that I am thinking about were jigs that slid on top of or next to the fence.
This is where routers are beneficial. Watch out for 45� bits though. Most router bits for 45� do not cut a full bevel for 3/4 thick boards - If 45� is what you want. IF a router bit does what you want, look very close at the "CUTTING height" of the bit. The average 45� bevel bit is about 5/8" tall, while other bevel angled bits are usually a full 3/4 inch tall.Last edited by leehljp; 03-27-2013, 05:48 AM.Hank Lee
Experience is what you get when you don't get what you wanted!Comment
-
How thick are the boards? Most circular saws will do a 45�.Comment
-
Since you said that "sometimes i need to bevel a 10 to12" board", a jig would be possible. The limitation would be that the board would have to be long/wide enough to allow it to be clamped to the jig with the clamps well clear of the blade. No way i would try to hold a board against the jig in this type of cut.
As JR and Chop said, the better solution is to fix the problem. The adjustmet/elevation mechanism and gears can be accessed from the left side of the saw.Don, aka Pappy,
Wise men talk because they have something to say,
Fools because they have to say something.
PlatoComment
-
I think I know what you are asking... and if so, I think I've done that to some degree. So before I post a picture or two, let me ask if you mean something like cutting a raised panel "bevel" along the edge of your stock?
(I made a jig that I cut Shaker-style "bevels" or raised panel bevels... currently only on 10" wide stock at less than 36" lengths, keeping the BT blade at 90-degrees)
So, if I'm close to understanding... let me know and I'll go find some pictures I know I have.
CWSThink it Through Before You Do!Comment
-
45 degree bevel
yes i think that is what i am talking about, as sometimes i need to bevel the edges of boards 6-8-10 inches wide and 2-3 ft long.
thanksComment
-
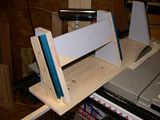
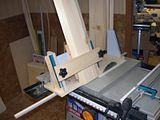
Lum,
I made this, that attaches to my sled. I made it so I could adjust the angle as needed.
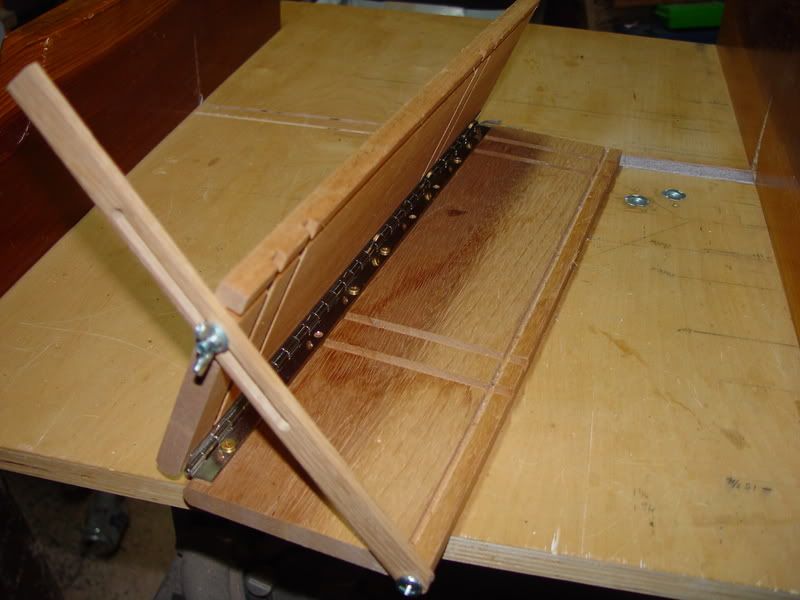
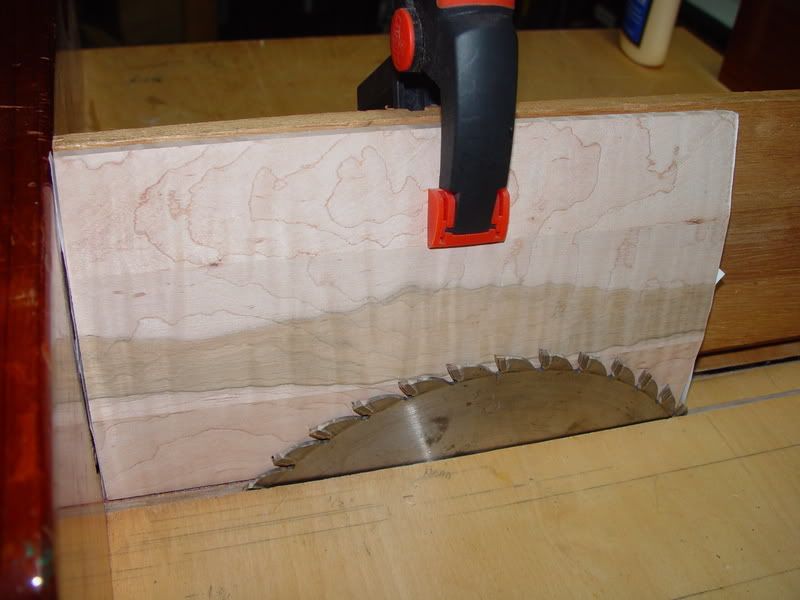
SteveI would never die for my beliefs because I might be wrong. Bertrand RussellComment
-
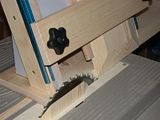
nice. are those kerf cuts/small dadoes on the back side purposeful, or was this jig cobbled together for project scraps?there's a solution to every problem.......you just have to be willing to find it.Comment
-
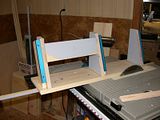
Here is the jig that I made to cut Quaker-style raised panels on my BT3100-1. Basically, it's pretty simple and uses some scraps from the shop. It is NOT adjustable though, and I like what Schmogg has done to make his sled adjustable for bevel cuts, though I'm not sure that approach would work for the task that I had in mind. I've thought what changes I could make to allow for variable angles, but it's a low priority.
In any case, I did some looking around and couldn't find anything that answered the challenge for me at the time. After some searching and examination of "raised panels" I decided that a bevel of 20-degrees from vertical was best looking, and to that end, I made the jig pictured. As it stands, I can securely clamp a 9-1/2 inch wide board up to about 34 inches or so. The panels shown are approx. 8 x 29 inches.
Concern for me was to get consistancy and of course to do this safely, as the blade guard would have to be removed. The other consideration was how to move the stock through the blade and have secure as I did so.
So for my particular need, the jig required three support areas where I could hold the work piece with clamps, and also could guide it through the cut. At the time I didn't have the optional miter slot, and later I was to discover that the miter slot by its self didn't offer the range of support that this jig did.
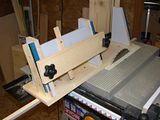
As it developed, I would position the SMT such that it offered a miter-like slot in which I could place a rather long guide stick of about 36 inches, pull the SMT back to a starting position and then use the glide of the SMT with the jig to move the stock forward and after it reached it's most rear position, I could then continue to slide the jig until the cut was complete. I also felt much more comfortable with my hand on the on the front and back edge the jig where they would be completely clear of the cutting area.
The last two photos show my add on clamp for cutting the ends of the panels. This includes a vertical stop or guide piece and of course a couple of T-nuts with knobs and a cross-piece for securing the stock.
This jig serves pretty much only one purpose, but to date I've cut many panels for the library and am now setting up for making shutters for the windows in that room. By changing the width of the guide/miter stick or it's location in reference to the beveled edge distance from the blade, you can widen the edge below the taper... for example, the raised panel has only about an 1/8-inch needed to fit the rail-like molding and the shutters, which require a tongue and groove fit, has about 3/8-inches. I simply changed out the guide stick to achieve the difference, and relocated the SMT for that spacing difference.
While I know this doesn't fit your 45-degree need, it may give you some ideas; so, here it is:
 Think it Through Before You Do!
Comment
-
I would never die for my beliefs because I might be wrong. Bertrand RussellComment
-
Just fix the saw, it isn't that hard. I have 2 married together to make a Frankensaw and have been through most all problems that anyone can experience. I could have bought other saws but just fell in love with the first BT3000 that came out and resolved myself to overcome any problems. I have made many jigs and usually just used them for firewood, the saw as sold will preform just fine as sold. Maintenance is of the utmost importance. I would follow the first posts about giving things a little cleaning and dry lube care. That has never let me down. I use a Wixey to set and check my my adjustments but they are usually dead on. Trust the saw, and read Lorin's setup and repair posts.
Just my thoughts.
CorksCork,
Dare to dream and dare to fail.Comment
-
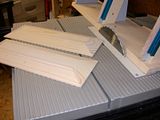
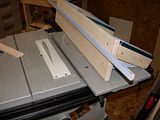
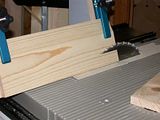
45 sled
thanks for the pix this looks like it could be used in a lot of angle cuttingComment


Comment