Ryobi Router Table Set Up / Fence

Collapse
This topic is closed.
X
X
 
  • Time
  • Show
Clear All
new posts
  • movnup
    Established Member
    • Aug 2006
    • 190
    • Seattle
    • BT3000

    Ryobi Router Table Set Up / Fence

    I need some advice on how to set up or purchase the correct parts to set up the router table. I looked at all the threads, the two examples of build your own, and with nothing written about it in the owners manual here are my questions as follows:

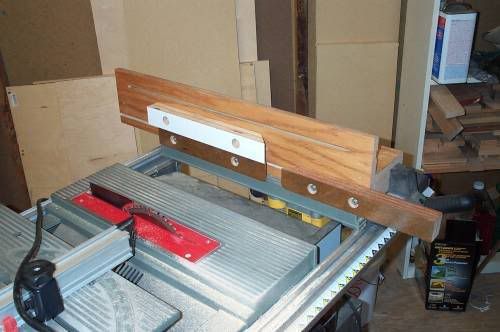
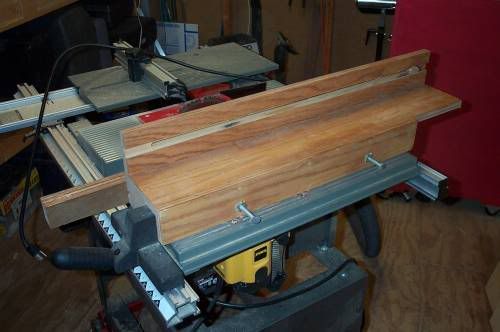
    1) With the home built fences it appears that they have a second router accessory table - was this an aftermarket part (came with the accessory kit)or can you create one or two saw depth spacer block(s) to create working surfaces and also support the router fence on the RHS???

    2) It also doesn't appear there is much surface area for working with wider stock once the fence is attached - my intuition is that you would want a spacer block on both sides of the router fence on the RHS of the saw blade to give you the largest and safest working area possible.

    3) It looks like from the pictures you feed the wood from the back of the saw into the bit - Ray from the UK had a nice diagram on feed direction but it didn't state front to back / back to front or which side the fence should be on relative to the bit when you are facing the saw.

    4) Is there a store bought fence out there that works well and can I just attach the router using the template on the site ??? I saw a couple of pictures of people using some type of Craftmans fence ....

    5) Is it really worth the time / expense / usabilty to build this (which I would enjoy doing) or just save up to buy one of the table top models that people have been talking about in the bargain alerts. The engineers at RYOBI thought this was a good idea to include the router top so I would love to understand their design intent and figure out how to make their vision a reality with you all's expert help!!!

    Thanks,
    Jim Z.
  • steve-norrell
    Veteran Member
    • Apr 2006
    • 1001
    • The Great Land - Alaska
    • BT3100-1

    #2
    For what its worth from another newbie . . .

    I used the Ryobi router accessory table for several months with both Craftsman and Bosch routers. I had to drill holes in the aluminum plate to mount the Bosch and access its above-the-table adjustment feature. I found the accessory table to be a workable circumstance, especially after I installed the Bosch.

    I also tried using the Ryobi router fence that attaches to the saw's rip fence. I found it to be marginally useful and somewhat cumbersome.

    I have since installed a Woodpecker 18 x 21 table top with a JessEm lift and Bench Dog router fence. I had to drill two holes in the Bench Dog to match the slots on the router table. I will eventually cut grooves for T-Tracks to give better control of the fence. So far I am very pleased with this arrangement.

    There are two advantages of this system (IMO): if the router fence is on the left of the router bit, you would be able to feed from the front of the saw, and, the router fence is easily removable and independent of the rip fence. I plug the router into the saw's switchable outlet, providing "out front" control.

    I am sure you will get plenty of other very good and helpful suggestions from this forum. Good luck!

    Comment

    • crokett
      The Full Monte
      • Jan 2003
      • 10627
      • Mebane, NC, USA.
      • Ryobi BT3000

      #3
      I built a tall fence attachment for my saw. The fence drops over the existing rip fence. I put t-slots in it so I can attach various attachments (featherboards, router split fence, hold downs) with t-bolts. The tall fence stays on the saw all the time unless I need the extra rip capacity that is lost with it installed.
      David

      The chief cause of failure in this life is giving up what you want most for what you want at the moment.

      Comment

      • Black wallnut
        cycling to health
        • Jan 2003
        • 4715
        • Ellensburg, Wa, USA.
        • BT3k 1999

        #4
        Originally posted by steve-norrell
        For what its worth from another newbie . . .

        .... two advantages of this system (IMO): if the router fence is on the left of the router bit, you would be able to feed from the front of the saw, ....... "out front" control.

        I am sure you will get plenty of other very good and helpful suggestions from this forum. Good luck!
        If the fence is to the left of the bit you need to feed from the back of the saw to the front! To feed front to back the fence must be on the right side of the bit.
        Donate to my Tour de Cure


        marK in WA and Ryobi Fanatic Association State President ©

        Head servant of the forum

        ©

        Comment

        • movnup
          Established Member
          • Aug 2006
          • 190
          • Seattle
          • BT3000

          #5
          Does anyone have any pictures they can upload of what their completed working version looks like ??? I looked online to the store bought parts (guessing at the part numbers purchased - roughly $450 total??) but I wasn't able to mentally track on the home made version that crokett descibed when it came to how the split fence was created / installed. I would love to hear other forum members weigh in on what worked and didn't work / lessons learned for them including total cost to get it set up the way they like it.

          Comment

          • steve-norrell
            Veteran Member
            • Apr 2006
            • 1001
            • The Great Land - Alaska
            • BT3100-1

            #6
            Originally posted by Black wallnut
            If the fence is to the left of the bit you need to feed from the back of the saw to the front! To feed front to back the fence must be on the right side of the bit.
            You are right. My error. In my setup, the fence will be on the right as you stand in front of the saw.

            Thanks for catching that error.

            Steve

            Comment

            • crokett
              The Full Monte
              • Jan 2003
              • 10627
              • Mebane, NC, USA.
              • Ryobi BT3000

              #7
              Here are some pictures. The upper t-slot in the front is for featherboards, etc.

              Front showing the split fence attached. The white split fence is an offset fence for using the router for edge jointing.


              Rear:
              David

              The chief cause of failure in this life is giving up what you want most for what you want at the moment.

              Comment

              • movnup
                Established Member
                • Aug 2006
                • 190
                • Seattle
                • BT3000

                #8
                Thanks much ... a couple of design questions as follows:

                1) Were the fences able to move independantly
                2) Did you have a spacer insert to put between the router fence and the saw blade as I couldn't tell if the whole assembeled unit would "fill the gap"
                3) What did you use for a safety guard and dust collection

                I guess that was more than a couple but I'm a marketing guy and we play with words for a living ....

                Comment

                • crokett
                  The Full Monte
                  • Jan 2003
                  • 10627
                  • Mebane, NC, USA.
                  • Ryobi BT3000

                  #9
                  The fences move independently. For using the tablesaw I generally remove the split fence attachment. However I could just slide the pieces together so there is no gap. There isn't a guard. I learned woodworking in jr high with tools without them and am comfortable working without one. The fence could probably be modified to include one.

                  For dust collection if you look at the top pic near the rip fence locking handle you can see the split fence attachment is about 2" off the rip fence. I integrated a hollow column into the fence attachment with the intention of adding a fitting for a shopvac hose to the rear and cutting a hole in the face where the router bit would be. However I discovered a more effective solution was a jig that clamps to the top of the fence directly over the bit and lets me use a full 2" hose. A side benefit I discovered is it also functions somewhat as a blade guard.
                  David

                  The chief cause of failure in this life is giving up what you want most for what you want at the moment.

                  Comment

                  • steve-norrell
                    Veteran Member
                    • Apr 2006
                    • 1001
                    • The Great Land - Alaska
                    • BT3100-1

                    #10
                    Work in progress . . . .

                    Here are some photos of how I am installing a router table on the BT table saw.

                    I used aluminum angle 'irons' to attach the router table top (Woodpeck 18 x 21) to the rails, with plywood and/or MDF spacers to adjust table height to level with the rest of the saw. The fence is a Bench Dog 26 ProFence. A Bosch 1617 router is mounted in a JessEm lift.

                    I have routed slots for T-Tracks in the table top; the Incra "T-Track Plus" is mounted on one side of the table and a regular T-Track on the other side (to be replaced with the T-Track Plus soon). Dust collection is to a 20 gal. Shop-Vac using 2 1/2 inch hose and pipes. The hose attached to the router fence also plugs into the top of the Shark Guard.

                    The router plugs into the BT outlet and is controlled from the front; feeding stock is from the front.

                    Overall cost was higher than I wanted, and a unit like the Bench Dog or Bosch should be considered if you have the room (which I don't).

                    My "shop" is in the winter mode and as you can see in the background, we have the archaic habit of parking vehicles in the "shop" during the winter.
                    Last edited by steve-norrell; 11-30-2008, 06:03 PM.

                    Comment

                    • movnup
                      Established Member
                      • Aug 2006
                      • 190
                      • Seattle
                      • BT3000

                      #11
                      Very very sweet set up .. I noticed a couple of things if you could be so kind to clarify.

                      1) It looks like you are using your own t-tracks to move the fence versus the ones built into the table ... was that for a longer length of travel for wide stock???
                      2) The custom fence on the saw has melamine facing the router ... this is probably a really dumb question but I presume that was just to hold the new fence on Ryobi fence ... also did you make that fence yourself???
                      3) Roughly what do you think you have into dollar wise ???

                      I don't have a lot of shop real estate either so a saw mounted version is a must and I' getting some great ideas from everyone so keep them coming!!!

                      Comment

                      • steve-norrell
                        Veteran Member
                        • Apr 2006
                        • 1001
                        • The Great Land - Alaska
                        • BT3100-1

                        #12
                        Originally posted by movnup
                        Very very sweet set up .. I noticed a couple of things if you could be so kind to clarify.

                        1) It looks like you are using your own t-tracks to move the fence versus the ones built into the table ... was that for a longer length of travel for wide stock???
                        The table top comes with slots (you can see them just inside of the added T-Tracks) but I wanted extra flexibility in moving the router fence both sideways and toward and away from the router bit. I am not sure that is necessary, but it gave me a chance to learn some routing techniques (just don't look too closely).

                        Originally posted by movnup
                        2) The custom fence on the saw has melamine facing the router ... this is probably a really dumb question but I presume that was just to hold the new fence on Ryobi fence ... also did you make that fence yourself???
                        The fence is the original Ryobi fence with a) a UHMW piece on the saw side, b) a piece of MDF board on the router side, c) a piece of plywood on the top to hold T-Tracks for attaching featherboards, stop blocks and sacrificial boards. There is also a piece of UHMW on the miter fence; that is there to give me a slighly longer fence. These are visible in the photo taken from the right side of the saw.

                        Originally posted by movnup
                        3) Roughly what do you think you have into dollar wise ???
                        I probably have somewhere between $300 and $350 in that setup. As I said earlier, I think it would be cheaper to buy a table top unit. They come fairly complete and almost always with a pre-drilled plate to mount the rounter under the table. If I were to do it over, I would look for a bench-top unit (like Bench Dog) and figure out how to mount the table top on the Ryobi saw rails.

                        Originally posted by movnup
                        I don't have a lot of shop real estate either so a saw mounted version is a must and I' getting some great ideas from everyone so keep them coming!!!
                        Thanks for the interest, but don't forget to spend time digging through the posts on this web site. They are invaluable.

                        Good luck.

                        Comment

                        • Black wallnut
                          cycling to health
                          • Jan 2003
                          • 4715
                          • Ellensburg, Wa, USA.
                          • BT3k 1999

                          #13
                          Shameless Plug

                          http://www.blackwalnutjigs.com/routerfence.asp

                          The one I made for Scottydont attached to the BT3 rails via the Popeye/ Thom2 method. It features a 2" dust collection port and 4" tall UHMW sliding fence faces. See link for more details.

                          Although I'm more than happy to custom make these for forum members my fence is eaisly assembled by any with modest skill.
                          Donate to my Tour de Cure


                          marK in WA and Ryobi Fanatic Association State President ©

                          Head servant of the forum

                          ©

                          Comment

                          • movnup
                            Established Member
                            • Aug 2006
                            • 190
                            • Seattle
                            • BT3000

                            #14
                            I greatly appreciate everyone's input and pictures. I have been sending PM's to Popeye on his router fence also and he is sending me up the custom t-bolts he used in his design so the net net is I'm going to see if I can aggregate the home built and store bought verisons with the features people liked built in.

                            As an FYI, the project that started this research is a bunk bed with a desk underneath for my little girl that will match a tall maple arts and craft style dresser. We bought a crib / dresser at the same time and she's at the point where it would work out well. My only concern so far (besides the router set up) is how to match the color / finish which you will probably see in a post sometime down the road.

                            As a final note you all and this forum are AWESOME !!!

                            THANK YOU !!!!!!!!!!!!!!

                            Comment

                            • steve-norrell
                              Veteran Member
                              • Apr 2006
                              • 1001
                              • The Great Land - Alaska
                              • BT3100-1

                              #15
                              I should have researched more carefully . . .
                              . . . or, why didn't I think of that.

                              I took a look at Popeye's photos on his web site and realize that the Bench Dog router fence could be attached to the rails using long T-bolts and threaded knobs. These can be obtained at http://www.t-nuts.com. or they can be relatively easily built (as Popeye did).

                              But then I wouldn't have had the experience or routing out channels for the T-Tracks.

                              Good ideas abound, you only have to do the research to find them and this forum is a good place to start looking.

                              Comment

                              Working...