

Recently posted about the clearance on Groz planes at Woodcraft (in the Bargain Alert forum). That posting received a lot of comments, so I decided to share my results once my jack plane arrived.
The short story is that the workmanship from the factory was not great. But after a 1/2 hour of tuning it up the plane cuts great and I would not hesitate to do it again. I feel like it was a great value.
Updated (1/31/2012 - adding text from pdf file to cover for my technical difficulties with posting a pdf...)
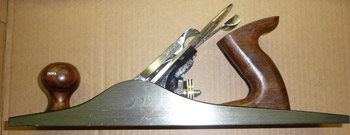
Groz #5 (Jack) Plane Review
Purchased the Groz #5 Jack plane from Woodcraft (web) and had it shipped to me in Jan. 2012. At that time, Woodcraft had the Groz planes on clearance and the #5 was $17.99 (plus $7.50 for shipping).
Out of the box:
I had hoped to use the plane right out of the box� so I could do a before and after. However, when the plane arrived it was in a cardboard box with no instructions or paperwork of any kind. In addition, the manufacture had coated the metal to prevent rusting. I have no idea what the coating was but it had to be removed before the plane could be used. Because of this I needed to disassemble the plane without using it.
Preparing the plane
I used mineral spirits to remove the coating. It was everywhere (including under the frog).
Once the coating was removed I decided to flatten the sole. I �painted� the sole with a permanent marker and sanded the sole with 100grit sand paper (attached to a granite tile). It took about 60 seconds of sanding to flatten the sole enough that the marker was completely removed. I repeated this same process with 220 grit and 400 grit paper. The result was a very flat and smooth sole (total time about 10 min).
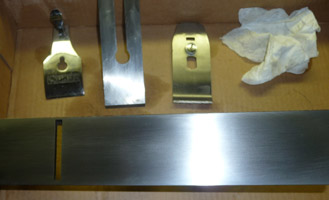
Next I used a small file to remove all burrs from the mouth of the plane. In the corners, under the frog there was some paint that needed to be removed. After �cleaning� the mouth, I also filed lightly on the frog to ensure flatness and secure seating of the frog to plane. (maybe 5 min.)
One thing I did not like about the Groz plane was that the screw. positioning the frog relative to the mouth, could not be adjusted with the frog in place. The knob used to adjust blade height was in the way. This forced the user to adjust the frog screw and then install the frog to see if it was ok. If not� pull off the frog adjust the screw and try again. I positioned the frog so that the angle of the mouth and the frog align perfectly.
Also of note was that the blade did not sit centered in the middle of the mouth. When assembled the blade was ~1/16" from the right wall and maybe ~3/16 from the left. I don't think it matters, but does highlight the lack of precision in the manufacturing process.
Sharpening the blade
Woodcraft has a blade sharpening service, but the pictures I saw in some reviews did not impress me. So, my blade arrived without any additional sharpening. It was sort of sharp, but since it was already off, I decided to sharpen it myself.
I have several granite tiles with different grits of sandpaper glued to them. Using the �scary-sharp� method, I started at 220grit and went up to 600 grit. (Flattening the back and sharpening the bevel) By the end the blade had a mirror surface that was sharp enough to shave with. (total time 15 min)
Actual results
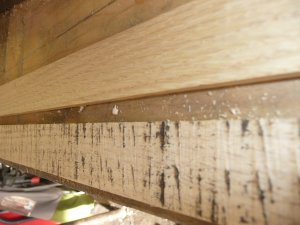
After assembling the plane. My first use was on some oak that I had �resawed� down to �� thick using my band saw. The surface of the oak after the band saw was very jagged. With my new Groz plane I was able to quickly clean up the surface so that sanding was optional.
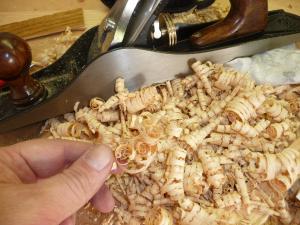
The shavings from the plane were paper thin and the chip breaker did a good job of removing material so the plane never clogged.
Conclusions
I am very pleased with my new plane. While the plane arrived in no condition to be used and the craftsmanship was not top notch, the results make we feel like the $25 and half-hour or �tuning� were completely worth it. I would not hesitate to buy another Groz plane.
Groz5_review2.zip
The short story is that the workmanship from the factory was not great. But after a 1/2 hour of tuning it up the plane cuts great and I would not hesitate to do it again. I feel like it was a great value.
Updated (1/31/2012 - adding text from pdf file to cover for my technical difficulties with posting a pdf...)
Groz #5 (Jack) Plane Review
Purchased the Groz #5 Jack plane from Woodcraft (web) and had it shipped to me in Jan. 2012. At that time, Woodcraft had the Groz planes on clearance and the #5 was $17.99 (plus $7.50 for shipping).
Out of the box:
I had hoped to use the plane right out of the box� so I could do a before and after. However, when the plane arrived it was in a cardboard box with no instructions or paperwork of any kind. In addition, the manufacture had coated the metal to prevent rusting. I have no idea what the coating was but it had to be removed before the plane could be used. Because of this I needed to disassemble the plane without using it.
Preparing the plane
I used mineral spirits to remove the coating. It was everywhere (including under the frog).
Once the coating was removed I decided to flatten the sole. I �painted� the sole with a permanent marker and sanded the sole with 100grit sand paper (attached to a granite tile). It took about 60 seconds of sanding to flatten the sole enough that the marker was completely removed. I repeated this same process with 220 grit and 400 grit paper. The result was a very flat and smooth sole (total time about 10 min).
Next I used a small file to remove all burrs from the mouth of the plane. In the corners, under the frog there was some paint that needed to be removed. After �cleaning� the mouth, I also filed lightly on the frog to ensure flatness and secure seating of the frog to plane. (maybe 5 min.)
One thing I did not like about the Groz plane was that the screw. positioning the frog relative to the mouth, could not be adjusted with the frog in place. The knob used to adjust blade height was in the way. This forced the user to adjust the frog screw and then install the frog to see if it was ok. If not� pull off the frog adjust the screw and try again. I positioned the frog so that the angle of the mouth and the frog align perfectly.
Also of note was that the blade did not sit centered in the middle of the mouth. When assembled the blade was ~1/16" from the right wall and maybe ~3/16 from the left. I don't think it matters, but does highlight the lack of precision in the manufacturing process.
Sharpening the blade
Woodcraft has a blade sharpening service, but the pictures I saw in some reviews did not impress me. So, my blade arrived without any additional sharpening. It was sort of sharp, but since it was already off, I decided to sharpen it myself.
I have several granite tiles with different grits of sandpaper glued to them. Using the �scary-sharp� method, I started at 220grit and went up to 600 grit. (Flattening the back and sharpening the bevel) By the end the blade had a mirror surface that was sharp enough to shave with. (total time 15 min)
Actual results
After assembling the plane. My first use was on some oak that I had �resawed� down to �� thick using my band saw. The surface of the oak after the band saw was very jagged. With my new Groz plane I was able to quickly clean up the surface so that sanding was optional.
The shavings from the plane were paper thin and the chip breaker did a good job of removing material so the plane never clogged.
Conclusions
I am very pleased with my new plane. While the plane arrived in no condition to be used and the craftsmanship was not top notch, the results make we feel like the $25 and half-hour or �tuning� were completely worth it. I would not hesitate to buy another Groz plane.
Groz5_review2.zip
Attached Files