

That's the way that I've approached the ones that I've "restored." I use them rather than display them.
There is a great video out there somewhere that was originally done in Japanese if I remember correctly. It depicts in slow motion the importance of setting the chipbreaker correctly. I haven't been able to find it but if I do will post it. I would like to see it again myself. Also, the mouth has to be set correctly relative to the blade depth. Play around with those things and you'll see what a difference it makes when you're planing.
-
Richard,
Thank you for the link. Actually, I hooked up with your earlier link to that home page and read through just about every article, including that particular one on "Japanning". All very interesting stuff, and I can well see that it would be ever so easy to become a collector, providing one can find more of these. It is all very interesting.
The "Japanning" on this particular #3 is fairly decent and as previously mentioned only need a slight touch-up. The casting is rough on the inside and I can see that some sandblasting might be in order should I ever care to go that route. But, that isn't the case at this point.
I did put some walnut stain on the tote and knob. The knob is a couple shades darker and the tote would require significant sanding to get the dark marks out of it. I don't want to reduce the surface however, and that would be required if I attempted to remove those dark marks. So, at this point I've only lightly sanded, applied some stripper, and then some cleaning with an abrasive pad, followed by a walnut oil stain. In a few days, I'll shellac the surface and apply some Butchers wax. (also read that article in your link )
)
Objective for me is to make this workable, and also to look good, but I want it to appear as old too, and not just pretty it up for display.
Thanks,
CWSLeave a comment:
-
Here's the link to japanning should you want it.
http://home.comcast.net/~rexmill/pla.../japanning.htmLeave a comment:
-
since you've cleaned it up - might as well restore the handles with some stain.
Great find, though ----
My hand planes are Pre WWII Miller Falls ---- and I use them a lot.Leave a comment:
-
Thanks a lot there fella!! (Didn't think that I'd ever get one of those.)
So far the #3 has cleaned up really well. I still haven't sharpened the blade, figure I'll leave that to last.
I'm getting ready to re-finish the knob and tote, but I've got to get the right stain for that. After further cleaning, I've found the black "japaning" to be pretty good. A bit of resin needed cleaning around the mouth but once that was off, there was only a rust spot, about 1/4" dia, to be touched up.
I took a Sharpie and marked up the sole and then took several swipes across some 1000 grit W&D, on my granit tile, and it was all removed. With a straight edge, I can't slip a 0.002 feeler anywhere along it's surface. I'd still have to do a lot of honing to get the grind thing to a mirror finish though, but I doubt that necessary.
By the condition, I'd say this belonged to a good carpenter or woodworker. The guy in the store thought it came from an estate sales, as that is how they acquire most of the old tools (that and garage sales).
I'll post some pictures when I get this polished up and back together.
Thanks for the comments,
CWSLeave a comment:
-
My understanding is that re-japnning a plane can be a real PITA. Somewhere I have a link on this. If I can find it I will post it.
As far as the iron is concerned, most of the experts say that the face should be mirror polished anywhere from 1/32 inch above the cutting edge to all the way to the slot. It depends on which "expert" you read. I polish mine about 1/2" above the cutting edge. The bevel itself should also be polished of course.
Also, for use, the sole should be flattened in at least three points - the very front, the very back, and the area just in front of the cutting edge. These flattened areas should be in the same plane.This should be done with the blade, chip-breaker, and lever cap in place but retracted so that the blade does not protrude.
If the tote and knob feel good in your hands, I would leave them alone. After all, you're the one who will be using it.
Other things to consider for use: the bed should be flattened to prevent chattering. Some say the whole bed while others say only the bottom 1' or so. The chip breaker should be fitted to the blade and adjusted properly for the size chip you are creating. The frog should be adjusted to obtain the proper mouth opening.
When everything is sharp and adjusted properly, they are a joy to use. Good luck.
PS I apologize for the confusion I caused with the dating. Erik and you are absolutely correct. I explained that in my previous post.Last edited by phrog; 09-01-2013, 01:30 PM.Leave a comment:
-
Erik, I think you are absolutely correct. That's what I get for relying too much on one source (Patrick Leach). He goes into detail explaining and showing the four different types of frog receivers but, as far as I could see (my vision is poor and I may have overlooked this info on his site), does not mention a suspension of the frog-adjusting screw during the war. I've learned something here and thank you for pointing that out. (I have used your referenced site before but not as much as the Patrick Leach site.) I thought that all non-adjusting screw bench planes were prior to 1907. Both my bench planes carry a 1910 patent date and have the screw (and I'm sure each is worth at least a million dollars). Again, thanks.
Leave a comment:
-
Thanks again to everyone,
I've pretty much read through the provided links, so I'm pretty sure that this is the Type 17, WWII era plane. That makes it about as old as I am, I guess.
My understanding is that there have been four frog mounting designs of the base, and if that is so then this is the third design. The frog itself seems to also fall into that after-30's design too; and the "Stanley" logo marking on the blade iron, lever cap, and lateral adjustment lever are all indicating this period.
A couple of articles pointed that "tapping the hole" for the frog adjustment screw "was only doing half the job" without also adding the the adjustment itself on WWII-era planes, but then I also read that there were many inconsistencies during that time period. Also bear in mind the steel hardware, instead of brass, as brass was used for other things during the war. One thing that caught my eye though was one of the articles pointing out that WWII-era casting were heavier or thicker than others. Yet this particular #3 seems to be on the thin side and more like my Sears 107-37031 block plane from what I believe is the late 40's or early 50's.
The sole casting only bears "Made in U.S.A." and "Bailey No. 3" raised on the casting.
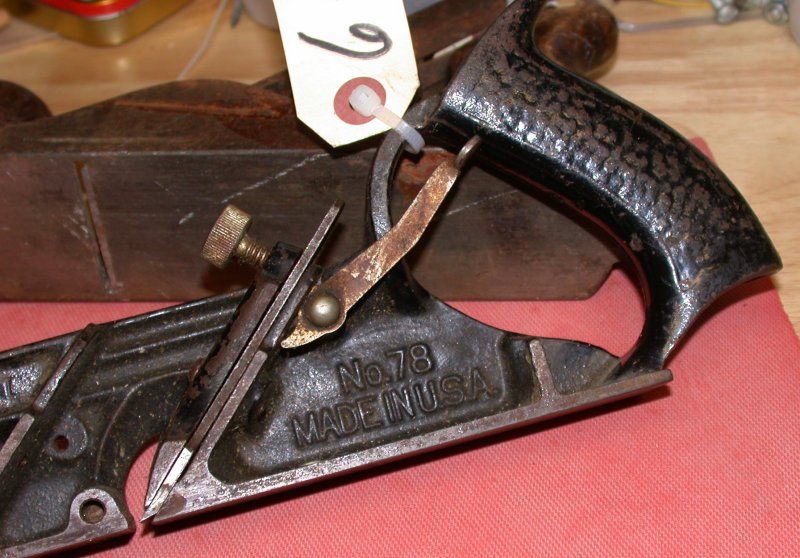
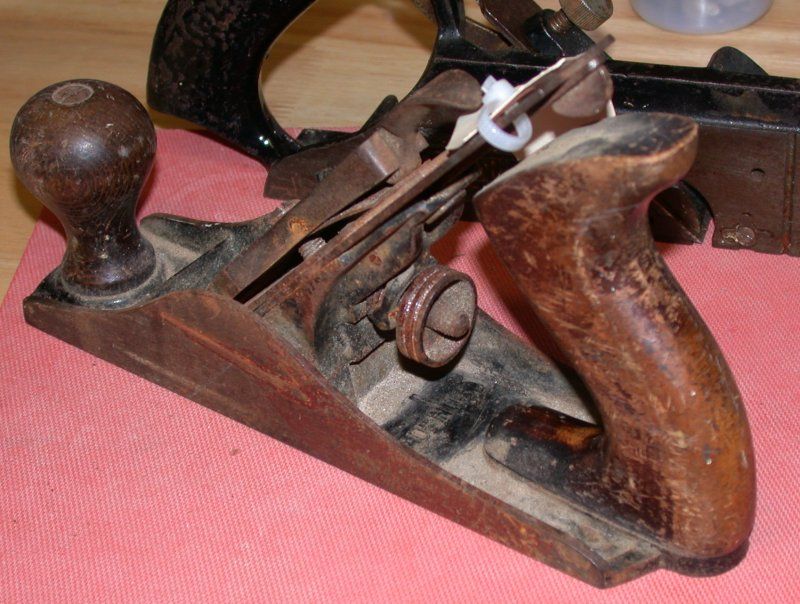
One thing that I forgot to mention and I don't know if it is important or not, as I haven't seen it mentioned anywhere (could have missed it though): On the #3 sole casting, underneath the tote handle is a "U", and on the frog, in that area which supports the lower end of the blade there is also a "U". These appear to be 'stamped' into the casting. On the #78, I found a similar mark " 1 U " upside down in between the ribs on that curved nose piece. Whether any of these were stamped or cast-in, it appears to be done at the factory before the paint was applied.
Whatever the case, I'm not really a "collector" and am perhaps more interested in using these. Surprisingly, the blade on both of these are remarkably sharp and to a some degree usable as is; though I'm certainly going to put a better edge on them. The sole is also remarkably flat.
Question though: While I understand these are neither rare or even a great find for "a collector", I certainly do not want to ruin them in any way. Does one repaint the the black 'jappaning' or leave it alone (it is only slightly deteriorated) and should one also refinish the tote and knob, brighten up the iron, removing the surface grind marks, etc.?
Thanks,
CWSLast edited by cwsmith; 09-01-2013, 10:35 AM.Leave a comment:
-
Check out the Type 17 (1942-45) description on Rexmill's page:
http://home.comcast.net/~rexmill/pla...ing/typing.htm He even mentions the inconsistencies of the frog adjusting screw. The machining cwsmith shows on the top of the frog is a lot later than the pre-1907.
Most of my Stanleys don't have a frog adjusting screw. Most are Type 11's and before. Nothing really old and collectible though.Leave a comment:
-
That's what gave me a headache. If you read Patrick Leach's frog description, this is what I think he describes as the third type (definitely Not 1 or 2). He says it was first used in 1902 and it used an adjustment screw to move the frog forward or backward. Then he goes on to say the screw was first used in 1907. Perhaps there was a period of 5 years when the screw was missing on this third type but he doesn't say one way or the other. Perhaps they just removed the screw for certain periods. ???
I missed the part about the steel wheel. I kept trying to make out whether or not it was brass. Thanks for pointing that out.
That's what I believe in both cases. And if it works for you for what you paid for it, you Done Good. It definitely looks like a great user.
PS: the knicker Erik is referring to on the #78 is in the little recess near the sole on the "label" side just in front of the blade opening. It should be turned when in use so that one of the "points" scores the wood before the blade cuts the wood.Last edited by phrog; 08-31-2013, 10:36 PM.Leave a comment:
-
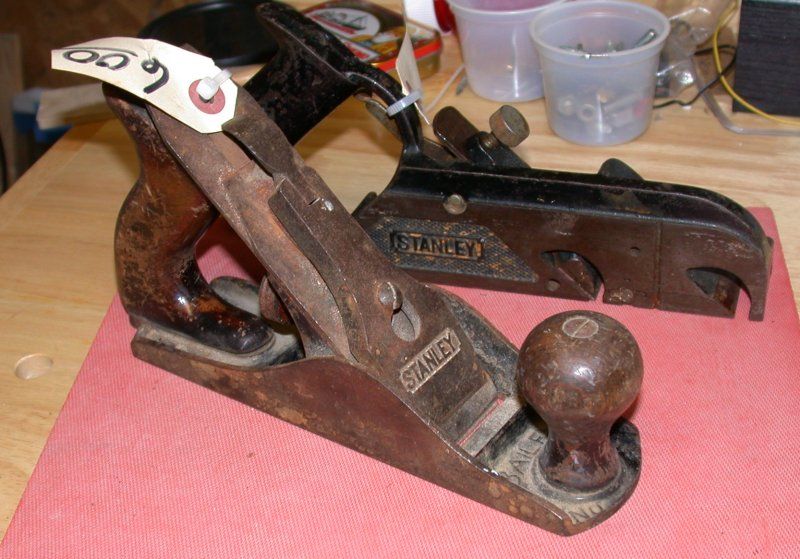
Nice job on the No 3. It cleaned up well.
I don't think it is pre-1907, just because the absence of the frog adjusting screw. I believe the frog mounting area was different then. The steel adjusting wheel, tall knob, and other things make me want to think war era. I can't quite make out the logo on the iron. It could be a piecemeal hybrid. All that really matters in the end is how well it works.
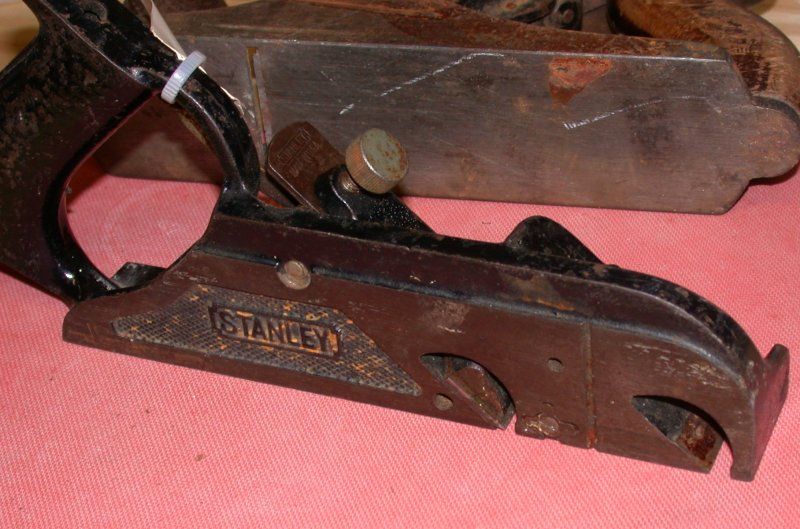
Your 78 appears to be missing the fence and the depth stop. It's a later model than mine as yours has the adjusting lever. Looks like your knicker is turned without an edge cutting.Leave a comment:
-
Call me crazy (and you won't be the first) but your #3 shows signs of more than one type unless I'm missing something or forgotten something. The frog adjustment screw (which yours does NOT have) was added in 1907. That would make me think the plane was made PRIOR TO 1907. However, the lever cap has the kidney shaped hole rather than a keyhole shaped hole. The kidney shaped hole was the later shape and was added in the early '30's. That would make me think that the plane was made AFTER 1930-35. You may have a hybrid. Someone may have replaced the lever cap, perhaps. My head hurts. I don't even want to look at the #78.
PS: The #3 appears to be in really nice shape.Leave a comment:
-
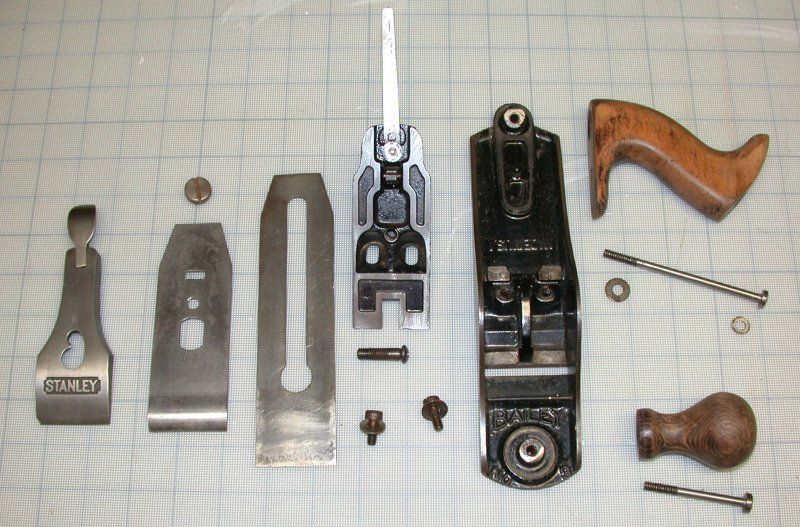
Thanks to everyone for all the great links, comments, and advice. Still reading, but am quite sure this is the WWII-era Type 17 (third and following pictures). The single-piece, long screws for tote and knob are steel as is the one-inch diameter adjustment knob; and the lever cap is not plated, and not too finely polished either. There is NO hole, tapped or otherwise for the frog adjusting screw, so figure that was just a matter of war manufacturing shortcomings.
In any case, here are some pictures (finally). Sorry, but I couldn't figure out how to post as thumbnails, but at least I cropped and reduced the images to 800 pixels wide. I have these on Photobucket and I guess I don't do enough of this to figure it out properly. Even as they are, I've got to edit the link that Photobucket gives me in order to post anything. Strange, but then like I said, "I don't do enough"... so maybe I'm doing it wrong.
I also couldn't seem to get these in the order that I would have liked. But surely everyone is probably more familiar with these two planes than I am.
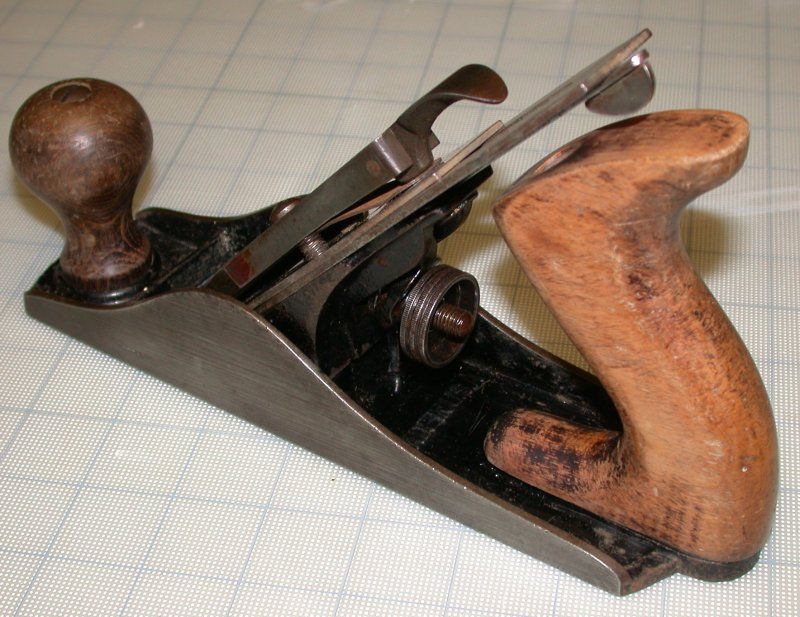
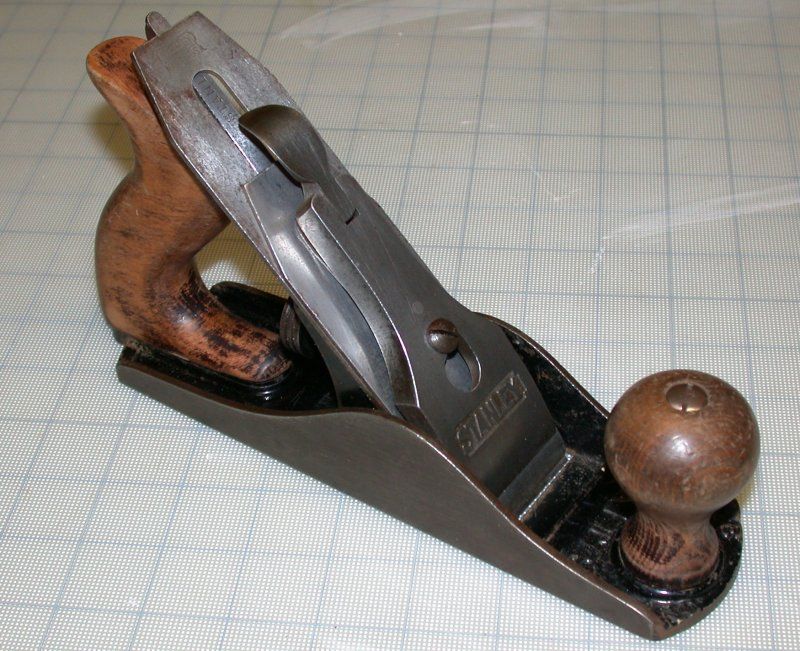
There are two each of the #78 and the Bailey #3 as I purchased them. One picture of the #3 disassembled and roughly cleaned up with 0000 steel wool to get just the loose surface grime off of them. And then two pictures of the #3 reassembled in that slightly cleaned condition.
Thanks again for everything, CWS
 Last edited by cwsmith; 08-31-2013, 06:50 PM.
Leave a comment:
-
Stanley plane dating flowchart. This will give you the type and range of production dates on Stanley bench planes except for a #1 or #2. The #1, from everything I have read, never had any changes made to it. The modifications to the #2 didn't follow the changes on the # 3-#8.
http://www.hyperkitten.com/tools/sta...hart_ascii.phpLeave a comment:


Leave a comment: