Maloof dresser part 4

Collapse
This topic is closed.
X
X
 
  • Time
  • Show
Clear All
new posts
  • atgcpaul
    Veteran Member
    • Aug 2003
    • 4055
    • Maryland
    • Grizzly 1023SLX

    Maloof dresser part 4

    So far this week I cut the sides, top, and bottom to final width. I traced my
    pattern on the sides and cut them oversize with a jigsaw. Working on one
    side at a time, I clamped the template to it and then used a flush trim bit in
    my router to shape the side to final size. Point of no return stuff here. Scary
    stuff.

    This morning I had to go buy a Bosch 3/8" roundover bit at Lowes. I didn't
    have one that size. What a difference a sharp bit makes! More point of no
    return stuff.


    I decided to roundover as much stuff before assembly as possible. I started
    on the inside face. When I came to a dado, I stopped short.


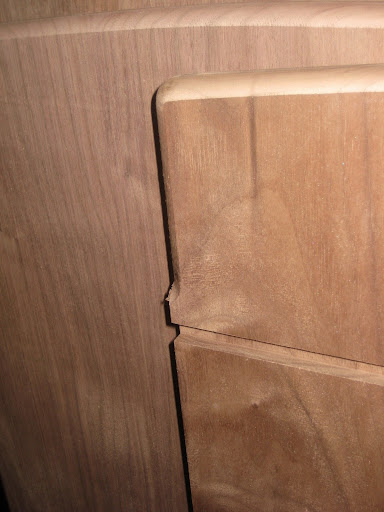
    The roundovers REALLY set off the piece. I like it!


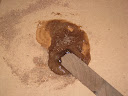
    Before I can really go one, I need to patch this spot on the inside face of one
    of the sides. I had to include this bit of bark to get a wide enough glue-up.
    I masked the area with painter's tape first. I really should have masked more.


    I've got plenty of fine wood dust so I mixed it up with some 5 minute epoxy
    and scooped it into that gap.


    Hopefully in the morning that epoxy will be rock hard throughout and I can
    continue. I took the day off work tomorrow so I think after I finish cleaning
    up the epoxy, I can do a final dry fit, cut a rabbet in the back pieces for the
    back, do a final sanding of the interior parts, and maybe even do a glue-up.

    I hope I can get to sleep with all the expectations.

    Paul
    Last edited by atgcpaul; 11-03-2011, 07:35 PM.
  • jking
    Senior Member
    • May 2003
    • 972
    • Des Moines, IA.
    • BT3100

    #2
    It looks like it's starting to come together nicely. I'm very interested to see how you handle the dado areas.

    I agree about the roundovers. Very nice.

    Comment

    • Shep
      Senior Member
      • Nov 2008
      • 710
      • Columbus, OH
      • Hitachi C10FL

      #3
      Looking great. Thanks again for posting this. I love being along for the ride.
      -Justin


      shepardwoodworking.webs.com


      ...you can thank me later.

      Comment

      • atgcpaul
        Veteran Member
        • Aug 2003
        • 4055
        • Maryland
        • Grizzly 1023SLX

        #4
        Lunch break.

        Thanks for the comments everyone. Would love to read any constructive
        criticism or anything I might be forgetting.

        The epoxy was set nice and hard this morning so I started shaving it level to
        the wood with my handplane. Almost level in this pic. The walnut sawdust
        really helped to make a good color match.


        I then had to make a rabbet in the top, bottom, and sides to accept the
        back. The sides had to be done on the router table because the rabbet is
        only between the top and bottom. While routing one of the sides, the piece
        slipped and I cut too far. Luckily it's the back but now there's a 1/4" gap at
        the top. More epoxy but after glue-up! On the actual top and bottom, I cut
        the rabbet using my TS.


        Referring back to my Maloof book and using my digital calipers, I figured out
        the locations of the plugged screw holes in the sides. I transferred the
        location of the holes onto my piece (now held together with clamps). On the
        top, I just evenly spaced 3 holes. I drilled the holes using a 3/8" forstner bit
        chucked in my cordless drill. I followed that by drilling a pilot hole. I should
        have just used my countersink and bit. Would have saved some time.


        So now the piece is assembled with some wood screws in those holes. I'm
        going to disassemble it one last time and then sand the internal areas before
        the glue-up. I wish, now, that I sanded before I did this assembly so I could
        have taped off the areas.


        Dust mask time. Time to go sand. See ya' in a few.


        Paul

        Comment

        • chopnhack
          Veteran Member
          • Oct 2006
          • 3779
          • Florida
          • Ryobi BT3100

          #5
          Paul, working like a pro

          Nice work. The areas around the epoxy repair look darker, is that from the epoxy flowing under the tape or is it internal wicking via the fibers or was it just the sheen after planing?
          I think in straight lines, but dream in curves

          Comment

          • atgcpaul
            Veteran Member
            • Aug 2003
            • 4055
            • Maryland
            • Grizzly 1023SLX

            #6
            Originally posted by chopnhack
            Paul, working like a pro

            Nice work. The areas around the epoxy repair look darker, is that from the epoxy flowing under the tape or is it internal wicking via the fibers or was it just the sheen after planing?
            The dark/black streak is bark. The parts that look shiny are epoxy that I hadn't
            planed down yet. It was an in-progress pic

            If I hadn't been lazy and taped off those areas, I wouldn't have needed to plane so much. It's all good now. That area is the inside/bottom of the piece so it's really not in an obvious area.

            Comment

            • atgcpaul
              Veteran Member
              • Aug 2003
              • 4055
              • Maryland
              • Grizzly 1023SLX

              #7
              OK. Last post for the night.

              Before dinner (no need to glue on an empty stomach) I took the whole thing
              apart and sanded everything with my ROS. Then I taped off all the glue
              prone areas and started gluing.

              After all those dry fits, I wised up and propped the bottom on an elevated
              base made of a router case and a sander case. In this pic, the divider is
              glued in and the top and bottom are screwed on. Game on!


              With the top and bottom elevated, I just need to glue/pound/screw on the sides.
              No tricky maneuvers required.


              At this point the sides are on and it's time to install the stretchers and
              runners. Because the carcase is solid wood, it needs to expand and contract
              with the seasons. Glueing in the runners along the whole dado would cause
              problems. Only the front stretcher is glued and screwed in.


              After the stretchers were glued and clamped in, I glued in the loose tenons
              and glue on the runners to the tenons but no glue in the dado.


              I was getting tired so I didn't glue on the rear stretcher. Tomorrow. Tomorrow
              I hope to work out the roundovers on the front and start building the drawers.

              Paul

              Comment

              Working...