Drill Press Table

Collapse
This topic is closed.
X
X
 
  • Time
  • Show
Clear All
new posts
  • nothing
    Forum Newbie
    • Sep 2007
    • 55
    • Central MS
    • Delta 36-979 with 30" Biese

    #16
    Originally posted by dbhost
    So, is that fence an "L" of one piece of wood, with a big rabbet cut into it, or is that two joined pieces? How did you join them?

    If I were to guess, I would say two pieces, joined maybe with biscuits or loose tenon?
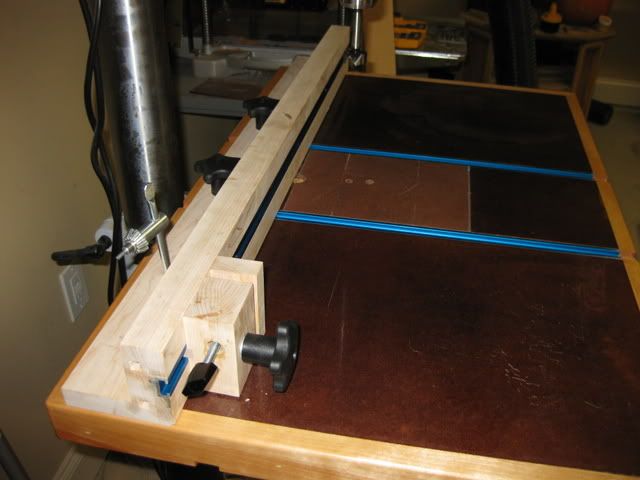
    Unfortunately I followed the directions on the plans to the tee on this and really think it was poorly designed. The fence is 4 pieces. It's hard to explain without detailed pics, but the idea was to have a 1/2" thick face glued to 3 pieces with grooves to allow for rods to be inserted to attach extensions. The directions called for attaching the base to the face at a right angle. Then the other two pieces are placed behind it. The problem is there is nothing to hold it square so I had to face joint the fence and do some resawing to square everything up again.

    If I decide to redo it I'm going to make it 3 pieces. I'll make the face 3/4 thick with grooves in the back for the extension rods and a rabbet at the bottom to help align the face to the base. Since I don't have a biscuit jointer I'd probably use pocket holes to attach the face and base. Then I'd cover the grooves in the back with a 1/2" backing and sand it flush.

    If you don't want or plan on adding extensions just use a solid block or laminate to about an inch thick, cut a rabbet at the bottom and attach with biscuits, pocketholes or whatever you prefer.

    Long story short, I wouldn't build the fence from the plans the same way at all.

    Comment

    • nothing
      Forum Newbie
      • Sep 2007
      • 55
      • Central MS
      • Delta 36-979 with 30" Biese

      #17


      If you look at the sides of the fence you can see holes where steel or aluminum rod can be added, problem is the joints shifted during the glue up and are too tight for the rods.

      Comment

      • Bill in Buena Park
        Veteran Member
        • Nov 2007
        • 1867
        • Buena Park, CA
        • CM 21829

        #18
        That's a beautiful table - well planned and executed. Great supplement to the DP, a classy and functional tool setup to be proud of.
        Bill in Buena Park

        Comment

        • shoottx
          Veteran Member
          • May 2008
          • 1240
          • Plano, Texas
          • BT3000

          #19
          Very Very Cool
          Often in error - Never in doubt

          Mike

          Comment

          • Slik Geek
            Senior Member
            • Dec 2006
            • 706
            • Lake County, Illinois
            • Ryobi BT-3000

            #20
            You've convinced me that I REALLY need to build one of those for my drill press. Very nice - I suspect that you'll wonder how you ever got by without it.

            You may want to consider adding a scrap piece of 3/4" plywood, attached beneath your drill press to broaden its base. This is especially important now that you have an expanded table surface. A heavy load on one side of the table might cause the drill press to tip to the side.

            Comment

            • dbhost
              Slow and steady
              • Apr 2008
              • 9463
              • League City, Texas
              • Ryobi BT3100

              #21
              Originally posted by nothing


              If you look at the sides of the fence you can see holes where steel or aluminum rod can be added, problem is the joints shifted during the glue up and are too tight for the rods.
              Bear with me here, I don't mean to be a pest, I am just trying to understand different ideas is all... What are the "extension rods" for?

              My DP table is a basic Grizzly unit, which works fine, but I always like reviewing different ideas to solve the same problem for future reference...
              Please like and subscribe to my YouTube channel. Please check out and subscribe to my Workshop Blog.

              Comment

              • JR
                The Full Monte
                • Feb 2004
                • 5636
                • Eugene, OR
                • BT3000

                #22
                Originally posted by dbhost
                What are the "extension rods" for?
                To extend a stop out beyond the end of the fence.
                JR

                Comment

                • nothing
                  Forum Newbie
                  • Sep 2007
                  • 55
                  • Central MS
                  • Delta 36-979 with 30" Biese

                  #23
                  Originally posted by Slik Geek
                  You may want to consider adding a scrap piece of 3/4" plywood, attached beneath your drill press to broaden its base. This is especially important now that you have an expanded table surface. A heavy load on one side of the table might cause the drill press to tip to the side.
                  That's a great point. How large do you think it needs to be?

                  Comment

                  • master53yoda
                    Established Member
                    • Oct 2008
                    • 456
                    • Spokane Washington
                    • bt 3000 2 of them and a shopsmith ( but not for the tablesaw part)

                    #24
                    Great table i'm in process on mine

                    Like the one i'm making except i'm trying to also put a spindle sander dust collector built in I'll post it if I ever get it done. the quality of workmanship is excellent.
                    Art

                    If you don't want to know, Don't ask

                    If I could come back as anyone one in history, It would be the man I could have been and wasn't....

                    Comment

                    • master53yoda
                      Established Member
                      • Oct 2008
                      • 456
                      • Spokane Washington
                      • bt 3000 2 of them and a shopsmith ( but not for the tablesaw part)

                      #25
                      your workmanship is excellent Looks great

                      You did an excellent job unlike my previous post that sounded like I did excellent work HA HA HA
                      Art

                      If you don't want to know, Don't ask

                      If I could come back as anyone one in history, It would be the man I could have been and wasn't....

                      Comment

                      • Slik Geek
                        Senior Member
                        • Dec 2006
                        • 706
                        • Lake County, Illinois
                        • Ryobi BT-3000

                        #26
                        Originally posted by nothing
                        That's a great point. How large do you think it needs to be?
                        On my Delta drill press, the stock base is 12-1/2" wide by 20" deep. I added a plywood base which is 22" wide by 30" deep. Note that my table is still the original, which is 12" square.

                        Since you have such a much wider table on yours, you may want to use an even wider base than mine.

                        Comment

                        • brubakes
                          Forum Newbie
                          • Jan 2009
                          • 61
                          • Medina, OH
                          • Sears 315.228110

                          #27
                          Very impressive. This is one of those projects I really need to get started on.

                          Comment

                          • ironhat
                            Veteran Member
                            • Aug 2004
                            • 2553
                            • Chambersburg, PA (South-central).
                            • Ridgid 3650 (can I still play here?)

                            #28
                            OK, I'm stealing some of your ideas whether you like it or not! LOL!! Really nice job... but, I'm still stealing your ideas!
                            Blessings,
                            Chiz

                            Comment

                            Working...