
 Tweet
Tweet
I saw a much cooler photo light box than mine over on the IAP website that used diffuser panels from fluorescent ceiling lights, but since I had my old scrap-based one, I wanted to borrow the diffuser panel idea, and add some economy light fixtures, to see how it would work out. The link below is to my video of the project - thanks for watching!
-
-
What bulbs are you using for the box? LED? Incandescent? Power? Color temperature?
 Loring in Katy, TX USA
If your only tool is a hammer, you tend to treat all problems as if they were nails.
BT3 FAQ - https://www.sawdustzone.org/forum/di...sked-questions -
Loring, this test was with three (3) 40-watt incandescent bulbs. Nothing high tech, just average household variety. I think these were the last 3 I had; I've replaced most of my household lighting with CFL, and that's all I keep as spares these days, and I'm pretty sure I wouldn't want to use those for photos. Do you have any recommendations for a better bulb for my future use?Bill in Buena ParkComment
-
Bill, I like your "photo booth". I want something better to photo my Tiny Tables than what I have, but I don't want something as large as it would be always in my way. Your diffusers hve me thinking about using bed sheets with lights a safe distance behind them.Comment
-
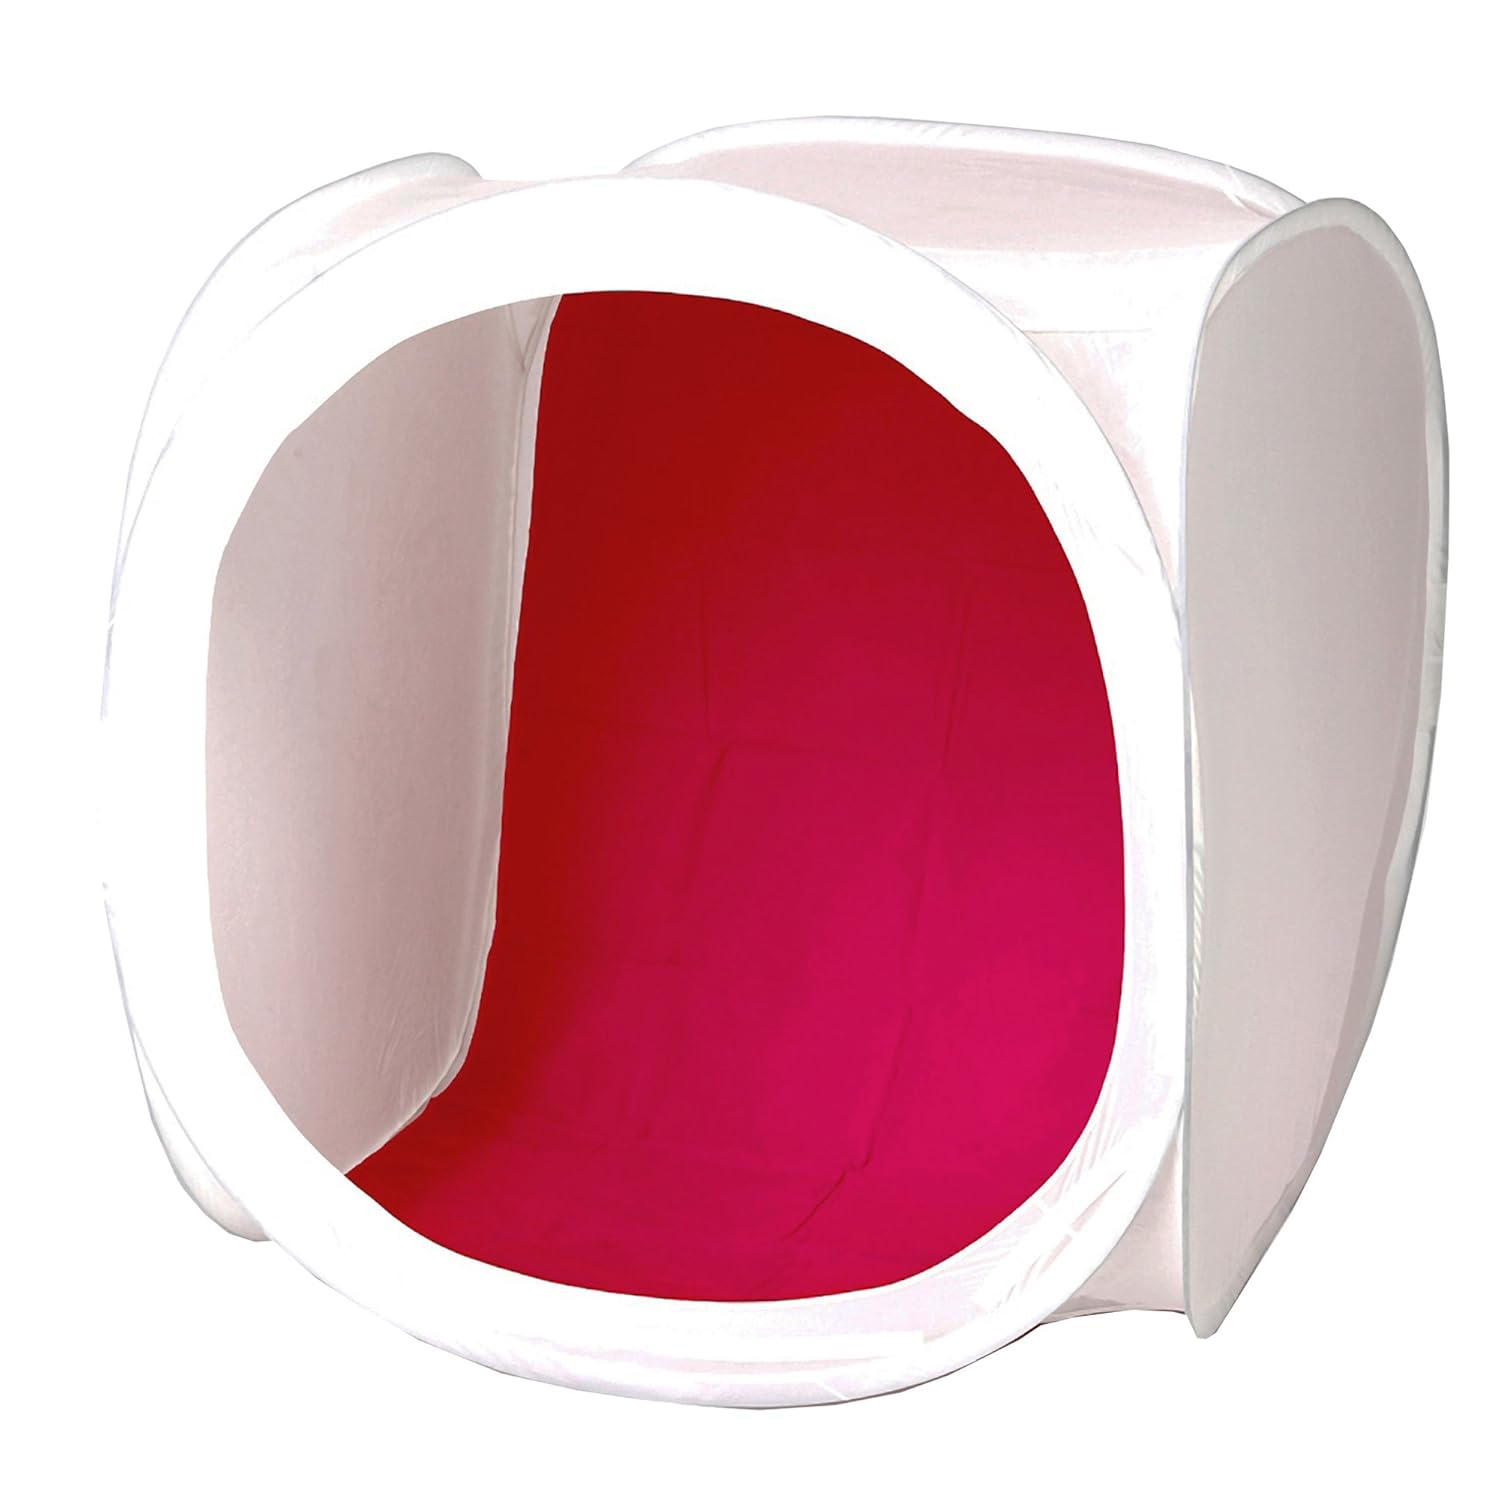
You can buy photo tents on eBay and Amazon that look like this and fold up nearly completely flat yet pop up quickly - nylon stretched over a wire frame.
They come in large variety of sizes for table top use. and have a folding zippered flap door with a slit through which you can stick the lens of the camera for taking picture of highly reflective objects where you want minimum distracting reflections.
Link to one on Amazon: https://www.amazon.com/Neewer-Shooti...rds=photo+tent
A 24 inch cubed one which is bigger than you need for pens comes with multiple colored backdrops and costs only $20 or so,
Folds flat in carrying case with everything - less than an inch thick - but you have to provide the lights. Usually two will do.
One vendor sells four sizes (and there are other sizes):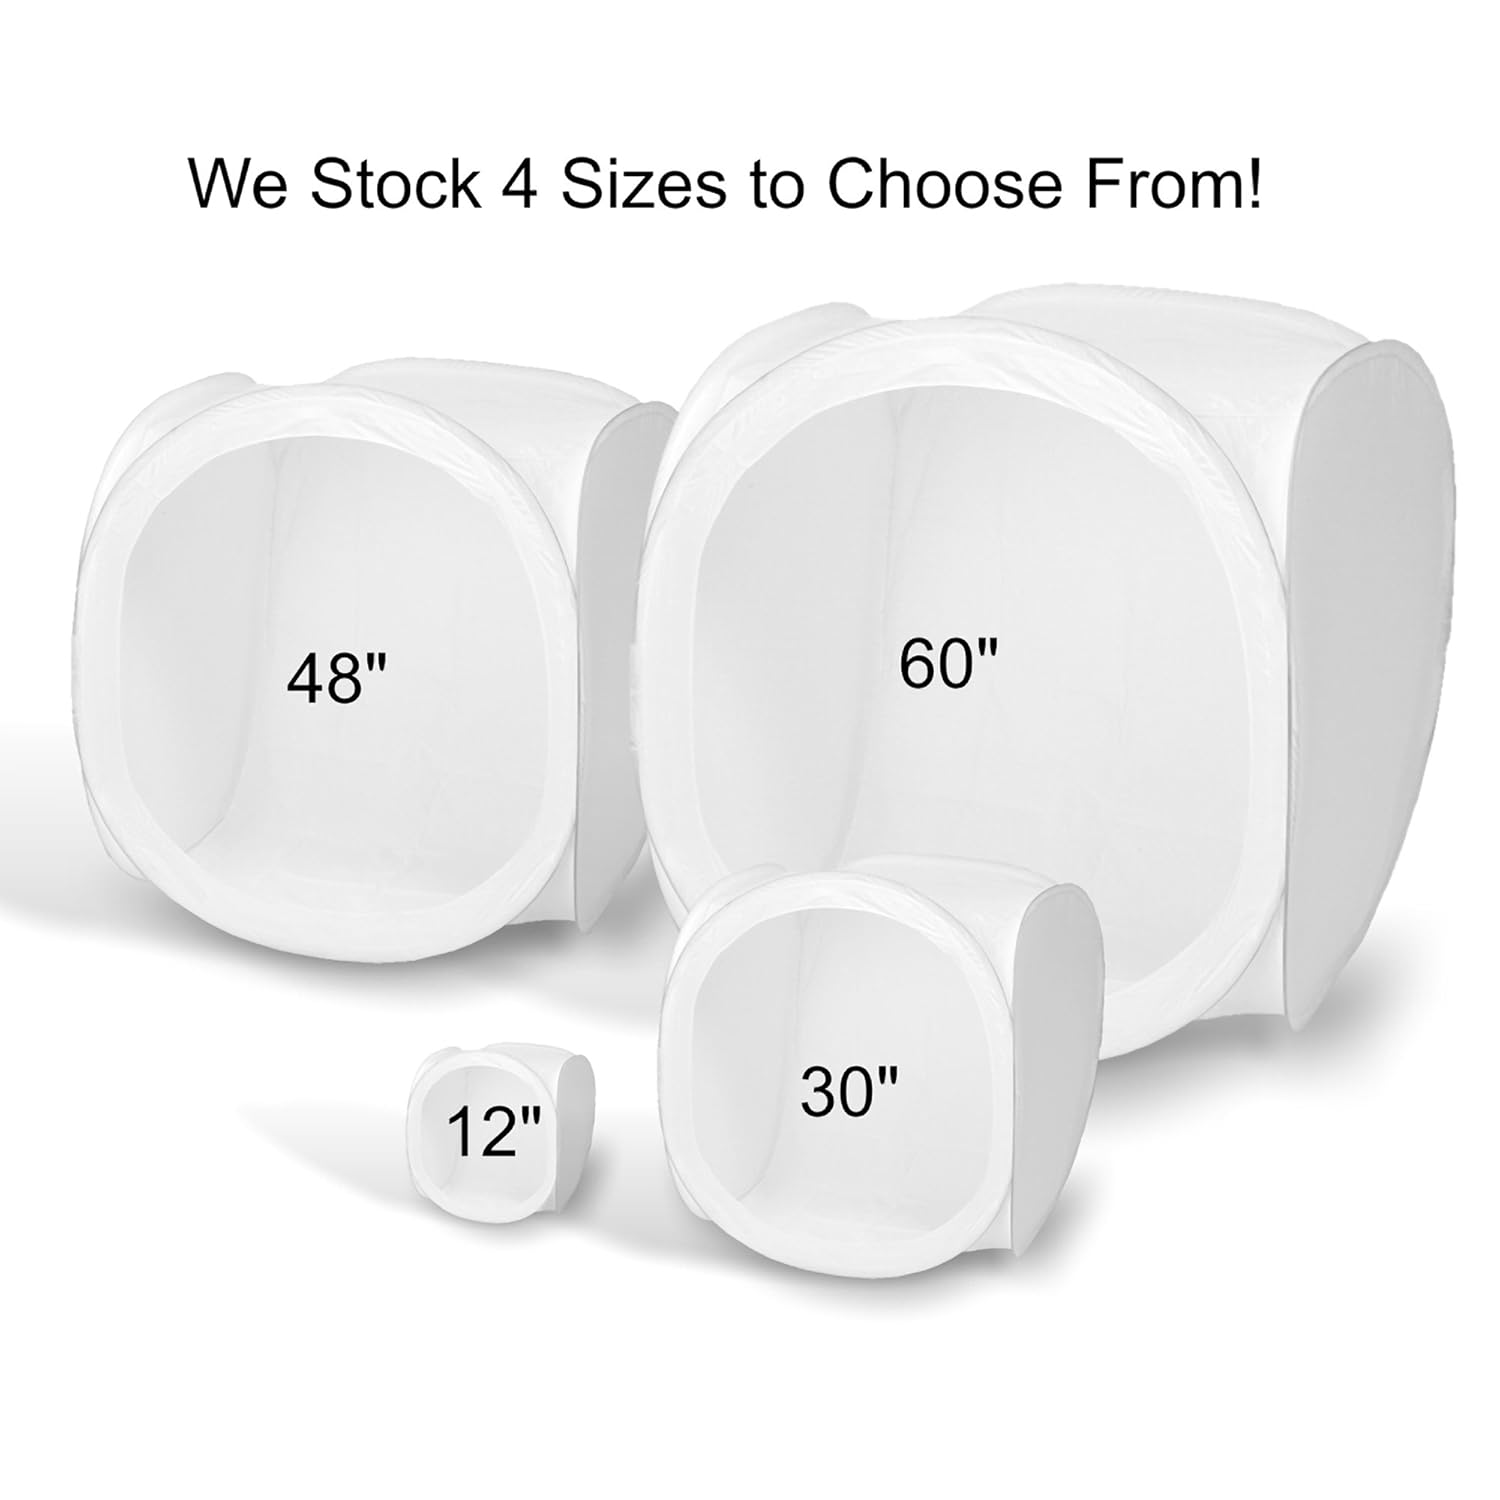
Last edited by LCHIEN; 11-09-2016, 11:57 AM.Loring in Katy, TX USA
If your only tool is a hammer, you tend to treat all problems as if they were nails.
BT3 FAQ - https://www.sawdustzone.org/forum/di...sked-questionsComment
-
Thanks Cap. I've seen the bed sheet thing done successfully as a backdrop; you could likely make diffuser setup by constructing a fex boxes to hold the lights (maybe 2 per box?) and full size diffuser panels for something that large. Not sure what wattage/color etc, you'll have to test and adjust that I'm guessing.Bill in Buena ParkComment
-
Bill,
NIce idea and I like your approach... really good for small objects like your pens, etc. Using a digital camera, which compensates for the light's color temperature, the bulbs probably doesn't matter all that much, as long as you have enough light to accomplish what you are looking for. Back when you had to pay very close attention to the type of film you were using, the light's temperature was extremely important and one wanted to get a bulb as close to 5,000 K as possible.
I spent a few years using photography to supplement my technical illustration and presentation demands. Using "daylight" film, taking photo's in a florescent-lighted office or shop would usually give a greenish tint, while incandescents would give a very warm amber, sepia-like tint.
I used a light table to photograph (to slide film) most of my artwork in negative format, with color gels to add color to the lines, graphs, etc. That required special 5,000 Kelvin "sunlight" florescents and daylight film. For object work taken on my copy stand or from a tripod I generally used halogen lighting and 3200 Kevin "Tungstan" film to come as close to the light temperature as possibl. Using continuous lighting offered advantages for a sort of low-tech object photo.... you could see exactly where the highlights and shadows fell and thus it was easier to control. Later, as my skills improved, I'd often use multiple flash units (daylight 5,000 Kevin). Using flash units offered advantages with location setups, but getting it just right was a challenge, at least for me.
I have an older Nikon digital, and those lighting challenges, at least in regard to light temperature, are much less... the camera technology does the "light balance" for me to a substantial degree; but on my camera, I have to set the adjustment. Otherwise there's a definit difference in the image depending on whether I use flash or the shop florescents.
The the concern would be whether your diffusers soften the light enough or will allow some level of hot spots. For something like your pens, that may not pose a problem, but on larger object, like capncarl's tiny tables, a more even light distribution or diffusion might be advantageous... it really depends on the amount of highlight and shadow that you are seeking.
Back in the late 70's, before I took up photography, I used two local professional photographers to shoot rather large compressor packages. One would come in with a rather elaborate light setup of flash units and diffusion light-reflective umbrellas. The photos would be almost flat in appearance with barely any highlights or shadows. The other photographer would use photo-floods, similar to what you have. These would be set up to give the best balance, with all too distinctive highlight and very dark shadows. In both case, I'd have to have the final "black & white's" heavily airbrushed before they could be published in the instruction manuals. (This was black and white photography, so color-balance didn't come into play... otherwise the task would have been much more complicated.)
I hope this helps,
CWSThink it Through Before You Do!Comment
-
CWS, great explanation - thank you. My approach for small pieces is obviously "low tech", and doesn't offer much in the way of re-positioning the lights or diffusers, and whereas I like the tents posted by Loring (that 30" model has attracted my eye), I would think they have the same issue. I understand that photography lighting is a field of art unto itself, and for the purposes of my woodworking hobby, I hope to grasp enough so as to comfortably capture the features of a piece, and not post one of those pictures we sometimes see on the web that leave us wondering what the piece really looks like.Bill in Buena ParkComment
-
Basically you shine the light at the walls of the tent, from say two sides. The light will diffuse and appear to come from a very large area. Internally light will also be reflected back by the opposite sides contributing to a diffuse source. The whole thing for tents like this is to get a single large (as opposed to point source) source that uniformly lights the object with few if any shadows and few reflections and few specular highlights. This is required for photographing shiny objects to control distracting surface reflections and highlights.
For some reason when you photograph shiny objects you don't notice all the reflections but when you look at the finished photograph the reflections are disturbing as all ****. Best to eliminate them at the source.
Last edited by LCHIEN; 11-09-2016, 01:22 PM.Loring in Katy, TX USA
If your only tool is a hammer, you tend to treat all problems as if they were nails.
BT3 FAQ - https://www.sawdustzone.org/forum/di...sked-questionsComment
-
Good points Loring - I have seen some photos of pieces with reflective areas (like the the mirror-like center band of a pen) where you can see the reflections of the surrounding area. I believe the tent with the little slit opening minimizes this, but I've also seen a couple photos where you can actually see the lens barrel peeking through the slit reflected in the image (on close inspection.) This could probably be improved with subject re-positioning, but that could compromise the desired shot angle.
What draws me to the 30" tent is the broad opening (which is counter to the reflection problem), since photographing 12+ inch bowls in anything smaller seems problematic. Thankfully, my work isn't usually all that reflective... Bill in Buena Park
Comment
-
Well, yeah, if you are taking a picture of a mirrored sphere then you will see a image of the camera lens in the sphere (but not the camera and photographer if you poke the lens through a slit.
Metallic and glass objects are bad in this respect, worse when they are curved.Last edited by LCHIEN; 11-10-2016, 06:26 AM.
-
-
Main thing, IMO, is to really get 'an eye' for the image you are looking for. Generally our brains have a tendency to not pay really close attention to highlight and shadows and I think it takes a bit of self-training to really pay attention to those and with a camera that actually allows you to view through the lens can be a great help in setting up you shot.
On large format studio cameras, the photographer could actually look at the ground glass behind the lens. One can compose the shot paying attention to actually get everything right, before placing the film pack on the camera. (Remember seeing pictures of the photographer with a black cloth over both his head and the back of the camera?) With a Single Lens Reflex you get pretty much the same view, albeit without the black cloth.
I used to take a lot of pictures from my copy stand, usually flat art work/illustrations that I'd done. To keep the artwork really flat, sometimes I'd have to cover it with a piece of plate glass. That of course is highly reflective. While the lens itself can be a problem, most likely its the camera body that is reflective of the lighting. The other problem with shooting anything flat, is 'parallax'... getting the camera perfectly centered, and the film-plane perfectly parallel with the art so there is no distortion. Lots of hints and fancy stuff on the market to accomplish that, but what was the most simple and the easiest was a simple little mirror, that I'd lay on top of the glass, positioning the camera so that my view finder directly reflected the mirrored lens ring.
One can't stop the reflection, but you can alter or hide it. For that purpose, I simply took a black card (about 8 x 10), cut a hole in it the diameter of my lens, and held in place by the lens filter or hood. That completely hid any reflection from the camera or anything behind it (like me).
The other thing to bear in mind, is that you may not want perfectly even light. I learned this when photographing textured or relief -surface bjects like coins or small parts. Using perfectly balanced lights from both right and left will make things look really flat in tone. Having one light closer than the other will highlight the relief, and show much better detail. So, play with the positioning when you think the object requires it.
AND, sometimes you don't want any shadow behind the object... like photographing something laying on a flat surface. For that I do a double exposure with the object laying on a light table. One exposure with the light table on, and the photo lights off, and the second exposure with just the photo lights. Object will look like its just floating, with no back shadow at all. (I don't think you can do double-exposures on a digital... can you? But then there's always a bit of digital retouching.)
Main thing Bill is to simply play around with it until you get exactly what you want. Beautiful part with Digital Photography, is that it doesn't cost you anything for film and processing.
Hope this helps,
CWS
Last edited by cwsmith; 11-10-2016, 11:41 AM.Think it Through Before You Do!Comment


Comment